Cours Python en ligne
Microservices sont un moyen d'organiser des systèmes logiciels complexes. Au lieu de mettre tout votre code dans une seule application, vous divisez votre application en microservices qui sont déployés indépendamment et qui communiquent entre eux. Ce didacticiel vous apprend à vous familiariser avec les microservices Python à l'aide de gRPC, l'un des frameworks les plus populaires.
Il est important de bien implémenter un cadre de microservices. Lorsque vous créez un framework pour prendre en charge des applications critiques, vous devez vous assurer qu'il est robuste et convivial pour les développeurs. Dans ce didacticiel, vous apprendrez à faire exactement cela. Cette connaissance vous rendra plus précieux pour les entreprises en croissance.
Afin de tirer le meilleur parti de ce didacticiel, vous devez comprendre les bases de Python et des applications Web. Si vous souhaitez un rappel à ce sujet, lisez d'abord les liens fournis.
À la fin de ce didacticiel, vous serez en mesure de:
- Mettre en place microservices en Python qui communiquent entre eux via gRPC
- Mettre en place middleware pour surveiller les microservices
- Test de l'unité et test d'intégration vos microservices et middleware
- Déployez des microservices dans un environnement de production Python avec Kubernetes
Vous pouvez télécharger tout le code source utilisé dans ce tutoriel en cliquant sur le lien ci-dessous:
Pourquoi des microservices?
Imaginez que vous travaillez chez Online Books For You, un site de commerce électronique populaire qui vend des livres en ligne. L'entreprise compte plusieurs centaines de développeurs. Chaque développeur écrit du code pour un produit ou une fonctionnalité back-end, comme la gestion du panier de l'utilisateur, la génération de recommandations, la gestion des transactions de paiement ou la gestion de l'inventaire de l'entrepôt.
Maintenant, demandez-vous, voudriez-vous tout ce code dans une seule application géante? Cela serait-il difficile à comprendre? Combien de temps faudrait-il pour tester? Comment garderiez-vous le code et les schémas de base de données sains? Ce serait certainement difficile, d'autant plus que l'entreprise essaie d'avancer rapidement.
Ne préférez-vous pas que le code correspondant aux fonctionnalités du produit modulaire soit, enfin, modulaire? Un microservice de panier pour gérer les paniers. Un microservice d'inventaire pour gérer l'inventaire.
Dans les sections ci-dessous, vous approfondirez un peu plus les raisons de séparer le code Python en microservices.
Modularité
Les changements de code empruntent souvent la voie de la moindre résistance. Votre PDG bien-aimé de Livres en ligne pour vous souhaite ajouter une nouvelle fonction d'achat de deux livres, en obtenir un gratuitement. Vous faites partie de l'équipe à qui on a demandé de le lancer le plus rapidement possible. Jetez un œil à ce qui se passe lorsque tout votre code est dans une seule application.
En tant qu'ingénieur le plus intelligent de votre équipe, vous mentionnez que vous pouvez ajouter du code à la logique du panier pour vérifier s'il y a plus de deux livres dans le panier. Si tel est le cas, vous pouvez simplement soustraire le coût du livre le moins cher du total du panier. Pas de soucis, vous faites une demande de tirage.
Ensuite, votre responsable produit vous dit que vous devez suivre l'impact de cette campagne sur les ventes de livres. C'est aussi assez simple. Étant donné que la logique qui implémente la fonctionnalité acheter-deux-obtenir-un est dans le code du panier, vous allez ajouter une ligne dans le flux de paiement qui met à jour une nouvelle colonne dans la base de données des transactions pour indiquer que la vente faisait partie de la promotion: buy_two_get_one_free_promo = true. Terminé.
Ensuite, votre chef de produit vous rappelle que l'offre n'est valable que pour une seule utilisation par client. Vous devez ajouter une logique pour vérifier si des transactions précédentes avaient cela buy_two_get_one_free_promo ensemble de drapeau. Oh, et vous devez masquer la bannière de promotion sur la page d'accueil, vous devez donc également ajouter cette vérification. Oh, et vous devez envoyer des e-mails aux personnes qui n'ont pas utilisé la promotion. Ajoutez cela aussi.
Plusieurs années plus tard, la base de données des transactions est devenue trop volumineuse et doit être remplacée par une nouvelle base de données partagée. Toutes ces références doivent être modifiées. Malheureusement, la base de données est référencée partout dans la base de code à ce stade. Vous considérez que c'était en fait un peu aussi facile d'ajouter toutes ces références.
C'est pourquoi avoir tout votre code dans une seule application peut être dangereux à long terme. Parfois, il est bon d’avoir des limites.
La base de données des transactions doit être accessible uniquement à un microservice de transactions. Ensuite, si vous avez besoin de le mettre à l'échelle, ce n'est pas si mal. D'autres parties du code peuvent interagir avec les transactions via une API abstraite qui masque les détails de l'implémentation. Tu pourrait faites cela dans une seule application – il est tout simplement moins probable que vous le fassiez. Les changements de code empruntent souvent la voie de la moindre résistance.
La flexibilité
La division de votre code Python en microservices vous offre plus de flexibilité. D'une part, vous pouvez écrire vos microservices dans différentes langues. Souvent, la première application Web d’une entreprise est écrite en Ruby ou en PHP. Cela ne veut pas dire que tout le reste doit l'être aussi!
Vous pouvez également mettre à l'échelle chaque microservice indépendamment. Dans ce didacticiel, vous allez utiliser une application Web et un microservice de recommandations comme exemple d'exécution.
Votre application Web sera probablement liée aux E / S, récupérant des données à partir d'une base de données et chargeant peut-être des modèles ou d'autres fichiers à partir du disque. Un microservice de recommandations peut effectuer beaucoup de calculs, ce qui le rend lié au processeur. Il est logique d'exécuter ces deux microservices Python sur un matériel différent.
Robustesse
Si tout votre code est dans une seule application, vous devez tout déployer en même temps. C'est un gros risque! Cela signifie qu'une modification d'une petite partie du code peut détruire l'ensemble du site.
La possession
Lorsqu'une seule base de code est partagée par un grand nombre de personnes, il n'y a souvent pas de vision claire de l'architecture du code. Cela est particulièrement vrai dans les grandes entreprises où les employés vont et viennent. Il y a peut-être des gens qui ont une vision de l'apparence du code, mais il est difficile de l'appliquer quand n'importe qui peut le modifier et que tout le monde avance rapidement.
L'un des avantages des microservices est que les équipes peuvent s'approprier clairement leur code. Cela rend plus probable qu'il y aura une vision claire pour le code et que le code restera propre et organisé. Il indique également clairement qui est responsable de l'ajout de fonctionnalités au code ou des modifications en cas de problème.
Quelle est la taille de «Micro»?
La taille des microservices est l'un de ces sujets qui peuvent déclencher un débat houleux parmi les ingénieurs. Voici mes deux cents: micro est un abus de langage. On devrait juste dire prestations de service. Cependant, dans ce didacticiel, vous verrez microservices utilisé pour la cohérence.
Rendre les microservices trop petits peut entraîner des problèmes. Tout d'abord, cela va à l'encontre de l'objectif de rendre le code modulaire. Le code d'un microservice doit avoir un sens ensemble, tout comme les données et les méthodes d'une classe ont un sens ensemble.
Pour utiliser les classes comme analogie, considérez fichier objets en Python. La fichier object a toutes les méthodes dont vous avez besoin. Vous pouvez .lis() et .écrire() à lui, ou vous pouvez .readlines () si tu veux. Vous ne devriez pas avoir besoin d'un FileReader et un FileWriter classe. Peut-être connaissez-vous les langages qui font cela, et peut-être avez-vous toujours pensé que c'était un peu lourd et déroutant.
Les microservices sont les mêmes. La portée du code devrait sembler juste. Ni trop grand, ni trop petit.
Deuxièmement, les microservices sont plus difficiles à tester que le code monolithique. Si un développeur souhaite tester une fonctionnalité qui s'étend sur de nombreux microservices, il doit tous les mettre en œuvre dans son environnement de développement. Cela ajoute de la friction. Ce n’est pas si grave avec quelques microservices, mais s’il y en a des dizaines, ce sera un problème majeur.
Obtenir la bonne taille de microservice est un art. Une chose à surveiller est que chaque équipe doit posséder un nombre raisonnable de microservices. Si votre équipe compte cinq personnes mais vingt microservices, c'est un signal d'alarme. D'un autre côté, si votre équipe travaille sur un seul microservice qui est également partagé par cinq autres équipes, cela peut également être un problème.
Ne créez pas de microservices aussi petits que possible juste pour le plaisir. Certains microservices peuvent être volumineux. Mais faites attention lorsqu'un seul microservice effectue deux ou plusieurs choses totalement indépendantes. Cela se produit généralement parce que l'ajout de fonctionnalités non liées à un microservice existant est le chemin de moindre résistance, pas parce qu'il y appartient.
Voici quelques façons de diviser votre hypothétique librairie en ligne en microservices:
- Marketplace sert la logique de navigation de l'utilisateur sur le site.
- Chariot garde une trace de ce que l'utilisateur a mis dans son panier et du flux de paiement.
- Transactions gère le traitement des paiements et l'envoi des reçus.
- Inventaire fournit des données sur les livres en stock.
- Compte d'utilisateur gère l'inscription des utilisateurs et les détails du compte, comme la modification de leur mot de passe.
- Commentaires stocke les notes de livres et les critiques saisies par les utilisateurs.
Ce ne sont que quelques exemples et non une liste exhaustive. Cependant, vous pouvez voir comment chacun d'entre eux appartiendrait probablement à sa propre équipe, et la logique de chacun est relativement indépendante. De plus, si le microservice Avis était déployé avec un bogue qui l'a provoqué, l'utilisateur pouvait toujours utiliser le site et effectuer des achats malgré l'échec du chargement des avis.
Le compromis microservice-monolith
Les microservices ne sont pas toujours meilleurs que les monolithes qui conservent tout votre code dans une seule application. Généralement, et en particulier au début d'un cycle de vie de développement logiciel, les monolithes vous permettront d'aller plus vite. Ils facilitent le partage de code et l'ajout de fonctionnalités, et le fait de devoir déployer un seul service vous permet de transmettre rapidement votre application aux utilisateurs.
Le compromis est que, à mesure que la complexité augmente, toutes ces choses peuvent progressivement rendre le monolithe plus difficile à développer, plus lent à déployer et plus fragile. La mise en œuvre d'un monolithe vous fera probablement gagner du temps et des efforts au départ, mais cela peut revenir plus tard pour vous hanter.
La mise en œuvre de microservices en Python vous coûtera probablement du temps et des efforts à court terme, mais si elle est bien faite, elle peut vous permettre de mieux évoluer à long terme. Bien sûr, la mise en œuvre de microservices trop tôt pourrait vous ralentir lorsque la vitesse est la plus précieuse.
Le cycle de démarrage typique de la Silicon Valley consiste à commencer par un monolithe pour permettre une itération rapide lorsque l'entreprise trouve un produit adapté aux clients. Une fois que l'entreprise a un produit performant et a embauché plus d'ingénieurs, il est temps de commencer à penser aux microservices. Ne les mettez pas en œuvre trop tôt, mais n’attendez pas trop longtemps.
Pour en savoir plus sur le compromis microservice-monolithe, regardez l'excellente discussion de Sam Newman et Martin Fowler, When To Use Microservices (And When Not To!).
Exemples de microservices
Dans cette section, vous allez définir des microservices pour votre site Web Books For You en ligne. Vous allez définir une API pour eux et écrire le code Python qui les implémente en tant que microservices au cours de ce didacticiel.
Pour que les choses restent gérables, vous ne définirez que deux microservices:
- Marketplace sera une application Web très minimale qui affiche une liste de livres à l'utilisateur.
- Recommandations sera un microservice qui fournit une liste de livres susceptibles d'intéresser l'utilisateur.
Voici un diagramme qui montre comment votre utilisateur interagit avec les microservices:
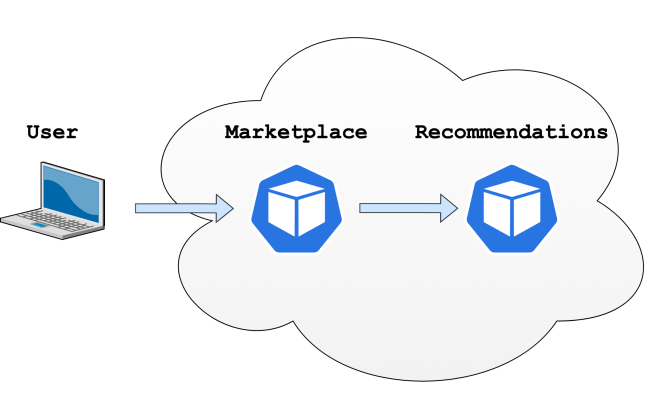
Vous pouvez voir que l'utilisateur interagira avec le microservice Marketplace via son navigateur et que le microservice Marketplace interagira avec le microservice Recommendations.
Pensez un instant à l'API Recommendations. Vous voulez que la demande de recommandations ait quelques fonctionnalités:
- Identifiant d'utilisateur: Vous pouvez l'utiliser pour personnaliser les recommandations. Cependant, par souci de simplicité, toutes les recommandations de ce didacticiel seront aléatoires.
- Catégorie de livre: Pour rendre l'API un peu plus intéressante, vous allez ajouter des catégories de livres, telles que mystère, auto-assistance, etc.
- Résultats maximum: Vous ne souhaitez pas renvoyer tous les livres en stock, vous allez donc ajouter une limite à la demande.
La réponse sera une liste de livres. Chaque livre aura les données suivantes:
- ID du livre: Un identifiant numérique unique pour le livre.
- Titre de livre: Le titre que vous pouvez afficher à l'utilisateur.
Un vrai site Web aurait plus de données, mais vous maintiendrez le nombre de fonctionnalités limité pour les besoins de cet exemple.
Vous pouvez maintenant définir cette API de manière plus formelle, dans la syntaxe de tampons de protocole:
    1syntaxe = "proto3";
    2
    3énumération RéserverCatégorie
    4    MYSTÈRE = 0;
    5    LA SCIENCE-FICTION = 1;
    6    SELF_HELP = 2;
    sept
    8
    9message Recommandation Demande
dix    int32 identifiant d'utilisateur = 1;
11    RéserverCatégorie Catégorie = 2;
12    int32 max_results = 3;
13
14
15message RéserverRecommandation
16    int32 id = 1;
17    chaîne Titre = 2;
18
19
20message RecommandationRéponse
21    répété RéserverRecommandation recommandations = 1;
22
23
24un service Recommandations
25    rpc Recommander (Recommandation Demande) Retour (RecommandationRéponse);
26
Ce fichier tampon de protocole déclare votre API. Les tampons de protocole ont été développés chez Google et fournissent un moyen de spécifier formellement une API. Cela peut sembler un peu cryptique au début, alors voici une ventilation ligne par ligne:
-
Ligne 1 spécifie que le fichier utilise le
proto3syntaxe au lieu de l'ancienneproto2version. -
Lignes 3 à 7 définissez vos catégories de livres et chaque catégorie se voit également attribuer un identifiant numérique.
-
Lignes 9 à 13 définissez votre requête API. UNE
messagecontient des champs, chacun d'un type spécifique. Vous utilisezint32, qui est un entier 32 bits, pour leID de l'utilisateuretmax_resultsdes champs. Vous utilisez également leRéserverCatégorieenum que vous avez défini ci-dessus commeCatégorietype. En plus de chaque champ ayant un nom, il est également attribué un ID de champ numérique. Vous pouvez ignorer cela pour le moment. -
Lignes 15 à 18 définissez un nouveau type que vous pouvez utiliser pour une recommandation de livre. Il a un ID entier 32 bits et un titre basé sur une chaîne.
-
Lignes 20 à 22 définissez votre réponse de microservice Recommandations. Noter la
répétémot-clé, qui indique que la réponse contient en fait une liste deRéserverRecommandationobjets. -
Lignes 24 à 26 définir la méthode de l'API. Vous pouvez considérer cela comme une fonction ou une méthode sur une classe. Il faut un
Recommandation Demandeet renvoie unRecommandationRéponse.
rpc signifie appel de procédure à distance. Comme vous le verrez bientôt, vous pouvez appeler un RPC comme une fonction normale en Python. Mais l'implémentation du RPC s'exécute sur un autre serveur, ce qui en fait un éloigné appel de procédure.
Pourquoi RPC et tampons de protocole?
D'accord, alors pourquoi devriez-vous utiliser cette syntaxe formelle pour définir votre API? Si vous souhaitez faire une requête d'un microservice à un autre, ne pouvez-vous pas simplement faire une requête HTTP et obtenir une réponse JSON? Eh bien, vous pouvez le faire, mais il y a des avantages à utiliser des tampons de protocole.
Documentation
Le premier avantage de l'utilisation des tampons de protocole est qu'ils donnent à votre API un schéma bien défini et auto-documenté. Si vous utilisez JSON, vous devez documenter les champs qu'il contient et leurs types. Comme pour toute documentation, vous courez le risque que la documentation soit inexacte, incomplète ou obsolète.
Lorsque vous écrivez votre API dans le langage de tampon de protocole, vous pouvez générer du code Python à partir de celui-ci. Votre code ne sera jamais désynchronisé avec votre documentation. La documentation est bonne, mais le code auto-documenté est meilleur.
Validation
Le deuxième avantage est que, lorsque vous générez du code Python à partir de tampons de protocole, vous obtenez une validation de base gratuite. Par exemple, le code généré n'acceptera pas les champs du mauvais type. Le code généré a également tout le passe-partout RPC intégré.
Si vous utilisez HTTP et JSON pour votre API, vous devez écrire un petit code qui construit la requête, l'envoie, attend la réponse, vérifie le code d'état, analyse et valide la réponse. Avec les tampons de protocole, vous pouvez générer du code qui ressemble à un appel de fonction normal mais qui fait une requête réseau sous le capot.
Vous pouvez obtenir ces mêmes avantages en utilisant des frameworks HTTP et JSON tels que Swagger et RAML. Pour un exemple de Swagger en action, consultez les API REST Python avec Flask, Connexion et SQLAlchemy.
Alors, y a-t-il des raisons d'utiliser gRPC plutôt que l'une de ces alternatives? La réponse est toujours oui.
Performance
Le framework gRPC est généralement plus efficace que l'utilisation de requêtes HTTP classiques. gRPC est construit sur HTTP / 2, qui peut effectuer plusieurs requêtes en parallèle sur une connexion longue durée de manière thread-safe. La configuration de la connexion est relativement lente, donc le faire une fois et le partage de la connexion sur plusieurs demandes permet de gagner du temps. Les messages gRPC sont également binaires et plus petits que JSON. De plus, HTTP / 2 a une compression d'en-tête intégrée.
gRPC a une prise en charge intégrée des demandes et des réponses en continu. Il gérera les problèmes de réseau plus gracieusement qu'une connexion HTTP de base, se reconnectant automatiquement même après de longues déconnexions. Cela a aussi intercepteurs, que vous découvrirez plus tard dans ce didacticiel. Vous pouvez même implémenter des plugins sur le code généré, ce que les gens ont fait pour générer des indices de type Python. En gros, vous bénéficiez gratuitement de nombreuses infrastructures de qualité!
Convivialité pour les développeurs
La raison la plus intéressante pour laquelle de nombreuses personnes préfèrent gRPC à REST est que vous pouvez définir votre API en termes de fonctions, pas de verbes et de ressources HTTP. En tant qu'ingénieur, vous avez l'habitude de penser en termes d'appels de fonction, et c'est exactement à quoi ressemblent les API gRPC.
Le mappage des fonctionnalités sur une API REST est souvent délicat. Vous devez décider quelles sont vos ressources, comment construire des chemins et quels verbes utiliser. Il existe souvent plusieurs choix, par exemple comment imbriquer les ressources ou utiliser POST ou un autre verbe. REST vs gRPC peut se transformer en un débat sur les préférences. L'un n'est pas toujours meilleur que l'autre, alors utilisez ce qui convient le mieux à votre cas d'utilisation.
À proprement parler, tampons de protocole fait référence au format de sérialisation des données envoyées entre deux microservices. Les tampons de protocole s'apparentent donc à JSON ou XML en ce sens qu'ils permettent de formater les données. Contrairement à JSON, les tampons de protocole ont un schéma strict et sont plus compacts lorsqu'ils sont envoyés sur le réseau.
D'autre part, l'infrastructure RPC est en fait appelée gRPCou Google RPC. Cela ressemble plus à HTTP. En fait, comme mentionné ci-dessus, gRPC est construit sur HTTP / 2.
Exemple d'implémentation
Après tout ce discours sur les tampons de protocole, il est temps de voir ce qu’ils peuvent faire. Le terme tampons de protocole est une bouchée, vous verrez donc la sténographie courante protobufs utilisé dans ce tutoriel à l'avenir.
Comme mentionné à quelques reprises, vous pouvez générer du code Python à partir de protobufs. L'outil est installé dans le cadre du grpcio-tools paquet.
Tout d'abord, définissez votre structure de répertoire initiale:
.
├── protobufs /
│ └── recommendations.proto
|
└── recommandations /
La protobufs / répertoire contiendra un fichier appelé recommandations.proto. Le contenu de ce fichier est le code protobuf ci-dessus. Pour plus de commodité, vous pouvez afficher le code en développant la section réductible ci-dessous:
    1syntaxe = "proto3";
    2
    3énumération RéserverCatégorie
    4    MYSTÈRE = 0;
    5    LA SCIENCE-FICTION = 1;
    6    SELF_HELP = 2;
    sept
    8
    9message Recommandation Demande
dix    int32 identifiant d'utilisateur = 1;
11    RéserverCatégorie Catégorie = 2;
12    int32 max_results = 3;
13
14
15message RéserverRecommandation
16    int32 id = 1;
17    chaîne Titre = 2;
18
19
20message RecommandationRéponse
21    répété RéserverRecommandation recommandations = 1;
22
23
24un service Recommandations
25    rpc Recommander (Recommandation Demande) Retour (RecommandationRéponse);
26
Vous allez générer du code Python pour interagir avec cela dans le recommandations / annuaire. Tout d'abord, vous devez installer grpcio-tools. Créer le fichier recommandations / exigences.txt et ajoutez ce qui suit:
Pour exécuter le code localement, vous devez installer les dépendances dans un environnement virtuel. Les commandes suivantes installeront les dépendances sous Windows:
C:  python -m venv venv
C:  venv  Scripts  activate.bat
(venv) C:  python -m pip install -r requirements.txt
Sous Linux et macOS, utilisez les commandes suivantes pour créer un environnement virtuel et installer les dépendances:
$ python3 -m venv venv
$ la source venv / bin / activer  # Linux / macOS uniquement
(venv) $ python -m pip install -r requirements.txt
Maintenant, pour générer du code Python à partir des protobufs, exécutez ce qui suit:
$ CD recommandations
$ python -m grpc_tools.protoc -I ../protobufs --python_out=.
         --grpc_python_out=. ../protobufs/recommendations.proto
Cela génère plusieurs fichiers Python à partir du .proto fichier. Voici une ventilation:
python -m grpc_tools.protocexécute le compilateur protobuf, qui générera du code Python à partir du code protobuf.-I ../protobufsindique au compilateur où trouver les fichiers importés par votre code protobuf. Vous n'utilisez pas réellement la fonction d'importation, mais le-JEflag est néanmoins requis.--python_out =. --grpc_python_out =.indique au compilateur où sortir les fichiers Python. Comme vous le verrez sous peu, cela générera deux fichiers, et vous pouvez les placer chacun dans un répertoire séparé avec ces options si vous le souhaitez.../protobufs/recommendations.protoest le chemin vers le fichier protobuf, qui sera utilisé pour générer le code Python.
Si vous regardez ce qui est généré, vous verrez deux fichiers:
$ ls
recommendations_pb2.py recommendations_pb2_grpc.py
Ces fichiers incluent des types et des fonctions Python pour interagir avec votre API. Le compilateur générera du code client pour appeler un RPC et un code serveur pour implémenter le RPC. Vous examinerez d'abord le côté client.
Le client RPC
Le code généré est quelque chose que seule une carte mère peut aimer. C'est-à-dire que ce n'est pas très joli Python. En effet, il n’est pas vraiment destiné à être lu par des humains. Ouvrez un shell Python pour voir comment interagir avec lui:
>>> de recommandations_pb2 importer RéserverCatégorie, Recommandation Demande
>>> demande = Recommandation Demande(
...     identifiant d'utilisateur=1, Catégorie=RéserverCatégorie.LA SCIENCE-FICTION, max_results=3
... )
>>> demande.Catégorie
1
Vous pouvez voir que le compilateur protobuf a généré des types Python correspondant à vos types protobuf. Jusqu'ici tout va bien. Vous pouvez également voir qu'il y a une vérification de type dans les champs:
>>> demande = Recommandation Demande(
... identifiant d'utilisateur="Oops", Catégorie=RéserverCatégorie.LA SCIENCE-FICTION, max_results=3
... )
Traceback (dernier appel le plus récent):
Fichier "" , ligne 1, dans Cela montre que vous obtenez une TypeError si vous passez le mauvais type à l'un de vos champs protobuf.
Une remarque importante est que tous les champs de proto3 sont facultatives, vous devrez donc valider qu'elles sont toutes définies. Si vous laissez une valeur non définie, la valeur par défaut sera zéro pour les types numériques ou une chaîne vide pour les chaînes:
>>> demande = Recommandation Demande(
...     identifiant d'utilisateur=1, Catégorie=RéserverCatégorie.LA SCIENCE-FICTION
... )
>>> demande.max_results
0
Ici vous obtenez 0 car c'est la valeur par défaut pour unset int des champs.
Pendant que protobufs vérifie le type pour vous, vous devez toujours valider les valeurs réelles. Ainsi, lorsque vous implémentez votre microservice Recommandations, vous devez valider que tous les champs contiennent de bonnes données. Cela est toujours vrai pour n'importe quel serveur, que vous utilisiez protobufs, JSON ou autre chose. Validez toujours l'entrée.
La recommandations_pb2.py Le fichier qui a été généré pour vous contient les définitions de type. La recommandations_pb2_grpc.py Le fichier contient le cadre pour un client et un serveur. Jetez un œil aux importations nécessaires pour créer un client:
>>> importer grpc
>>> de recommandations_pb2_grpc importer RecommandationsStub
Vous importez le grpc module, qui fournit certaines fonctions de configuration des connexions aux serveurs distants. Ensuite, vous importez le stub du client RPC. Cela s'appelle un bout car le client lui-même n’a aucune fonctionnalité. Il appelle un serveur distant et renvoie le résultat.
Si vous regardez en arrière votre définition de protobuf, vous verrez le Recommandations de service ... partie à la fin. Le compilateur protobuf prend ce nom de microservice, Recommandations, et ajoute Bout à lui pour former le nom du client, RecommandationsStub.
Vous pouvez maintenant faire une requête RPC:
>>> canal = grpc.insecure_channel("localhost: 50051")
>>> client = RecommandationsStub(canal)
>>> demande = Recommandation Demande(
...     identifiant d'utilisateur=1, Catégorie=RéserverCatégorie.LA SCIENCE-FICTION, max_results=3
... )
>>> client.Recommander(demande)
Traceback (dernier appel le plus récent):
  ...
grpc._channel._InactiveRpcError: <_InactiveRpcError de RPC qui s'est terminé par:
                status = StatusCode.UNAVAILABLE
                details = "échec de la connexion à toutes les adresses"
                ...
Vous créez une connexion à localhost, votre propre machine, sur le port 50051. Ce port est le port standard pour gRPC, mais vous pouvez le changer si vous le souhaitez. Vous allez utiliser une chaîne non sécurisée pour le moment, qui n'est ni authentifiée ni chiffrée, mais vous apprendrez comment utiliser des chaînes sécurisées plus loin dans ce didacticiel. Vous passez ensuite ce canal à votre stub pour instancier votre client.
Vous pouvez maintenant appeler le Recommander méthode que vous avez définie sur votre Recommandations microservice. Pensez à la ligne 25 de votre définition protobuf: rpc Recommend (...) renvoie (...). C’est là que le Recommander méthode vient de. Vous obtiendrez une exception, car aucun microservice ne fonctionne réellement sur localhost: 50051, vous mettrez donc en œuvre cela ensuite!
Maintenant que vous avez réglé le client, vous allez regarder côté serveur.
Le serveur RPC
Tester le client dans la console est une chose, mais implémenter le serveur il y en a un peu. Vous pouvez laisser votre console ouverte, mais vous implémenterez le microservice dans un fichier.
Commencez par les importations et quelques données:
    1# recommendations / recommendations.py
    2de concurrent importer futurs
    3importer Aléatoire
    4
    5importer grpc
    6
    septde recommandations_pb2 importer (
    8    RéserverCatégorie,
    9    RéserverRecommandation,
dix    RecommandationRéponse,
11)
12importer recommandations_pb2_grpc
13
14books_by_category =
15    RéserverCatégorie.MYSTÈRE: [[[[
16        RéserverRecommandation(id=1, Titre="Le faucon maltais"),
17        RéserverRecommandation(id=2, Titre="Meurtre sur l'Orient Express"),
18        RéserverRecommandation(id=3, Titre="Le Chien des Baskerville"),
19    ],
20    RéserverCatégorie.LA SCIENCE-FICTION: [[[[
21        RéserverRecommandation(
22            id=4, Titre="Le Guide du voyageur galactique"
23        ),
24        RéserverRecommandation(id=5, Titre="Le match de Ender"),
25        RéserverRecommandation(id=6, Titre="Les chroniques des dunes"),
26    ],
27    RéserverCatégorie.SELF_HELP: [[[[
28        RéserverRecommandation(
29            id=sept, Titre="Les 7 habitudes des personnes hautement efficaces"
30        ),
31        RéserverRecommandation(
32            id=8, Titre="Comment gagner des amis et influencer les gens"
33        ),
34        RéserverRecommandation(id=9, Titre="La recherche d'un sens par l'homme"),
35    ],
36
Ce code importe vos dépendances et crée des exemples de données. Voici une ventilation:
- Ligne 2 importations
futurscar gRPC a besoin d'un pool de threads. Vous y reviendrez plus tard. - Ligne 3 importations
Aléatoireparce que vous allez sélectionner au hasard des livres pour des recommandations. - Ligne 14 crée le
books_by_categorydictionnaire, dans lequel les clés sont des catégories de livres et les valeurs sont des listes de livres de cette catégorie. Dans un véritable microservice de recommandations, les livres seraient stockés dans une base de données.
Ensuite, vous allez créer une classe qui implémente les fonctions du microservice:
29classe RecommandationService(
30    recommandations_pb2_grpc.Recommandations
31):
32    def Recommander(soi, demande, le contexte):
33        si demande.Catégorie ne pas dans books_by_category:
34            le contexte.avorter(grpc.StatusCode.PAS TROUVÉ, "Catégorie introuvable")
35
36        books_for_category = books_by_category[[[[demande.Catégorie]
37        num_results = min(demande.max_results, len(books_for_category))
38        books_to_recommend = Aléatoire.échantillon(
39            books_for_category, num_results
40        )
41
42        revenir RecommandationRéponse(recommandations=books_to_recommend)
Vous avez créé une classe avec une méthode pour implémenter le Recommander RPC. Voici les détails:
-
Ligne 29 définit le
RecommandationServiceclasse. Il s'agit de l'implémentation de votre microservice. Notez que vous sous-classezRecommandations. Cela fait partie de l'intégration avec gRPC que vous devez faire. -
Ligne 32 définit un
Recommander()méthode sur votre classe. Celui-ci doit avoir le même nom que le RPC que vous définissez dans votre fichier protobuf. Il faut aussi unRecommandation Demandeet renvoie unRecommandationRéponsetout comme dans la définition protobuf. Il faut aussi unle contexteparamètre. Le contexte vous permet de définir le code d'état de la réponse. -
Lignes 33 et 34 utilisation
avorter()pour terminer la demande et définir le code d'état surPAS TROUVÉsi vous obtenez une catégorie inattendue. Étant donné que gRPC est construit sur HTTP / 2, le code d'état est similaire au code d'état HTTP standard. Le paramétrer permet au client de prendre différentes actions en fonction du code qu'il reçoit. Il permet également aux intergiciels, comme les systèmes de surveillance, de consigner le nombre de requêtes contenant des erreurs. -
Lignes 36 à 40 Choisissez au hasard des livres de la catégorie donnée à recommander. Vous vous assurez de limiter le nombre de recommandations à
max_results. Tu utilisesmin ()pour vous assurer de ne pas demander plus de livres qu'il n'y en a, ou bienéchantillon aléatoiresera une erreur. -
Ligne 38 renvoie un
RecommandationRéponseobjet avec votre liste de recommandations de livres.
Notez qu'il serait plus agréable de lever une exception sur les conditions d'erreur plutôt que d'utiliser avorter() comme vous le faites dans cet exemple, mais la réponse ne définirait pas correctement le code d'état. Il existe un moyen de contourner ce problème, que vous aborderez plus tard dans le didacticiel lorsque vous examinerez les intercepteurs.
La RecommandationService class définit votre implémentation de microservice, mais vous devez toujours l'exécuter. C'est ce que servir() Est-ce que:
41def servir():
42    serveur = grpc.serveur(futurs.ThreadPoolExecutor(max_workers=dix))
43    recommandations_pb2_grpc.add_RecommendationsServicer_to_server(
44        RecommandationService(), serveur
45    )
46    serveur.add_insecure_port("[::]: 50051 ")
47    serveur.début()
48    serveur.wait_for_termination()
49
50
51si __Nom__ == "__principale__":
52    servir()
servir() démarre un serveur réseau et utilise votre classe de microservice pour gérer les demandes:
- Ligne 42 crée un serveur gRPC. Vous lui dites d'utiliser
dixthreads pour répondre aux demandes, ce qui est excessif pour cette démo mais une bonne valeur par défaut pour un microservice Python réel. - Ligne 43 associe votre classe au serveur. C'est comme ajouter un gestionnaire de requêtes.
- Ligne 46 dit au serveur de fonctionner sur le port
50051. Comme mentionné précédemment, il s'agit du port standard pour gRPC, mais vous pouvez utiliser tout ce que vous voulez à la place. - Lignes 47 et 48 appel
serveur.start ()etserver.wait_for_termination ()pour démarrer le microservice et attendre son arrêt. La seule façon de l'arrêter dans ce cas est de taper Ctrl+C dans le terminal. Dans un environnement de production, il existe de meilleures façons d'arrêter, que vous aborderez plus tard.
Sans fermer le terminal que vous utilisiez pour tester le client, ouvrez un nouveau terminal et exécutez la commande suivante:
$ recommandations python.py
Cela exécute le microservice Recommendations afin que vous puissiez tester le client sur certaines données réelles. Now return to the terminal you were using to test the client so you can create the channel stub. If you left your console open, then you can skip the imports, but they’re repeated here as a refresher:
>>> importer grpc
>>> from recommendations_pb2_grpc importer RecommendationsStub
>>> channel = grpc.insecure_channel("localhost:50051")
>>> client = RecommendationsStub(channel)
Now that you have a client object, you can make a request:
>>> request = RecommendationRequest(
...    user_id=1, category=BookCategory.SCIENCE_FICTION, max_results=3)
>>> client.Recommend(request)
recommendations
        id: 6
        title: "The Dune Chronicles"

recommendations
        id: 4
        title: "The Hitchhiker's Guide To The Galaxy"

recommendations
        id: 5
        title: "Ender's Game"
It works! You made an RPC request to your microservice and got a response! Note that the output you see may be different because recommendations are chosen at random.
Now that you have the server implemented, you can implement the Marketplace microservice and have it call the Recommendations microservice. You can close your Python console now if you’d like, but leave the Recommendations microservice running.
Tying It Together
Make a new marketplace/ directory and put a marketplace.py file in it for your Marketplace microservice. Your directory tree should now look like this:
.
├── marketplace/
│   ├── marketplace.py
│   ├── requirements.txt
│   └── templates/
│       └── homepage.html
|
├── protobufs/
│   └── recommendations.proto
|
└── recommendations/
    ├── recommendations.py
    ├── recommendations_pb2.py
    ├── recommendations_pb2_grpc.py
    └── requirements.txt
Note the new marketplace/ directory for your microservice code, requirements.txt, and a home page. All will be described below. You can create empty files for them for now and fill them in later.
You can start with the microservice code. The Marketplace microservice will be a Flask app to display a webpage to the user. It’ll call the Recommendations microservice to get book recommendations to display on the page.
Open the marketplace/marketplace.py file and add the following:
    1# marketplace/marketplace.py
    2importer os
    3
    4from flask importer Flask, render_template
    5importer grpc
    6
    septfrom recommendations_pb2 importer BookCategory, RecommendationRequest
    8from recommendations_pb2_grpc importer RecommendationsStub
    9
10app = Flask(__name__)
11
12recommendations_host = os.getenv("RECOMMENDATIONS_HOST", "localhost")
13recommendations_channel = grpc.insecure_channel(
14    f"recommendations_host:50051"
15)
16recommendations_client = RecommendationsStub(recommendations_channel)
17
18
19@app.route("/")
20def render_homepage():
21    recommendations_request = RecommendationRequest(
22        user_id=1, category=BookCategory.MYSTERY, max_results=3
23    )
24    recommendations_response = recommendations_client.Recommend(
25        recommendations_request
26    )
27    return render_template(
28        "homepage.html",
29        recommendations=recommendations_response.recommendations,
30    )
You set up Flask, create a gRPC client, and add a function to render the homepage. Here’s a breakdown:
- Line 10 creates a Flask app to render a web page for the user.
- Lines 12 to 16 create your gRPC channel and stub.
- Lines 20 to 30 create
render_homepage()to be called when the user visits the home page of your app. It returns an HTML page loaded from a template, with three science fiction book recommendations.
Remarque: In this example, you create the gRPC channel and stub as globals. Usually globals are a no-no, but in this case an exception is warranted.
The gRPC channel keeps a persistent connection to the server to avoid the overhead of having to repeatedly connect. It can handle many simultaneous requests and will reestablish dropped connections. However, if you create a new channel before each request, then Python will garbage collect it, and you won’t get most of the benefits of a persistent connection.
You want the channel to stay open so you don’t need to reconnect to the recommendations microservice for every request. You could hide the channel inside another module, but since you only have one file in this case, you can keep things simpler by using globals.
Open the homepage.html file in your marketplace/templates/ directory and add the following HTML:
    1
    2
    3<html lang="en">
    4<head>
    5    <title>Online Books For You</title>
    6</head>
    sept<body>
    8    <h1>Mystery books you may like</h1>
    9    <ul>
10    % for book in recommendations %
11        <li> book.title </li>
12    % endfor %
13    </ul>
14</body>
This is only a demo home page. It should display a list of book recommendations when you’re done.
To run this code, you’ll need the following dependencies, which you can add to marketplace/requirements.txt:
flask ~= 1.1
grpcio-tools ~= 1.30
Jinja2 ~= 2.11
pytest ~= 5.4
The Recommendations and Marketplace microservices will each have their own requirements.txt, but for convenience in this tutorial, you can use the same virtual environment for both. Run the following to update your virtual environment:
$ python -m pip install -r marketplace/requirements.txt
Now that you’ve installed the dependencies, you need to generate code for your protobufs in the marketplace/ directory as well. To do that, run the following in a console:
$ cd marketplace
$ python -m grpc_tools.protoc -I ../protobufs --python_out=.
         --grpc_python_out=. ../protobufs/recommendations.proto
This is the same command that you ran before, so there’s nothing new here. It might feel strange to have the same files in both the marketplace/ et recommendations/ directories, but later you’ll see how to automatically generate these as part of a deployment. You typically wouldn’t store them in a version control system like Git.
To run your Marketplace microservice, enter the following in your console:
$ FLASK_APP=marketplace.py flask run
You should now have the Recommendations and Marketplace microservices running in two separate consoles. If you shut down the Recommendations microservice, restart it in another console with the following:
$ cd recommendations
$ python recommendations.py
This runs your Flask app, which runs by default on port 5000. Go ahead and open that up in your browser and check it out:

You now have two microservices talking to each other! But they’re still just on your development machine. Next, you’ll learn how to get these into a production environment.
You can stop your Python microservices by typing Ctrl+C in the terminal where they’re running. You’ll be running these in Docker next, which is how they’ll run in a production environment.
Production-Ready Python Microservices
At this point, you have a Python microservice architecture running on your development machine, which is great for testing. In this section, you’ll get it running in the cloud.
Docker
Docker is an amazing technology that lets you isolate a group of processes from other processes on the same machine. You can have two or more groups of processes with their own file systems, network ports, and so on. You can think of it as a Python virtual environment, but for the whole system and more secure.
Docker is perfect for deploying a Python microservice because you can package all the dependencies and run the microservice in an isolated environment. When you deploy your microservice to the cloud, it can run on the same machine as other microservices without them stepping on one another’s toes. This allows for better resource utilization.
This tutorial won’t dive deeply into Docker because it would take an entire book to cover. Instead, you’ll just get set up with the basics you need to deploy your Python microservices to the cloud. For more information on Docker, you can check out Python Docker Tutorials.
Before you get started, if you’d like to follow along on your machine, then make sure you have Docker installed. You can download it from the official site.
You’ll create two Docker images, one for the Marketplace microservice and one for the Recommendations microservice. An image is basically a file system plus some metadata. In essence, each of your microservices will have a mini Linux environment to itself. It can write files without affecting the actual file system and open ports without conflicting with other processes.
To create your images, you need to define a Dockerfile. You always start with a base image that has some basic things in it. In this case, your base image will include a Python interpreter. You’ll then copy files from your development machine into your Docker image. You can also run commands inside the Docker image. This is useful for installing dependencies.
Recommendations Dockerfile
You’ll start by creating the Recommendations microservice Docker image. Create recommendations/Dockerfile and add the following:
    1FROM python
    2
    3RUN mkdir /service
 4COPY protobufs/ /service/protobufs/
 5COPY recommendations/ /service/recommendations/
 6WORKDIR    /service/recommendations
    septRUN python -m pip install --upgrade pip
 8RUN python -m pip install -r requirements.txt
 9RUN python -m grpc_tools.protoc -I ../protobufs --python_out=.
10           --grpc_python_out=. ../protobufs/recommendations.proto
11
12EXPOSE    50051
13ENTRYPOINT [[[[ "python", "recommendations.py" ]
Here’s a line-by-line walkthrough:
-
Line 1 initializes your image with a basic Linux environment plus the latest version of Python. At this point, your image has a typical Linux file system layout. If you were to look inside, it would have
/bin,/home, and all the basic files you would expect. -
Line 3 creates a new directory at
/serviceto contain your microservice code. -
Lines 4 and 5 copy the
protobufs/etrecommendations/directories into/service. -
Line 6 gives Docker a
WORKDIR /service/recommendationsinstruction, which is kind of like doing acdinside the image. Any paths you give to Docker will be relative to this location, and when you run a command, it will be run in this directory. -
Line 7 updates
pipto avoid warnings about older versions. -
Line 8 tells Docker to run
pip install -r requirements.txtinside the image. This will add all thegrpcio-toolsfiles, and any other packages you might add, into the image. Note that you’re not using a virtual environment because it’s unnecessary. The only thing running in this image will be your microservice, so you don’t need to isolate its environment further. -
Line 9 runs the
python -m grpc_tools.protoccommand to generate the Python files from the protobuf file. Votre/servicedirectory inside the image now looks like this:/service/ | ├── protobufs/ │ └── recommendations.proto | └── recommendations/ ├── recommendations.py ├── recommendations_pb2.py ├── recommendations_pb2_grpc.py └── requirements.txt -
Line 12 tells Docker that you’re going to run a microservice on port
50051, and you want to expose this outside the image. -
Line 13 tells Docker how to run your microservice.
Now you can generate a Docker image from your Dockerfile. Run the following command from the directory containing all your code—not inside the recommendations/ directory, but one level up from that:
$ docker build . -f recommendations/Dockerfile -t recommendations
This will build the Docker image for the Recommendations microservice. You should see some output as Docker builds the image. Now you can run it:
$ docker run -p 127.0.0.1:50051:50051/tcp recommendations
You won’t see any output, but your Recommendations microservice is now running inside a Docker container. When you run an image, you get a container. You could run the image multiple times to get multiple containers, but there’s still only one image.
La -p 127.0.0.1:50051:50051/tcp option tells Docker to forward TCP connections on port 50051 on your machine to port 50051 inside the container. This gives you the flexibility to forward different ports on your machine.
For example, if you were running two containers that both ran Python microservices on port 50051, then you would need to use two different ports on your host machine. This is because two processes can’t open the same port at the same time unless they’re in separate containers.
Marketplace Dockerfile
Next, you’ll build your Marketplace image. Create marketplace/Dockerfile and add the following:
    1FROM python
    2
    3RUN mkdir /service
 4COPY protobufs/ /service/protobufs/
 5COPY marketplace/ /service/marketplace/
 6WORKDIR    /service/marketplace
    septRUN python -m pip install --upgrade pip
 8RUN python -m pip install -r requirements.txt
 9RUN python -m grpc_tools.protoc -I ../protobufs --python_out=.
10           --grpc_python_out=. ../protobufs/recommendations.proto
11
12EXPOSE    5000
13ENV FLASK_APP=marketplace.py
14ENTRYPOINT [[[[ "flask", "run", "--host=0.0.0.0"]
This is very similar to the Recommendations Dockerfile, with a few differences:
- Line 13 uses
ENV FLASK_APP=marketplace.pyto set the environment variableFLASK_APPinside the image. Flask needs this to run. - Line 14 adds
--host=0.0.0.0à laflask runcommand. If you don’t add this, then Flask will only accept connections from localhost.
But wait, aren’t you still running everything on localhost? Well, not really. When you run a Docker container, it’s isolated from your host machine by default. localhost inside the container is different from localhost outside, even on the same machine. That’s why you need to tell Flask to accept connections from anywhere.
Go ahead and open a new terminal. You can build your Marketplace image with this command:
$ docker build . -f marketplace/Dockerfile -t marketplace
That creates the Marketplace image. You can now run it in a container with this command:
$ docker run -p 127.0.0.1:5000:5000/tcp marketplace
You won’t see any output, but your Marketplace microservice is now running.
Networking
Unfortunately, even though both your Recommendations and Marketplace containers are running, if you now go to http://localhost:5000 in your browser, you’ll get an error. You can connect to your Marketplace microservice, but it can’t connect to the Recommendations microservice anymore. The containers are isolated.
Luckily, Docker provides a solution to this. You can create a virtual network and add both your containers to it. You can also give them DNS names so they can find each other.
Below, you’ll create a network called microservices and run the Recommendations microservice on it. You’ll also give it the DNS name recommendations. First, stop the currently running containers with Ctrl+C. Then run the following:
$ docker network create microservices
$ docker run -p 127.0.0.1:50051:50051/tcp --network microservices
             --name recommendations recommendations
La docker network create command creates the network. You only need to do this once and then you can connect multiple containers to it. You then add ‑‑network microservices à la docker run command to start the container on this network. La ‑‑name recommendations option gives it the DNS name recommendations.
Before you restart the marketplace container, you need to change the code. This is because you hard-coded localhost:50051 in this line from marketplace.py:
recommendations_channel = grpc.insecure_channel("localhost:50051")
Now you want to connect to recommendations:50051 instead. But rather than hardcode it again, you can load it from an environment variable. Replace the line above with the following two:
recommendations_host = os.getenv("RECOMMENDATIONS_HOST", "localhost")
recommendations_channel = grpc.insecure_channel(
    f"recommendations_host:50051"
)
This loads the hostname of the Recommendations microservice in the environment variable RECOMMENDATIONS_HOST. If it’s not set, then you can default it to localhost. This allows you to run the same code both directly on your machine or inside a container.
You’ll need to rebuild the marketplace image since you changed the code. Then try running it on your network:
$ docker build . -f marketplace/Dockerfile -t marketplace
$ docker run -p 127.0.0.1:5000:5000/tcp --network microservices
             -e RECOMMENDATIONS_HOST=recommendations marketplace
This is similar to how you ran it before, but with two differences:
-
You added the
‑‑network microservicesoption to run it on the same network as your Recommendations microservice. You didn’t add a‑‑nameoption because, unlike the Recommendations microservice, nothing needs to look up the IP address of the Marketplace microservice. The port forwarding provided by-p 127.0.0.1:5000:5000/tcpis enough, and it doesn’t need a DNS name. -
You added
-e RECOMMENDATIONS_HOST=recommendations, which sets the environment variable inside the container. This is how you pass the hostname of the Recommendations microservice to your code.
At this point, you can try localhost:5000 in your browser once again, and it should load correctly. Huzzah!
Docker Compose
It’s amazing that you can do all this with Docker, but it’s a little tedious. It would be nice if there were a single command that you could run to start all your containers. Luckily there is! It’s called docker-compose, and it’s part of the Docker project.
Rather than running a bunch of commands to build images, create networks, and run containers, you can declare your microservices in a YAML file:
    1version: "3.8"
    2services:
    3
    4    marketplace:
    5        construire:
    6            context: .
    sept            dockerfile: marketplace/Dockerfile
    8        environment:
    9            RECOMMENDATIONS_HOST: recommendations
10        image: marketplace
11        networks:
12            - microservices
13        ports:
14            - 5000:5000
15
16    recommendations:
17        construire:
18            context: .
19            dockerfile: recommendations/Dockerfile
20        image: recommendations
21        networks:
22            - microservices
23
24networks:
25    microservices:
Typically, you put this into a file called docker-compose.yaml. Place this in the root of your project:
.
├── marketplace/
│   ├── marketplace.py
│   ├── requirements.txt
│   └── templates/
│       └── homepage.html
|
├── protobufs/
│   └── recommendations.proto
|
├── recommendations/
│   ├── recommendations.py
│   ├── recommendations_pb2.py
│   ├── recommendations_pb2_grpc.py
│   └── requirements.txt
│
└── docker-compose.yaml
This tutorial won’t go into much detail on syntax since it’s well documented elsewhere. It really just does the same thing you’ve done manually already. However, now you only need to run a single command to bring up your network and containers:
Once this is running, you should again be able to open localhost:5000 in your browser, and all should work perfectly.
Note that you don’t need to expose 50051 in the recommendations container when it’s in the same network as the Marketplace microservice, so you can drop that part.
Remarque: When developing with docker-compose, if you change any of the files, then run docker-compose build to rebuild the images. If you run docker-compose up, it will use the old images, which can be confusing.
If you’d like to stop docker-compose to make some edits before moving up, press Ctrl+C.
Testing
To unit test your Python microservice, you can instantiate your microservice class and call its methods. Here’s a basic example test for your RecommendationService implementation:
    1# recommendations/recommendations_test.py
    2from recommendations importer RecommendationService
    3
    4from recommendations_pb2 importer BookCategory, RecommendationRequest
    5
    6def test_recommendations():
    sept    service = RecommendationService()
    8    request = RecommendationRequest(
    9        user_id=1, category=BookCategory.MYSTERY, max_results=1
10    )
11    response = service.Recommend(request, None)
12    assert len(response.recommendations) == 1
Here’s a breakdown:
- Line 6 instantiates the class like any other and calls methods on it.
- Line 11 passes
Nonefor the context, which works as long as you don’t use it. If you want to test code paths that use the context, then you can mock it.
Integration testing involves running automated tests with multiple microservices not mocked out. So it’s a bit more involved, but it’s not overly difficult. Add a marketplace/marketplace_integration_test.py file:
from urllib.request importer urlopen
def test_render_homepage():
homepage_html = urlopen("http://localhost:5000").read().decode("utf-8")
assert "Online Books For You " dans homepage_html
assert homepage_html.count("" ) == 3
This makes an HTTP request to the home page URL and checks that it returns some HTML with a title and three
So how do you run this type of test? Fortunately, the good people at Docker have also provided a way to do this. Once you’re running your Python microservices with docker-compose, you can run commands inside them with docker-compose exec. So if you wanted to run your integration test inside the marketplace container, you could run the following command:
$ docker-compose build
$ docker-compose up
$ docker-compose exec marketplace pytest marketplace_integration_test.py
This runs the pytest command inside the marketplace container. Because your integration test connects to localhost, you need to run it in the same container as the microservice.
Deploying to Kubernetes
Great! You now have a couple of microservices running on your computer. You can quickly bring them up and run integration tests on both of them. But you need to get them into a production environment. For this, you’ll use Kubernetes.
This tutorial won’t go into depth on Kubernetes because it’s a large topic, and comprehensive documentation and tutorials are available elsewhere. However, in this section you’ll find the basics to get your Python microservices to a Kubernetes cluster in the cloud.
Remarque: To deploy Docker images to a cloud provider, you need to push your Docker images to an image registry like Docker Hub.
The following examples use the images in this tutorial, which have already been pushed to Docker Hub. If you’d like to change them, or if you want to create your own microservices, then you’ll need to create an account on Docker Hub so you can push images. You can create also create a private registry if you’d like, or use another registry, such as Amazon’s ECR.
Kubernetes Configs
You can start with a minimal Kubernetes configuration in kubernetes.yaml. The complete file is a little long, but it consists of four distinct sections, so you’ll look at them one by one:
    1---
    2apiVersion: apps/v1
    3gentil: Deployment
    4métadonnées:
    5    Nom: marketplace
    6    Étiquettes:
    sept        app: marketplace
    8spec:
    9    replicas: 3
10    selector:
11        matchLabels:
12            app: marketplace
13    template:
14        métadonnées:
15            Étiquettes:
16                app: marketplace
17        spec:
18            conteneurs:
19                - Nom: marketplace
20                  image: hidan/python-microservices-article-marketplace:0.1
21                  env:
22                      - Nom: RECOMMENDATIONS_HOST
23                        value: recommendations
This defines a Deployment for the Marketplace microservice. A Deployment tells Kubernetes how to deploy your code. Kubernetes needs four main pieces of information:
- What Docker image to deploy
- How many instances to deploy
- What environment variables the microservices need
- How to identify your microservice
You can tell Kubernetes how to identify your microservice by using Étiquettes. Although not shown here, you can also tell Kubernetes what memory and CPU resources your microservice needs. You can find many other options in the Kubernetes documentation.
Here’s what’s happening in the code:
-
Line 9 tells Kubernetes how many pods to create for your microservice. A cosse is basically an isolated execution environment, like a lightweight virtual machine implemented as a set of containers. Setting
replicas: 3gives you three pods for each microservice. Having more than one allows for redundancy, enabling rolling updates without downtime, scaling as you need more machines, and having failovers in case one goes down. -
Line 20 is the Docker image to deploy. You must use a Docker image on an image registry. To get your image there, you must push it to the image registry. There are instructions on how to do this when you log in to your account on Docker Hub.
The Deployment for the Recommendations microservice is very similar:
24---
25apiVersion: apps/v1
26gentil: Deployment
27métadonnées:
28    Nom: recommendations
29    Étiquettes:
30        app: recommendations
31spec:
32    replicas: 3
33    selector:
34        matchLabels:
35            app: recommendations
36    template:
37        métadonnées:
38            Étiquettes:
39                app: recommendations
40        spec:
41            conteneurs:
42                - Nom: recommendations
43                  image: hidan/python-microservices-article-recommendations:0.1
The main difference is that one uses the name marketplace and the other uses recommendations. You also set the RECOMMENDATIONS_HOST environment variable on the marketplace Deployment but not on the recommendations Deployment.
Next, you define a Service for the Recommendations microservice. Whereas a Deployment tells Kubernetes how to deploy your code, a Service tells it how to route requests to it. To avoid confusion with the term service that is commonly used to talk about microservices, you’ll see the word capitalized when used in reference to a Kubernetes Service.
Here’s the Service definition for recommendations:
44---
45apiVersion: v1
46gentil: Service
47métadonnées:
48    Nom: recommendations
49spec:
50    selector:
51        app: recommendations
52    ports:
53        - protocol: TCP
54          port: 50051
55          targetPort: 50051
Here’s what’s happening in the definition:
-
Line 48: When you create a Service, Kubernetes essentially creates a DNS hostname with the same
Nomwithin the cluster. So any microservice in your cluster can send a request torecommendations. Kubernetes will forward this request to one of the pods in your Deployment. -
Line 51: This line connects the Service to the Deployment. It tells Kubernetes to forward requests to
recommendationsto one of the pods in therecommendationsDeployment. This must match one of the key-value pairs in theÉtiquettesof the Deployment.
La marketplace Service is similar:
56---
57apiVersion: v1
58gentil: Service
59métadonnées:
60    Nom: marketplace
61spec:
62    type: LoadBalancer
63    selector:
64        app: marketplace
65    ports:
66        - protocol: TCP
67          port: 5000
68          targetPort: 5000
Aside from the names and ports, there’s only one difference. You’ll notice that type: LoadBalancer appears only in the marketplace Service. This is because marketplace needs to be accessible from outside the Kubernetes cluster, whereas recommendations only needs to be accessible inside the cluster.
Remarque: It’s more common to use an Ingress Service than a LoadBalancer Service in a large cluster with many microservices. If you’re developing microservices in a corporate environment, then that’s probably the way to go.
Check out Sandeep Dinesh’s article Kubernetes NodePort vs LoadBalancer vs Ingress? When should I use what? pour plus d'informations.
You can see the complete file by expanding the box below:
    1---
    2apiVersion: apps/v1
    3gentil: Deployment
    4métadonnées:
    5    Nom: marketplace
    6    Étiquettes:
    sept        app: marketplace
    8spec:
    9    replicas: 3
10    selector:
11        matchLabels:
12            app: marketplace
13    template:
14        métadonnées:
15            Étiquettes:
16                app: marketplace
17        spec:
18            conteneurs:
19                - Nom: marketplace
20                  image: hidan/python-microservices-article-marketplace:0.1
21                  env:
22                      - Nom: RECOMMENDATIONS_HOST
23                        value: recommendations
24---
25apiVersion: apps/v1
26gentil: Deployment
27métadonnées:
28    Nom: recommendations
29    Étiquettes:
30        app: recommendations
31spec:
32    replicas: 3
33    selector:
34        matchLabels:
35            app: recommendations
36    template:
37        métadonnées:
38            Étiquettes:
39                app: recommendations
40        spec:
41            conteneurs:
42                - Nom: recommendations
43                  image: hidan/python-microservices-article-recommendations:0.1
44---
45apiVersion: v1
46gentil: Service
47métadonnées:
48    Nom: recommendations
49spec:
50    selector:
51        app: recommendations
52    ports:
53        - protocol: TCP
54          port: 50051
55          targetPort: 50051
56---
57apiVersion: v1
58gentil: Service
59métadonnées:
60    Nom: marketplace
61spec:
62    type: LoadBalancer
63    selector:
64        app: marketplace
65    ports:
66        - protocol: TCP
67          port: 5000
68          targetPort: 5000
Now that you have a Kubernetes configuration, your next step is to deploy it!
Deploying Kubernetes
You typically deploy Kubernetes using a cloud provider. There are many cloud providers you can choose from, including Google Kubernetes Engine (GKE), Amazon Elastic Kubernetes Service (EKS), and DigitalOcean.
If you’re deploying microservices at your company, then the cloud provider you use will likely be dictated by your infrastructure. For this demo, you’ll run Kubernetes locally. Almost everything will be the same as using a cloud provider.
If you’re running Docker Desktop on Mac or Windows, then it comes with a local Kubernetes cluster that you can enable in the Preferences menu. Open Preferences by clicking the Docker icon in the system tray, then find the Kubernetes section and enable it:

If you’re running on Linux, then you can install minikube. Follow the instructions on the start page to get set up.
Once you’ve created your cluster, you can deploy your microservices with the following command:
$ kubectl apply -f kubernetes.yaml
If you’d like to try deploying to Kubernetes in the cloud, DigitalOcean is the least complicated to set up and has a simple pricing model. You can sign up for an account and then create a Kubernetes cluster in a few clicks. If you change the defaults to use only one node and the cheapest options, then at the time of this writing the cost was only $0.015 per hour.
Follow the instructions DigitalOcean provides to download a config file for kubectl and run the command above. You can then click the Kubernetes button in DigitalOcean to see your Services running there. DigitalOcean will assign an IP address to your LoadBalancer Service, so you can visit your Marketplace app by copying that IP address into your browser.
Important: When you’re done, destroy your cluster so you don’t continue being charged for it. You should also go to the Networking tab and destroy the Load Balancer, which is separate from the cluster but also accrues a charge.
That wraps up deploying to Kubernetes. Next, you’ll learn how to monitor you Python microservices.
Python Microservice Monitoring With Interceptors
Once you have some microservices in the cloud, you want to have visibility into how they’re doing. Some things you want to monitor include:
- How many requests each microservice is getting
- How many requests result in an error, and what type of error they raise
- The latency on each request
- Exception logs so you can debug later
You’ll learn about a few ways of doing this in the sections below.
Why Not Decorators
One way you could do this, and the most natural to Python developers, is to add a decorator to each microservice endpoint. However, in this case, there are several downsides to using decorators:
- Developers of new microservices have to remember to add them to each method.
- If you have a lot of monitoring, then you might end up with a stack of decorators.
- If you have a stack of decorators, then developers may stack them in the wrong order.
- You could consolidate all your monitoring into a single decorator, but then it could get messy.
This stack of decorators is what you want to avoid:
    1class RecommendationService(recommendations_pb2_grpc.RecommendationsServicer):
    2    @catch_and_log_exceptions
    3    @log_request_counts
    4    @log_latency
    5    def Recommend(self, request, context):
    6        ...
Having this stack of decorators on every method is ugly and repetitive, and it violates the DRY programming principle: don’t repeat yourself. Decorators are also a challenge to write, especially if they accept arguments.
Interceptors
There an alternative approach to using decorators that you’ll pursue in this tutorial: gRPC has an interceptor concept that provides functionality similar to a decorator but in a cleaner way.
Implementing Interceptors
Unfortunately, the Python implementation of gRPC has a fairly complex API for interceptors. This is because it’s incredibly flexible. However, there’s a grpc-interceptor package to simplify them. For full disclosure, I’m the author.
Add it to your recommendations/requirements.txt along with pytest, which you’ll use shortly:
grpc-interceptor ~= 0.12.0
grpcio-tools ~= 1.30
pytest ~= 5.4
Then update your virtual environment:
$ python -m pip install recommendations/requirements.txt
You can now create an interceptor with the following code. You don’t need to add this to your project as it’s just an example:
    1from grpc_interceptor importer ServerInterceptor
    2
    3class ErrorLogger(ServerInterceptor):
    4    def intercept(self, method, request, context, method_name):
    5        try:
    6            return method(request, context)
    sept        except Exception comme e:
    8            self.log_error(e)
    9            raise
10
11    def log_error(self, e: Exception) -> None:
12        # ...
This will call log_error() whenever an unhandled exception in your microservice is called. You could implement this by, for example, logging exceptions to Sentry so you get alerts and debugging info when they happen.
To use this interceptor, you would pass it to grpc.server() like this:
interceptors = [[[[ErrorLogger()]
server = grpc.server(futures.ThreadPoolExecutor(max_workers=10),
                     interceptors=interceptors)
With this code, every request to and response from your Python microservice will go through your interceptor, so you can count how many requests and errors it gets.
grpc-interceptor also provides an exception for each gRPC status code and an interceptor called ExceptionToStatusInterceptor. If one of the exceptions is raised by the microservice, then ExceptionToStatusInterceptor will set the gRPC status code. This allows you to simplify your microservice by making the changes highlighted below to recommendations/recommendations.py:
    1from grpc_interceptor importer ExceptionToStatusInterceptor
    2from grpc_interceptor.exceptions importer NotFound
    3
    4# ...
    5
    6class RecommendationService(recommendations_pb2_grpc.RecommendationsServicer):
    sept    def Recommend(self, request, context):
    8        if request.category ne pas dans books_by_category:
    9            raise NotFound("Category not found")
10
11        books_for_category = books_by_category[[[[request.category]
12        num_results = min(request.max_results, len(books_for_category))
13        books_to_recommend = random.sample(books_for_category, num_results)
14
15        return RecommendationResponse(recommendations=books_to_recommend)
16
17def serve():
18    interceptors = [[[[ExceptionToStatusInterceptor()]
19    server = grpc.server(
20        futures.ThreadPoolExecutor(max_workers=10),
21        interceptors=interceptors
22    )
23    # ...
This is more readable. You can also raise the exception from many functions down the call stack rather than having to pass context so you can call context.abort(). You also don’t have to catch the exception yourself in your microservice—the interceptor will catch it for you.
Testing Interceptors
If you want to write your own interceptors, then you should test them. But it’s dangerous to mock too much out when testing something like interceptors. For example, you could call .intercept() in the test and make sure it returns what you want, but this wouldn’t test realistic inputs or that they even get called at all.
To improve testing, you can run a gRPC microservice with interceptors. La grpc-interceptor package provides a framework to do that. Below, you’ll write a test for the ErrorLogger interceptor. This is only an example, so you don’t need to add it to your project. If you were to add it, then you would add it to a test file.
Here’s how you could write a test for an interceptor:
    1from grpc_interceptor.testing importer dummy_client, DummyRequest, raises
    2
    3class MockErrorLogger(ErrorLogger):
    4    def __init__(self):
    5        self.logged_exception = None
    6
    sept    def log_error(self, e: Exception) -> None:
    8        self.logged_exception = e
    9
10def test_log_error():
11    mock = MockErrorLogger()
12    ex = Exception()
13    special_cases = "error": raises(ex)
14
15    avec dummy_client(special_cases=special_cases, interceptors=[[[[mock]) comme client:
16        # Test no exception
17        assert client.Execute(DummyRequest(input="foo")).output == "foo"
18        assert mock.logged_exception is None
19
20        # Test exception
21        avec pytest.raises(grpc.RpcError) comme e:
22            client.Execute(DummyRequest(input="error"))
23        assert mock.logged_exception is ex
Here’s a walk-through:
-
Lines 3 to 8 subclass
ErrorLoggerto mock outlog_error(). You don’t actually want the logging side effect to happen. You just want to make sure it’s called. -
Lines 15 to 18 use the
dummy_client()context manager to create a client that’s connected to a real gRPC microservice. You sendDummyRequestto the microservice, and it replies withDummyResponse. By default, theinputdeDummyRequestis echoed to theoutputdeDummyResponse. However, you can passdummy_client()a dictionary of special cases, and ifinputmatches one of them, then it will call a function you provide and return the result. -
Lines 21 to 23: You test that
log_error()is called with the expected exception.raises()returns another function that raises the provided exception. You setinputtoerrorso that the microservice will raise an exception.
For more information about testing, you can read Effective Python Testing With Pytest and Understanding the Python Mock Object Library.
An alternative to interceptors in some cases is to use a service mesh. It will send all microservice requests and responses through a proxy, so the proxy can automatically log things like request volume and error counts. To get accurate error logging, your microservice still needs to set status codes correctly. So in some cases, your interceptors can complement a service mesh. One popular service mesh is Istio.
Best Practices
Now you have a working Python microservice setup. You can create microservices, test them together, deploy them to Kubernetes, and monitor them with interceptors. You can get started creating microservices at this point. You should keep some best practices in mind, however, so you’ll learn a few in this section.
Protobuf Organization
Generally, you should keep your protobuf definitions separate from your microservice implementation. Clients can be written in almost any language, and if you bundle your protobuf files into a Python wheel or something similar, then if someone wants a Ruby or Go client, it’s going to be hard for them to get the protobuf files.
Even if all your code is Python, why should someone need to install the package for the microservice just to write a client for it?
A solution is to put your protobuf files in a separate Git repo from the microservice code. Many companies put tout the protobuf files for tout microservices in a single repo. This makes it easier to find all microservices, share common protobuf structures among them, and create useful tooling.
If you do choose to store your protobuf files in a single repo, you need to be careful that the repo stays organized, and you should definitely avoid cyclical dependencies between Python microservices.
Protobuf Versioning
API versioning can be hard. The main reason is that if you change an API and update the microservice, then there may still be clients using the old API. This is especially true when the clients live on customers’ machines, such as mobile clients or desktop software.
You can’t easily force people to update. Even if you could, network latency causes race conditions, and your microservice is likely to get requests using the old API. Good APIs should be either backward compatible or versioned.
To achieve backward compatibility, Python microservices using protobufs version 3 will accept requests with missing fields. If you want to add a new field, then that’s okay. You can deploy the microservice first, and it will still accept requests from the old API without the new field. The microservice just needs to handle that gracefully.
If you want to make more drastic changes, then you’ll need to version your API. Protobufs allow you to put your API into a package namespace, which can include a version number. If you need to drastically change the API, then you can create a new version of it. The microservice can continue to accept the old version as well. This allows you to roll out a new API version while phasing out an older version over time.
By following these conventions, you can avoid making breaking changes. Inside a company, people sometimes feel that making breaking changes to an API is acceptable because they control all the clients. This is up to you to decide, but be aware that making breaking changes requires coordinated client and microservice deploys, and it complicates rollbacks.
This can be okay very early in a microservice’s lifecycle, when there are no production clients. However, it’s good to get into the habit of making only nonbreaking changes once your microservice is critical to the health of your company.
Protobuf Linting
One way to ensure you don’t make breaking changes to your protobufs is to use a linter. A popular one is buf. You can set this up as part of your CI system so you can check for breaking changes in pull requests.
Type Checking Protobuf-Generated Code
Mypy is a project for statically type checking Python code. If you’re new to static type checking in Python, then you can read Python Type Checking to learn all about it.
The code generated by protoc is a little gnarly, and it doesn’t have type annotations. If you try to type check it with Mypy, then you’ll get lots of errors and it won’t catch real bugs like misspelled field names. Luckily, the nice people at Dropbox wrote a plugin for the protoc compiler to generate type stubs. These should not be confused with gRPC stubs.
In order to use it, you can install the mypy-protobuf package and then update the command to generate protobuf output. Note the new ‑‑mypy_out option:
$ python -m grpc_tools.protoc -I ../protobufs --python_out=.
         --grpc_python_out=. --mypy_out=. ../protobufs/recommendations.proto
Most of your Mypy errors should go away. You may still get an error about the grpc package not having type info. You can either install unofficial gRPC type stubs or add the following to your Mypy config:
[mypy-grpc.*]
ignore_missing_imports = Vrai
You’ll still get most of the benefits of type checking, such as catching misspelled fields. This is really helpful for catching bugs before they make it to production.
Shutting Down Gracefully
When running your microservice on your development machine, you can press Ctrl+C to stop it. This will cause the Python interpreter to raise a KeyboardInterrupt exception.
When Kubernetes is running your microservice and needs to stop it to roll out an update, it will send a signal to your microservice. Specifically, it will send a SIGTERM signal and wait thirty seconds. If your microservice hasn’t exited by then, it will send a SIGKILL signal.
You can, and should, catch and handle the SIGTERM so you can finish processing current requests but refuse new ones. You can do so by putting the following code in serve():
    1from signal importer signal, SIGTERM
    2
    3...
    4
    5def serve():
    6    server = grpc.server(futures.ThreadPoolExecutor(max_workers=10))
    sept    ...
    8    server.add_insecure_port("[::]:50051")
    9    server.start()
10
11    def handle_sigterm(*_):
12        impression("Received shutdown signal")
13        all_rpcs_done_event = server.stop(30)
14        all_rpcs_done_event.wait(30)
15        impression("Shut down gracefully")
16
17    signal(SIGTERM, handle_sigterm)
18    server.wait_for_termination()
Here’s a breakdown:
- Line 1 imports
signal, which allows you to catch and handle signals from Kubernetes or almost any other process. - Line 11 defines a function to handle
SIGTERM. The function will be called when Python receives theSIGTERMsignal, and Python will pass it two arguments. You don’t need the arguments, however, so use*_to ignore them both. - Line 13 calls
server.stop(30)to shut down the server gracefully. It will refuse new requests and wait30seconds for current requests to complete. It returns immediately, but it returns athreading.Eventobject on which you can wait. - Line 14 waits on the
Eventobject so Python doesn’t exit prematurely. - Line 17 registers your handler.
When you deploy a new version of your microservice, Kubernetes will send signals to shut down the existing microservice. Handling these to shut down gracefully will ensure a request isn’t dropped.
Securing Channels
So far you’ve been using insecure gRPC channels. This means a few things:
-
The client can’t confirm that it’s sending requests to the intended server. Someone could create an imposter microservice and inject it somewhere that the client might send a request to. For instance, they might be able to inject the microservice in a pod to which the load balancer would send requests.
-
The server can’t confirm the client sending requests to it. As long as someone can connect to the server, they can send it arbitrary gRPC requests.
-
The traffic is unencrypted, so any nodes routing traffic can also view it.
This section will describe how to add TLS authentication and encryption.
Remarque: This does not address authenticating users, only microservice processes.
You’ll learn two ways to set up TLS:
- The straightforward way, in which the client can validate the server, but the server doesn’t validate the client.
- The more complex way, with mutual TLS, in which the client and the server validate each other.
In both cases, traffic is encrypted.
TLS Basics
Before diving in, here’s a brief overview of TLS: Typically, a client validates a server. For example, when you visit Amazon.com, your browser validates that it’s really Amazon.com and not an imposter. To do this, the client must receive some sort of assurance from a trustworthy third party, sort of like how you might trust a new person only if you have a mutual friend who vouches for them.
With TLS, the client must trust a certificate authority (CA). The CA will sign something held by the server so the client can verify it. This is a bit like your mutual friend signing a note and you recognizing their handwriting. For more information, see How internet security works: TLS, SSL, and CA.
Your browser implicitly trusts some CAs, which are typically companies like GoDaddy, DigiCert, or Verisign. Other companies, like Amazon, pay a CA to sign a digital certificate for them so your browser trusts them. Typically, the CA would verify that Amazon owns Amazon.com before signing their certificate. That way, an imposter wouldn’t have a signature on a certificate for Amazon.com, and your browser would block the site.
With microservices, you can’t really ask a CA to sign a certificate because your microservices run on internal machines. The CA would probably be happy to sign a certificate and charge you for it, but the point is that it’s not practical. In this case, your company can act as its own CA. The gRPC client will trust the server if it has a certificate signed by your company or by you if you’re doing a personal project.
Server Authentication
The following command will create a CA certificate that can be used to sign a server’s certificate:
$ openssl req -x509 -nodes -newkey rsa:4096 -keyout ca.key -out ca.pem
              -subj /O=me
This will output two files:
ca.keyis a private key.ca.pemis a public certificate.
You can then create a certificate for your server and sign it with your CA certificate:
$ openssl req -nodes -newkey rsa:4096 -keyout server.key -out server.csr
              -subj /CN=recommendations
$ openssl x509 -req -in server.csr -CA ca.pem -CAkey ca.key -set_serial 1
              -out server.pem
This will produce three new files:
server.keyis the server’s private key.server.csris an intermediate file.server.pemis the server’s public certificate.
Remarque: These commands are for example purposes only. The private keys are ne pas encrypted. If you want to generate certificates for your company, then consult your security team. They will likely have policies to create, store, and revoke certificates that you should follow.
You can add this to the Recommendations microservice Dockerfile. It’s very hard to securely add secrets to a Docker image, but there’s a way to do it with the latest versions of Docker, shown highlighted below:
    1# syntax = docker/dockerfile:1.0-experimental
    2# DOCKER_BUILDKIT=1 docker build . -f recommendations/Dockerfile
    3#                     -t recommendations --secret id=ca.key,src=ca.key
    4
    5FROM python
    6
    septRUN mkdir /service
 8COPY infra/ /service/infra/
 9COPY protobufs/ /service/protobufs/
10COPY recommendations/ /service/recommendations/
11COPY ca.pem /service/recommendations/
12
13WORKDIR    /service/recommendations
14RUN python -m pip install --upgrade pip
15RUN python -m pip install -r requirements.txt
16RUN python -m grpc_tools.protoc -I ../protobufs --python_out=.
17           --grpc_python_out=. ../protobufs/recommendations.proto
18RUN openssl req -nodes -newkey rsa:4096 -subj /CN=recommendations
19                                                                -keyout server.key -out server.csr
20RUN --mount=type=secret,id=ca.key
21                openssl x509 -req -in server.csr -CA ca.pem -CAkey /run/secrets/ca.key
22                                                                    -set_serial 1 -out server.pem
23
24EXPOSE    50051
25ENTRYPOINT [[[[ "python", "recommendations.py" ]
The new lines are highlighted. Here’s an explanation:
- Line 1 is needed to enable secrets.
- Lines 2 and 3 show the command for how to build the Docker image.
- Line 11 copies the CA public certificate into the image.
- Lines 18 and 19 generate a new server private key and certificate.
- Lines 20 to 22 temporarily load the CA private key so you can sign the server’s certificate with it. However, it won’t be kept in the image.
Remarque: For more information on ‑‑mount=type=secret, see the Docker documentation. In the future, this feature may be promoted to the stable release, at which time you won’t need to include the syntax = docker/dockerfile:1.0-experimental comment in the Dockerfile.
According to the versioning policy, the experimental syntax won’t go away, so you can continue to use it indefinitely.
Your image will now have the following files:
ca.pemserver.csrserver.keyserver.pem
You can now update serve() dans recommendations.py as highlighted:
    1def serve():
    2    server = grpc.server(futures.ThreadPoolExecutor(max_workers=10))
    3    recommendations_pb2_grpc.add_RecommendationsServicer_to_server(
    4        RecommendationService(), server
    5    )
    6
    sept    avec open("server.key", "rb") comme fp:
    8        server_key = fp.read()
    9    avec open("server.pem", "rb") comme fp:
10        server_cert = fp.read()
11
12    creds = grpc.ssl_server_credentials([([([([(server_key, server_cert)])
13    server.add_secure_port("[::]:443", creds)
14    server.start()
15    server.wait_for_termination()
Here are the changes:
- Lines 7 to 10 load the server’s private key and certificate.
- Lines 12 and 13 run the server using TLS. It will accept only TLS-encrypted connections now.
You’ll need to update marketplace.py to load the CA cert. You only need the public cert in the client for now, as highlighted:
    1recommendations_host = os.getenv("RECOMMENDATIONS_HOST", "localhost")
    2avec open("ca.pem", "rb") comme fp:
    3    ca_cert = fp.read()
    4creds = grpc.ssl_channel_credentials(ca_cert)
    5recommendations_channel = grpc.secure_channel(
    6    f"recommendations_host:443", creds
    sept)
    8recommendations_client = RecommendationsStub(recommendations_channel)
You’ll also need to add COPY ca.pem /service/marketplace/ to the Marketplace Dockerfile.
You can now run the client and server with encryption, and the client will validate the server. To make running everything straightforward, you can use docker-compose. However, at the time of this writing, docker-compose didn’t support build secrets. You will have to build the Docker images manually instead of with docker-compose build.
You can still run docker-compose up, however. Update the docker-compose.yaml file to remove the construire sections:
    1version: "3.8"
    2services:
    3
    4    marketplace:
    5        environment:
    6            RECOMMENDATIONS_HOST: recommendations
    sept        # DOCKER_BUILDKIT=1 docker build . -f marketplace/Dockerfile
    8        #                   -t marketplace --secret id=ca.key,src=ca.key
    9        image: marketplace
10        networks:
11            - microservices
12        ports:
13            - 5000:5000
14
15    recommendations:
16        # DOCKER_BUILDKIT=1 docker build . -f recommendations/Dockerfile
17        #                   -t recommendations --secret id=ca.key,src=ca.key
18        image: recommendations
19        networks:
20            - microservices
21
22networks:
23    microservices:
You’re now encrypting traffic and verifying that you’re connecting to the correct server.
Mutual Authentication
The server now proves that it can be trusted, but the client does not. Luckily, TLS allows verification of both sides. Update the Marketplace Dockerfile as highlighted:
    1# syntax = docker/dockerfile:1.0-experimental
    2# DOCKER_BUILDKIT=1 docker build . -f marketplace/Dockerfile
    3#                     -t marketplace --secret id=ca.key,src=ca.key
    4
    5FROM python
    6
    septRUN mkdir /service
 8COPY protobufs/ /service/protobufs/
 9COPY marketplace/ /service/marketplace/
10COPY ca.pem /service/marketplace/
11
12WORKDIR    /service/marketplace
13RUN python -m pip install -r requirements.txt
14RUN python -m grpc_tools.protoc -I ../protobufs --python_out=.
15           --grpc_python_out=. ../protobufs/recommendations.proto
16RUN openssl req -nodes -newkey rsa:4096 -subj /CN=marketplace
17                                                                -keyout client.key -out client.csr
18RUN --mount=type=secret,id=ca.key
19                openssl x509 -req -in client.csr -CA ca.pem -CAkey /run/secrets/ca.key
20                                                                    -set_serial 1 -out client.pem
21
22EXPOSE    5000
23ENV FLASK_APP=marketplace.py
24ENTRYPOINT [[[[ "flask", "run", "--host=0.0.0.0"]
These changes are similar to the ones you made for the Recommendations microservice in the preceding section.
Remarque: If you’re putting private keys in your Dockerfiles, then don’t host them on a public repository. It would be better to load the private keys at run time, over the network, from a server that’s accessible only via VPN.
Update serve() dans recommendations.py to authenticate the client as highlighted:
    1def serve():
    2    server = grpc.server(futures.ThreadPoolExecutor(max_workers=10))
    3    recommendations_pb2_grpc.add_RecommendationsServicer_to_server(
    4        RecommendationService(), server
    5    )
    6
    sept    avec open("server.key", "rb") comme fp:
    8        server_key = fp.read()
    9    avec open("server.pem", "rb") comme fp:
10        server_cert = fp.read()
11    avec open("ca.pem", "rb") comme fp:
12        ca_cert = fp.read()
13
14    creds = grpc.ssl_server_credentials(
15        [([([([(server_key, server_cert)],
16        root_certificates=ca_cert,
17        require_client_auth=Vrai,
18    )
19    server.add_secure_port("[::]:443", creds)
20    server.start()
21    server.wait_for_termination()
This loads the CA certificate and requires client authentication.
Finally, update marketplace.py to send its certificate to the server as highlighted:
    1recommendations_host = os.getenv("RECOMMENDATIONS_HOST", "localhost")
    2avec open("client.key", "rb") comme fp:
    3    client_key = fp.read()
    4avec open("client.pem", "rb") comme fp:
    5    client_cert = fp.read()
    6avec open("ca.pem", "rb") comme fp:
    sept    ca_cert = fp.read()
    8creds = grpc.ssl_channel_credentials(ca_cert, client_key, client_cert)
    9recommendations_channel = grpc.secure_channel(
10    f"recommendations_host:443", creds
11)
12recommendations_client = RecommendationsStub(recommendations_channel)
This loads certificates and sends them to the server for verification.
Now if you try to connect to the server with another client, even one using TLS but with an unknown certificate, then the server will reject it with the error PEER_DID_NOT_RETURN_A_CERTIFICATE.
Important: While it’s possible to manage mutual TLS this way, it isn’t easy to do so. It gets especially difficult if you want to enable only certain microservices to make requests to others.
If you have a need for heightened security like this, it’s probably better to use a service mesh and let it manage certificates and authorization for you. In addition to the traffic monitoring mentioned in the interceptor section, Istio can manage mutual TLS and per-service authorization, too. It’s also more secure because it will manage secrets for you and reissue certificates more frequently.
That wraps up securing communication between microservices. Next, you’ll learn about using AsyncIO with microservices.
AsyncIO and gRPC
AsyncIO support in the official gRPC package was lacking for a long time, but has recently been added. It’s still experimental and under active development, but if you really want to try AsyncIO in your microservices, then it could be a good option. You can check out the gRPC AsyncIO documentation for more details.
There’s also a third-party package called grpclib that implements AsyncIO support for gRPC and has been around longer.
Be extremely careful with AsyncIO on the server side. It’s easy to accidentally write blocking code, which will bring your microservice to its knees. As a demonstration, here’s how you might write the Recommendations microservice using AsyncIO with all logic stripped out:
    1importer time
    2
    3importer asyncio
    4importer grpc
    5importer grpc.experimental.aio
    6
    septfrom recommendations_pb2 importer (
    8    BookCategory,
    9    BookRecommendation,
10    RecommendationResponse,
11)
12importer recommendations_pb2_grpc
13
14class AsyncRecommendations(recommendations_pb2_grpc.RecommendationsServicer):
15    async def Recommend(self, request, context):
16        impression("Handling request")
17        time.sleep(5)  # Oops, blocking!
18        impression("Done")
19        return RecommendationResponse(recommendations=[])
20
21async def main():
22    grpc.experimental.aio.init_grpc_aio()
23    server = grpc.experimental.aio.server()
24    server.add_insecure_port("[::]:50051")
25    recommendations_pb2_grpc.add_RecommendationsServicer_to_server(
26        AsyncRecommendations(), server
27    )
28    await server.start()
29    await server.wait_for_termination()
30
31asyncio.courir(main())
There’s a mistake in this code. On line 17, you’ve accidentally made a blocking call inside an async function, which is a big no-no. Because AsyncIO servers are single-threaded, this blocks the whole server so it can only process one request at a time. This is much worse than a threaded server.
You can demonstrate this by making multiple concurrent requests:
    1from concurrent.futures importer ThreadPoolExecutor
    2
    3importer grpc
    4
    5from recommendations_pb2 importer BookCategory, RecommendationRequest
    6from recommendations_pb2_grpc importer RecommendationsStub
    sept
    8request = RecommendationRequest(user_id=1, category=BookCategory.MYSTERY)
    9channel = grpc.insecure_channel("localhost:50051")
10client = RecommendationsStub(channel)
11
12executor = ThreadPoolExecutor(max_workers=5)
13a = executor.soumettre(client.Recommend, request)
14b = executor.soumettre(client.Recommend, request)
15c = executor.soumettre(client.Recommend, request)
16d = executor.soumettre(client.Recommend, request)
17e = executor.soumettre(client.Recommend, request)
This will make five concurrent requests, but on the server side you’ll see this:
Handling request
Terminé
Handling request
Terminé
Handling request
Terminé
Handling request
Terminé
Handling request
Terminé
The requests are being handled sequentially, which is not what you want!
There are use cases for AsyncIO on the server side, but you must be very careful not to block. This means that you can’t use standard packages like requests or even make RPCs to other microservices unless you run them in another thread using run_in_executor.
You also have to be careful with database queries. Many of the great Python packages you’ve come to use may not support AsyncIO yet, so be careful to check whether they do. Unless you have a very strong need for AsyncIO on the server side, it might be safer to wait until there’s more package support. Blocking bugs can be hard to find.
If you’d like to learn more about AsyncIO, then you can check out Getting Started With Async Features in Python and Async IO in Python: A Complete Walkthrough.
Conclusion
Microservices are a way to manage complex systems. They become a natural way to organize code as an organization grows. Understanding how to effectively implement microservices in Python can make you more valuable to your company as it grows.
In this tutorial, you’ve learned:
- How to implement Python microservices effectively with gRPC
- How to deploy microservices to Kubernetes
- How to incorporate features such as integration testing, interceptors, TLS, et AsyncIO in your microservices
- What best practices to follow when creating Python microservices
You’re now equipped to start breaking your larger Python applications into smaller microservices, making your code more organized and maintainable. To review everything you’ve learned in this tutorial, you can download the source code from the examples by clicking the link below:
[ad_2]