Formation gratuite Python
- Développez votre portefeuille Python avec 13 idées de projets intermédiaires – Real Python
- Moins de bannières d'administrateur de plugin? Oui s'il vous plaît • WPShout
- 20+ meilleurs thèmes WordPress de blog pour les blogs personnels et indépendants
- De quelles informations avez-vous besoin pour commencer les tests?
- 10 meilleurs plugins de frais et de mises à niveau de produit WooCommerce
Certaines parties de Python semblent-elles magiques? Par exemple, comment les dictionnaires sont-ils beaucoup plus rapides que de parcourir une liste pour trouver un élément? Comment un générateur se souvient-il de l'état des variables chaque fois qu'il génère une valeur et pourquoi ne devez-vous jamais allouer de la mémoire comme les autres langages? Il s’avère, CPython, que le runtime Python le plus populaire est écrit en C et Python lisibles par l’homme. Ce tutoriel vous guidera à travers le code source de CPython.
Vous allez couvrir tous les concepts derrière les composants internes de CPython, leur fonctionnement et leurs explications visuelles au fur et à mesure.
Vous allez apprendre à:
- Lire et naviguer dans le code source
- Compiler CPython à partir du code source
- Naviguer et comprendre le fonctionnement interne de concepts tels que des listes, des dictionnaires et des générateurs
- Lancer la suite de tests
- Modifier ou mettre à niveau des composants de la bibliothèque CPython pour les ajouter aux versions futures
Oui, c'est un très long article. Si vous venez de préparer vous-même une tasse de thé, un café ou votre boisson préférée, il fera froid à la fin de la première partie.
Ce tutoriel est divisé en cinq parties. Prenez votre temps pour chaque partie et assurez-vous d’essayer les démos et les composants interactifs. Vous pouvez sentir que vous comprenez les concepts de base de Python qui peuvent vous aider à devenir un meilleur programmeur Python.
Bonus gratuit: 5 réflexions sur la maîtrise Python, un cours gratuit pour les développeurs Python qui vous montre la feuille de route et l'état d'esprit dont vous aurez besoin pour améliorer vos compétences en Python.
Partie 1: Introduction à CPython
Quand vous tapez python sur la console ou installer une distribution Python à partir de python.org, vous exécutez CPython. CPython est l’un des nombreux programmes d’exécution Python, mis à jour et écrit par différentes équipes de développeurs. PyPy, Cython et Jython sont des exemples d’exécution que vous avez peut-être entendus.
La particularité de CPython est qu’il contient à la fois une spécification de langage partagé et d’exécution que tous les environnements d’exécution Python utilisent. CPython est l'implémentation «officielle» ou de référence de Python.
La spécification du langage Python est le document qui décrit la description du langage Python. Par exemple, il est dit que affirmer est un mot clé réservé, et que [] est utilisé pour l'indexation, le découpage en tranches et la création de listes vides.
Pensez à ce que vous attendez de la distribution Python sur votre ordinateur:
- Quand vous tapez
pythonsans fichier ni module, il donne une invite interactive. - Vous pouvez importer des modules intégrés à partir de la bibliothèque standard, comme
JSON. - Vous pouvez installer des packages à partir d’Internet en utilisant
pépin. - Vous pouvez tester vos applications en utilisant le logiciel intégré.
Test de l'unitébibliothèque.
Tout cela fait partie de la distribution CPython. Il n’ya pas que le compilateur.
Remarque: Cet article a été écrit sur la version 3.8.0b4 du code source CPython.
Que contient le code source?
La distribution source de CPython est fournie avec toute une gamme d’outils, de bibliothèques et de composants. Nous allons explorer ceux de cet article. Nous allons d'abord nous concentrer sur le compilateur.
Pour télécharger une copie du code source de CPython, vous pouvez utiliser git pour extraire la dernière version sur une copie de travail localement:
git clone https://github.com/python/cpython
cd cpython
git checkout v3.8.0b4
Remarque: Si Git n’est pas disponible, vous pouvez télécharger la source au format ZIP directement sur le site Web de GitHub.
À l'intérieur de la nouvellement téléchargé cpython répertoire, vous trouverez les sous-répertoires suivants:
cpython /
│
├── Doc ← Source pour la documentation
├── Grammar ← La définition du langage lisible par ordinateur
├── Inclure ← Les fichiers d'en-tête C
├── Lib ← Modules de bibliothèque standard écrits en Python
├── Mac ← Fichiers de support macOS
├── Misc ← Divers dossiers
├── Modules ← Bibliothèque standard Modules écrits en C
├── Objets ← Types de noyau et modèle d'objet
├── Analyseur ← Le code source de l'analyseur Python
├── PC ← Fichiers de support de construction Windows
Build PCbuild ← Windows crée des fichiers de support pour les anciennes versions de Windows
├── Programmes ← Code source pour l'exécutable python et d'autres fichiers binaires
Python ← Le code source de l'interpréteur CPython
└── Outils ← Outils autonomes utiles pour la construction ou l'extension de Python
Ensuite, nous compilerons CPython à partir du code source. Cette étape nécessite un compilateur C et certains outils de construction, qui dépendent du système d’exploitation utilisé.
Compilation de CPython (macOS)
Compiler CPython sur macOS est simple. Vous aurez d’abord besoin de la boîte à outils essentielle du compilateur C. Les outils de développement en ligne de commande est une application que vous pouvez mettre à jour dans macOS via l'App Store. Vous devez effectuer l'installation initiale sur le terminal.
Pour ouvrir un terminal sous macOS, accédez au tableau de bord, puis Autre puis choisissez le Terminal app. Vous voudrez enregistrer cette application sur votre Dock, alors cliquez avec le bouton droit de la souris sur l'icône et sélectionnez Garder à quai.
Maintenant, dans le terminal, installez le compilateur C et la boîte à outils en lançant:
Cette commande apparaîtra avec une invite pour télécharger et installer un ensemble d'outils, y compris Git, Make et le compilateur GNU C.
Vous aurez également besoin d’une copie de travail d’OpenSSL à utiliser pour récupérer les packages sur le site Web PyPi.org. Si vous envisagez ultérieurement d'utiliser cette version pour installer des packages supplémentaires, la validation SSL est requise.
Le moyen le plus simple d'installer OpenSSL sur macOS consiste à utiliser HomeBrew. Si HomeBrew est déjà installé sur votre ordinateur, vous pouvez installer les dépendances pour CPython avec brasser installer commander:
$ brasser installer openssl xz zlib
Maintenant que vous avez les dépendances, vous pouvez lancer le configurer script, activant la prise en charge de SSL en découvrant l'emplacement d'installation de HomeBrew et en activant les points d'ancrage de débogage --with-pydebug:
$ CPPFLAGS="-JE$ (infusion - préfixe zlib)/comprendre"
 LDFLAGS="-L$ (infusion - préfixe zlib)/ lib "
 ./configure --with-openssl=$ (brassage - préfixe openssl) --with-pydebug
Cela va générer un Makefile à la racine du référentiel que vous pouvez utiliser pour automatiser le processus de construction. le ./configurer Cette étape ne doit être exécutée qu’une fois. Vous pouvez construire le binaire CPython en lançant:
le -j2 le drapeau permet faire exécuter 2 tâches simultanément. Si vous avez 4 cœurs, vous pouvez le changer à 4. Le -s le drapeau arrête le Makefile de l'impression de chaque commande, il s'exécute sur la console. Vous pouvez supprimer cela, mais le résultat est très détaillé.
Lors de la construction, vous risquez de recevoir des erreurs et, dans le résumé, il vous avertira que tous les packages ne peuvent pas être générés. Par exemple, _dbm, _sqlite3, _uuid, nis, Ossaudiodev, spwd, et _tkinter ne parviendrait pas à construire avec cet ensemble d'instructions. C’est acceptable si vous n’avez pas l’intention de développer ces packages. Si vous l'êtes, consultez le site Web du guide de développement pour plus d'informations.
La construction prendra quelques minutes et générera un binaire appelé python.exe. Chaque fois que vous apportez des modifications au code source, vous devrez recommencer. faire avec les mêmes drapeaux.
le python.exe binary est le binaire de débogage de CPython. Exécuter python.exe pour voir un REPL qui fonctionne:
$ ./python.exe
Python 3.8.0b4 (tags / v3.8.0b4: d93605de72, 30 août 2019, 10:00:03)
[Clang 10.0.1 (clang-1001.0.46.4)]    sur darwin
Tapez "aide", "copyright", "crédits" ou "licence" pour plus d'informations.
>>>
Remarque:
Oui, c’est vrai, la construction de macOS a une extension de fichier pour .EXE. C'est ne pas parce que c’est un binaire Windows. MacOS étant doté d’un système de fichiers ne respectant pas la casse et travaillant avec le binaire, les développeurs ne voulaient pas que les utilisateurs se réfèrent accidentellement au répertoire. Python/ alors .EXE a été ajouté pour éviter toute ambiguïté.
Si vous courez plus tard faire installer ou faire altinstall, le fichier sera renommé en python.
Compiler CPython (Linux)
Pour Linux, la première étape consiste à télécharger et installer faire, gcc, configurer, et pkgconfig.
Pour Fedora Core, RHEL, CentOS ou d’autres systèmes à base de yum:
$ sudo yum installer yum-utils
Pour Debian, Ubuntu ou autre aptesystèmes à base de:
$ sudo apt install build-essential
Ensuite, installez les packages requis pour Fedora Core, RHEL, CentOS ou d’autres systèmes basés sur yum:
$ sudo yum-builddep python3
Pour Debian, Ubuntu ou autre aptesystèmes à base de:
$ sudo apt installer libssl-dev zlib1g-dev libncurses5-dev
  libncursesw5-dev libreadline-dev libsqlite3-dev libgdbm-dev
  libdb5.3-dev libbz2-dev libexpat1-dev liblzma-dev libffi-dev
Maintenant que vous avez les dépendances, vous pouvez lancer le configurer script, activant les crochets de débogage --with-pydebug:
$ ./configure --with-pydebug
Examinez les résultats pour vous assurer que la prise en charge OpenSSL est marquée comme OUI. Sinon, consultez votre distribution pour savoir comment installer les en-têtes pour OpenSSL.
Ensuite, vous pouvez construire le fichier binaire CPython en exécutant la commande générée. Makefile:
Lors de la construction, vous risquez de recevoir des erreurs et, dans le résumé, il vous avertira que tous les packages ne peuvent pas être générés. C’est acceptable si vous n’avez pas l’intention de développer ces packages. Si vous l'êtes, consultez le site Web du guide de développement pour plus d'informations.
La construction prendra quelques minutes et générera un binaire appelé python. C'est le binaire de débogage de CPython. Exécuter ./python pour voir un REPL qui fonctionne:
$ ./python
Python 3.8.0b4 (tags / v3.8.0b4: d93605de72, 30 août 2019, 10:00:03)
[Clang 10.0.1 (clang-1001.0.46.4)]    sur darwin
Tapez "aide", "copyright", "crédits" ou "licence" pour plus d'informations.
>>>
Compiler CPython (Windows)
Le dossier PC contient un fichier de projet Visual Studio pour la construction et l’exploration de CPython. Pour utiliser cela, Visual Studio doit être installé sur votre PC.
La dernière version de Visual Studio, Visual Studio 2019, facilite l'utilisation de Python et du code source CPython. Il est donc recommandé de l'utiliser dans ce didacticiel. Si Visual Studio 2017 est déjà installé, cela fonctionnera également correctement.
Aucune des fonctionnalités payantes n'est requise pour la compilation de CPython ou de ce tutoriel. Vous pouvez utiliser l'édition communautaire de Visual Studio, disponible gratuitement sur le site Web de Visual Studio de Microsoft.
Une fois le programme d’installation téléchargé, il vous sera demandé de sélectionner les composants à installer. Le strict minimum pour ce tutoriel est:
- le Développement Python charge de travail
- L'option Outils de développement natifs Python
- Python 3 64 bits (3.7.2) (peut être désélectionné si vous avez déjà installé Python 3.7)
Toute autre fonctionnalité optionnelle peut être désélectionnée si vous voulez être plus consciencieux avec l'espace disque:

Le programme d'installation téléchargera et installera ensuite tous les composants requis. L'installation peut prendre une heure, vous pouvez donc lire et revenir à cette section.
Une fois l’installateur terminé, cliquez sur le bouton lancement bouton pour démarrer Visual Studio. Vous serez invité à vous connecter. Si vous disposez d'un compte Microsoft, vous pouvez vous connecter ou ignorer cette étape.
Une fois que Visual Studio démarre, vous serez invité à ouvrir un projet. Un raccourci pour se lancer dans la configuration de Git et le clonage de CPython consiste à choisir le Cloner ou vérifier le code option:

Pour l'URL du projet, tapez https://github.com/python/cpython cloner:

Visual Studio téléchargera ensuite une copie de CPython à partir de GitHub en utilisant la version de Git fournie avec Visual Studio. Cette étape vous évite également d'avoir à installer Git sous Windows. Le téléchargement peut prendre 10 minutes.
Une fois le projet téléchargé, vous devez le diriger vers le pcbuild Fichier de solution, en cliquant sur Solutions et projets et en sélectionnant pcbuild.sln:

Une fois la solution chargée, il vous sera demandé de recibler le projet à l’intérieur de la solution vers la version du compilateur C / C ++ que vous avez installée. Visual Studio ciblera également la version du SDK Windows que vous avez installée.
Assurez-vous de changer la version du Kit de développement logiciel (SDK) Windows vers la dernière version installée et le jeu d’outils de la plate-forme sur la dernière version. Si vous avez manqué cette fenêtre, vous pouvez cliquer avec le bouton droit de la souris sur la solution dans le menu déroulant. Solutions et projets fenêtre et cliquez Solution de reciblage.
Une fois cette opération terminée, vous devez télécharger des fichiers source pour pouvoir construire le package CPython complet. À l'intérieur de PCBuild dossier il y a un .chauve souris fichier qui automatise cela pour vous. Ouvrez une invite de ligne de commande dans le dossier téléchargé. PCBuild et courir get_externals.bat:
    > get_externals.bat
Utilisation de py -3.7 (trouvé 3.7 avec py.exe)
Récupération de bibliothèques externes ...
Récupération de bzip2-1.0.6 ...
Récupération de sqlite-3.21.0.0 ...
Récupération de xz-5.2.2 ...
Récupération de zlib-1.2.11 ...
Récupération des fichiers binaires externes ...
Récupération de openssl-bin-1.1.0j ...
Récupération de tcltk-8.6.9.0 ...
Fini.
Ensuite, dans Visual Studio, construisez CPython en appuyant sur Ctrl+Décalage+Bou choisir Solution de construction dans le menu du haut. Si vous recevez des erreurs concernant l'absence du SDK Windows, assurez-vous de définir les paramètres de ciblage appropriés dans Solution de reciblage la fenêtre. Vous devriez aussi voir Kits Windows dans votre menu Démarrer, et Kit de développement logiciel Windows à l'intérieur de ce menu.
La phase de construction peut prendre 10 minutes ou plus pour la première fois. Une fois la construction terminée, vous pouvez voir quelques avertissements que vous pouvez ignorer et éventuellement compléter.
Pour démarrer la version de débogage de CPython, appuyez sur F5 et CPython démarrera en mode Debug directement dans le REPL:

Ceci fait, vous pouvez exécuter la version Release en modifiant la configuration de construction de Déboguer à Libération dans la barre de menus supérieure et réexécutez Build Solution.
Vous avez maintenant les versions Debug et Release du binaire CPython dans PCBuild win32 .
Vous pouvez configurer Visual Studio pour pouvoir ouvrir un REPL avec la version Release ou Debug en choisissant Outils->Python->Environnements Python dans le menu du haut:
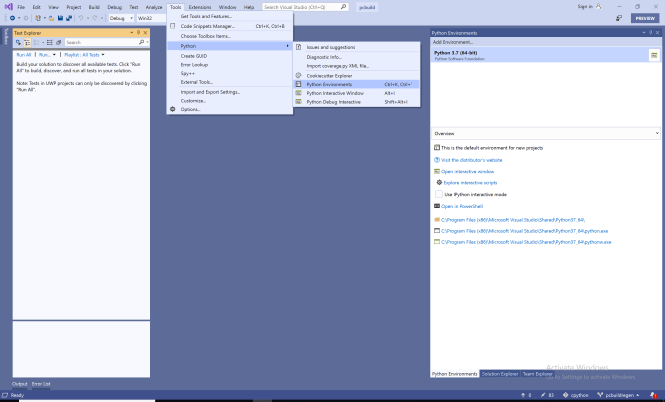
Puis clique Ajouter un environnement puis ciblez le binaire Debug ou Release. Le binaire de débogage se terminera par _d.exe, par exemple, python_d.exe et pythonw_d.exe. Vous voudrez probablement utiliser le binaire de débogage car il est fourni avec le support du débogage dans Visual Studio et sera utile pour ce tutoriel.
Dans la fenêtre Ajouter un environnement, ciblez le python_d.exe fichier en tant qu'interprète à l'intérieur du PCBuild / win32 et le pythonw_d.exe en tant qu'interprète fenêtré:

Maintenant, vous pouvez démarrer une session REPL en cliquant sur Ouvrir la fenêtre interactive dans la fenêtre Environnements Python et vous verrez le REPL pour la version compilée de Python:

Au cours de ce tutoriel, il y aura des sessions REPL avec des exemples de commandes. Je vous encourage à utiliser le binaire Debug pour exécuter ces sessions REPL au cas où vous souhaiteriez insérer des points d'arrêt dans le code.
Enfin, pour faciliter la navigation dans le code, dans la vue Solution, cliquez sur le bouton bascule en regard de l'icône Accueil pour passer en vue Dossier:

Maintenant que vous avez une version de CPython compilée et prête à l'emploi, voyons comment fonctionne le compilateur CPython.
Que fait un compilateur?
Le but d'un compilateur est de convertir une langue dans une autre. Pensez à un compilateur comme un traducteur. Vous engageriez un traducteur pour vous écouter en anglais, puis en japonais:

Certains compilateurs compileront un code machine de bas niveau pouvant être exécuté directement sur un système. D'autres compilateurs compileront dans un langage intermédiaire, qui sera exécuté par une machine virtuelle.
Une décision importante à prendre lors du choix d’un compilateur concerne les exigences de portabilité du système. Java et .NET CLR seront compilés dans un langage intermédiaire afin que le code compilé soit portable sur plusieurs architectures de systèmes. C, Go, C ++ et Pascal seront compilés en un exécutable de bas niveau qui ne fonctionnera que sur des systèmes similaires à celui qui a été compilé.
Étant donné que les applications Python sont généralement distribuées sous forme de code source, le rôle du moteur d'exécution Python consiste à convertir le code source Python et à l'exécuter en une seule étape. En interne, le runtime CPython compile votre code. Une idée fausse populaire est que Python est un langage interprété. C'est en fait compilé.
Le code Python n'est pas compilé en code machine. Il est compilé dans un langage intermédiaire spécial de bas niveau appelé bytecode que seul CPython comprend. Ce code est stocké dans .pyc fichiers dans un répertoire caché et mis en cache pour exécution. Si vous exécutez deux fois la même application Python sans changer le code source, ce sera toujours beaucoup plus rapide la deuxième fois. En effet, il charge le bytecode compilé et l'exécute directement.
Pourquoi CPython est-il écrit en C et non en Python?
le C in CPython est une référence au langage de programmation C, ce qui implique que cette distribution Python est écrite en langage C.
Cette affirmation est en grande partie vraie: le compilateur dans CPython est écrit en C pur. Cependant, de nombreux modules de bibliothèque standard sont écrits en Python pur ou une combinaison de C et Python.
Alors, pourquoi CPython est-il écrit en C et non en Python?
La réponse se trouve dans le fonctionnement des compilateurs. Il existe deux types de compilateur:
- Compilateurs auto-hébergés sont des compilateurs écrits dans le langage qu’ils compilent, tels que le compilateur Go.
- Compilateurs source à source sont des compilateurs écrits dans un autre langage qui ont déjà un compilateur.
Si vous écrivez un nouveau langage de programmation à partir de rien, vous avez besoin d’une application exécutable pour compiler votre compilateur! Vous avez besoin d’un compilateur pour tout exécuter. Ainsi, lorsque de nouveaux langages sont développés, ils sont souvent écrits en premier dans un langage plus ancien et plus établi.
Un bon exemple serait le langage de programmation Go. Le premier compilateur Go a été écrit en C, puis une fois que Go a pu être compilé, le compilateur a été réécrit en Go.
CPython a conservé son héritage C: de nombreux modules de bibliothèque standard, comme le ssl module ou le prises de courant module, sont écrites en C pour accéder aux API de système d'exploitation de bas niveau.
Les API des noyaux Windows et Linux pour créer des sockets réseau, travailler avec le système de fichiers ou interagir avec l’affichage sont toutes écrites en C. Il était donc logique que la couche d’extensibilité de Python se concentre sur le langage C. Plus loin dans cet article, nous aborderons la bibliothèque standard Python et les modules C.
Il existe un compilateur Python écrit en Python appelé PyPy. Le logo de PyPy est un Ouroboros destiné à représenter le caractère autonome du compilateur.
Jython est un autre exemple de compilateur croisé pour Python. Jython est écrit en Java et compilé à partir du code source Python en bytecode Java. De la même manière que CPython facilite l'importation de bibliothèques C et leur utilisation à partir de Python, Jython facilite l'importation et la référence de modules et de classes Java.
La spécification du langage Python
Le code source de CPython contient la définition du langage Python. C'est la spécification de référence utilisée par tous les interpréteurs Python.
La spécification est à la fois dans un format lisible par l'homme et par un ordinateur. La documentation contient une explication détaillée du langage Python, de ce qui est autorisé et du comportement de chaque instruction.
Documentation
Situé à l'intérieur du Doc / référence répertoire sont des explications reStructuredText de chacune des fonctionnalités du langage Python. Ceci constitue le guide de référence officiel Python sur docs.python.org.
Dans le répertoire se trouvent les fichiers dont vous avez besoin pour comprendre la langue, la structure et les mots-clés:
cpython / Doc / reference
|
├── compound_stmts.rst
├── datamodel.rst
├── exécutionmodèle.rst
├── expressions.rst
├── grammaire.rst
├── import.rst
├── index.rst
├── introduction.rst
├── analyse lexicale.rst
├── simple_stmts.rst
└── toplevel_components.rst
À l'intérieur compound_stmts.rst, la documentation des instructions composées, vous pouvez voir un exemple simple définissant le avec déclaration.
le avec Cette instruction peut être utilisée de différentes manières en Python, la plus simple étant l'instanciation d'un gestionnaire de contexte et d'un bloc de code imbriqué:
Vous pouvez affecter le résultat à une variable à l'aide de la touche comme mot-clé:
Vous pouvez également chaîner les gestionnaires de contexte avec une virgule:
avec X() comme y, z() comme jk:
   ...
Ensuite, nous explorerons la documentation lisible par ordinateur du langage Python.
Grammaire
La documentation contient la spécification du langage lisible par l'homme, et la spécification lisible par une machine est hébergée dans un seul fichier, Grammaire / Grammaire.
Le fichier de grammaire est écrit dans une notation contextuelle appelée forme Backus-Naur (BNF). BNF n'est pas spécifique à Python et est souvent utilisé comme notation pour les grammaires dans de nombreuses autres langues.
Le concept de structure grammaticale dans un langage de programmation s’inspire des travaux de Noam Chomsky sur les structures syntaxiques dans les années 1950!
Le fichier de grammaire de Python utilise la spécification Extended-BNF (EBNF) avec la syntaxe d’expression régulière. Donc, dans le fichier de grammaire, vous pouvez utiliser:
*pour la répétition+pour au moins une fois la répétition[]pour pièces optionnelles|pour des alternatives()pour grouper
Si vous recherchez le avec déclaration dans le fichier de grammaire, vers la ligne 80, vous verrez les définitions du avec déclaration:
with_stmt: 'avec' avec_item (',' avec_item) * ':' suite
with_item: test ['as' expr]
Tout ce qui est entre guillemets est un littéral de chaîne, qui définit les mots-clés. Alors le avec_stmt est spécifié comme:
- En commençant par le mot
avec - Suivi d'un
avec_l'item, qui est untesteret (éventuellement), le motcommeet une expression - Après un ou plusieurs éléments, séparés par une virgule
- Se terminant par un
: - Suivi d'un
suite
Il y a des références à d'autres définitions dans ces deux lignes:
suitefait référence à un bloc de code avec une ou plusieurs déclarationstesterse réfère à une déclaration simple qui est évaluéeexprse réfère à une expression simple
Si vous souhaitez explorer celles-ci en détail, l'ensemble de la grammaire Python est défini dans ce fichier unique.
Si vous souhaitez voir un exemple récent d'utilisation de la grammaire, dans PEP 572, le côlon est égal L’opérateur a été ajouté au fichier de grammaire dans ce commit Git.
En utilisant pgen
Le fichier de grammaire lui-même n'est jamais utilisé par le compilateur Python. Au lieu de cela, une table d’analyse créée par un outil appelé pgen est utilisé. pgen lit le fichier de grammaire et le convertit en table d'analyse. Si vous apportez des modifications au fichier de grammaire, vous devez régénérer la table d'analyse et recompiler Python.
Remarque: le pgen l’application a été réécrite en Python 3.8 de C à Python pur.
À voir pgen en action, changeons une partie de la grammaire Python. Autour de la ligne 51, vous verrez la définition de passer déclaration:
Changer cette ligne pour accepter le mot clé 'passer' ou 'procéder' comme mots-clés:
pass_stmt: 'pass' | 'procéder'
Maintenant, vous devez reconstruire les fichiers de grammaire.
Sur macOS et Linux, exécutez faire de la grammaire courir pgen sur le fichier de grammaire modifié. Pour Windows, il n’existe aucun moyen d’exécution officiel. pgen. Cependant, vous pouvez cloner ma fourchette et exécuter build.bat --regen de l'intérieur PCBuild annuaire.
Vous devriez voir une sortie semblable à celle-ci, montrant que la nouvelle Inclure / graminit.h et Python / graminit.c les fichiers ont été générés:
# Regenerate Doc / library / token-list.inc à partir de Grammar / Tokens
# using Tools / scripts / generate_token.py
...
python3 ./Tools/scripts/update_file.py ./Include/graminit.h ./Include/graminit.h.new
python3 ./Tools/scripts/update_file.py ./Python/graminit.c ./Python/graminit.c.new
Avec les tables d'analyse régénérées, vous devez recompiler CPython pour afficher la nouvelle syntaxe. Utilisez les mêmes étapes de compilation que celles que vous avez utilisées précédemment pour votre système d'exploitation.
Si le code compilé avec succès, vous pouvez exécuter votre nouveau fichier binaire CPython et démarrer un REPL.
Dans la réplique, vous pouvez maintenant essayer de définir une fonction et au lieu d'utiliser le passer déclaration, utilisez le procéder Autre mot clé que vous avez compilé dans la grammaire Python:
Python 3.8.0b4 (tags / v3.8.0b4: d93605de72, 30 août 2019, 10:00:03)
[Clang 10.0.1 (clang-1001.0.46.4)] sur darwin
Tapez "aide", "copyright", "crédits" ou "licence" pour plus d'informations.
>>> def exemple ():
... procéder
...
>>> exemple ()
Bien joué! Vous avez modifié la syntaxe CPython et compilé votre propre version de CPython. Expédier!
Nous allons ensuite explorer les jetons et leur relation avec la grammaire.
Jetons
A côté du fichier de grammaire dans le Grammaire le dossier est un Jetons fichier, qui contient chacun des types uniques trouvés en tant que nœud feuille dans une arborescence d'analyse syntaxique. Nous couvrirons les arbres d’analyseur en profondeur plus tard.
Chaque jeton a également un nom et un identifiant unique généré. Les noms sont utilisés pour simplifier la référence dans le tokenizer.
Remarque: le Jetons Le fichier est une nouvelle fonctionnalité de Python 3.8.
Par exemple, la parenthèse gauche est appelée LPARet les points-virgules sont appelés SEMI. Vous verrez ces jetons plus tard dans l'article:
LPAR '('
RPAR ')'
LSQB '['
RSQB                    ']'
COLON ':'
VIRGULE                   ','
SEMI ';'
Comme avec le Grammaire fichier, si vous modifiez le Jetons fichier, vous devez exécuter pgen encore.
Pour voir les jetons en action, vous pouvez utiliser le tokenize module en CPython. Créez un script Python simple appelé test_tokens.py:
# Bonjour le monde!
def ma_fonction():
   procéder
Pour le reste de ce tutoriel, ./python.exe fera référence à la version compilée de CPython. Cependant, la commande réelle dépendra de votre système.
Pour les fenêtres:
Pour Linux:
Pour macOS:
Puis passez ce fichier dans un module intégré à la bibliothèque standard appelée tokenize. Vous verrez la liste des jetons, par ligne et par caractère. Utilisez le -e flag pour afficher le nom exact du jeton:
$ ./python.exe -m tokenize -e test_tokens.py

0,0-0,0: ENCODING 'utf-8'
1,0-1,14: COMMENT '# Hello world!'
1,14-1,15: NL ' n'
2,0-2,3: NOM 'def'
2,4-2,15: NOM 'ma_fonction'
2,15-2,16: LPAR '('
2,16-2,17: RPAR ')'
2,17-2,18: COLON ':'
2,18-2,19: NEWLINE ' n'
3,0-3,3: INDENT ''
3,3-3,7: NOM 'continue'
3,7-3,8: NEWLINE ' n'
4,0-4,0: DEDENT ''
4,0-4,0: ENDMARKER ''
Dans la sortie, la première colonne correspond à la plage des coordonnées ligne / colonne, la deuxième colonne au nom du jeton et la dernière colonne à la valeur du jeton.
En sortie, le tokenize module a impliqué des jetons qui n'étaient pas dans le fichier. le CODAGE jeton pour utf-8et une ligne blanche à la fin, donnant RETENIR pour fermer la déclaration de fonction et un ENDMARKER pour terminer le fichier.
Il est recommandé de laisser une ligne vierge à la fin de vos fichiers source Python. Si vous l'omettez, CPython l'ajoute pour vous, avec une pénalité de performances minime.
le tokenize module est écrit en pur Python et est situé dans Lib / tokenize.py dans le code source CPython.
Important: Le code source de CPython contient deux tokenizer: un écrit en Python, présenté ici, et un autre écrit en C.
Le tokenizer écrit en Python est conçu comme un utilitaire et celui écrit en C est utilisé par le compilateur Python. Ils ont une sortie et un comportement identiques. La version écrite en C est conçue pour les performances et le module en Python est conçu pour le débogage.
Pour voir une lecture détaillée du tokenizer C, vous pouvez exécuter Python avec le -ré drapeau. En utilisant le test_tokens.py script que vous avez créé précédemment, exécutez-le avec les éléments suivants:
$ ./python.exe -d test_tokens.py

Token NAME / 'def' ... c'est un mot clé
    DFA 'file_input', état 0: appuyez sur 'stmt'
    DFA 'stmt', état 0: appuyez sur 'compound_stmt'
    DFA 'compound_stmt', état 0: appuyez sur 'funcdef'
    DFA 'funcdef', état 0: Shift.
Jeton NAME / 'my_function' ... c'est un jeton que nous connaissons
    DFA 'funcdef', état 1: Shift.
Jeton LPAR / '(' ... C'est un jeton que nous connaissons
    DFA 'funcdef', état 2: paramètres 'Push'
    DFA 'paramètres', état 0: Shift.
Jeton RPAR / ')' ... C'est un jeton que nous connaissons
    «Paramètres» DFA, état 1: Shift.
        «Paramètres» DFA, état 2: Pop directe.
Jeton COLON / ':' ... c'est un jeton que nous connaissons
    DFA 'funcdef', état 3: Shift.
Jeton NEWLINE / '' ... C'est un jeton que nous connaissons
    DFA 'funcdef', état 5: [switch func_body_suite to suite] Push 'suite'
    DFA 'suite', indiquez 0: Shift.
Jeton INDENT / '' ... C'est un jeton que nous connaissons
    «Suite» DFA, état 1: Shift.
Token NAME / 'continue' ... c'est un mot clé
    DFA 'suite', état 3: appuyez sur 'stmt'
...
        ACCEPTEZ.
Dans la sortie, vous pouvez voir qu'il est en surbrillance procéder en tant que mot clé. Dans le chapitre suivant, nous verrons comment l’exécution du fichier binaire Python est transmise au générateur de jetons et ce qui se passe à partir de là pour exécuter votre code.
Maintenant que vous avez une vue d'ensemble de la grammaire Python et de la relation entre les jetons et les instructions, il existe un moyen de convertir le pgen sortie dans un graphique interactif.
Voici une capture d'écran de la grammaire Python 3.8a2:

Le paquet Python utilisé pour générer ce graphique, instaviz, sera traité dans un chapitre ultérieur.
Gestion de la mémoire dans CPython
Tout au long de cet article, vous verrez des références à un PyArena objet. L’arène est l’une des structures de gestion de la mémoire de CPython. Le code est dans Python / pyarena.c et contient un wrapper autour des fonctions d’allocation de mémoire et de désallocation de C.
Dans un programme C traditionnellement écrit, le développeur devrait allouez de la mémoire pour les structures de données avant d'écrire dans ces données. Cette allocation marque la mémoire comme appartenant au processus avec le système d'exploitation.
Il appartient également au développeur de libérer, ou de libérer, la mémoire allouée lorsqu'elle n'est plus utilisée, et de la restituer dans la table des blocs de mémoire libre du système d'exploitation.
Si un processus alloue de la mémoire pour une variable, par exemple dans une fonction ou une boucle, lorsque cette fonction est terminée, la mémoire n'est pas automatiquement restituée au système d'exploitation en C. Ainsi, si elle n'a pas été explicitement désallouée dans le code C, cela provoque une fuite de mémoire. Le processus continuera à prendre plus de mémoire à chaque fois que cette fonction s'exécutera jusqu'à ce que le système manque de mémoire et se bloque!
Python enlève cette responsabilité au programmeur et utilise deux algorithmes: un compteur de références et un ramasse-miettes.
Chaque fois qu'un interprète est instancié, un PyArena est créé et associé à l’un des champs de l’interprète. Pendant le cycle de vie d'un interpréteur CPython, plusieurs arènes peuvent être attribuées. Ils sont connectés avec une liste chaînée. L’arène stocke une liste de pointeurs sur les objets Python en tant que PyListObject. Chaque fois qu'un nouvel objet Python est créé, un pointeur sur celui-ci est ajouté à l'aide de PyArena_AddPyObject (). Cet appel de fonction enregistre un pointeur dans la liste de l’arène, a_objects.
Même si Python n’a pas de pointeur, il existe des techniques intéressantes pour simuler le comportement des pointeurs.
le PyArena remplit une seconde fonction, qui consiste à allouer et référencer une liste de blocs de mémoire bruts. Par exemple, un PyList aurait besoin de mémoire supplémentaire si vous ajoutiez des milliers de valeurs supplémentaires. le PyList Le code C de l’objet n’alloue pas de mémoire directement. L'objet obtient des blocs bruts de mémoire du PyArena en appelant PyArena_Malloc () du PyObject avec la taille de mémoire requise. Cette tâche est complétée par une autre abstraction dans Objets / obmalloc.c. Dans le module d'allocation d'objet, la mémoire peut être allouée, libérée et réaffectée pour un objet Python.
Une liste chaînée de blocs alloués est stockée à l'intérieur de l'arène. Ainsi, lorsqu'un interprète est arrêté, tous les blocs de mémoire gérée peuvent être désalloués en une fois à l'aide de PyArena_Free ().
Prendre le PyListObject Exemple. Si tu devais .ajouter() à la fin d’une liste Python, il n’est pas nécessaire de réaffecter au préalable la mémoire utilisée dans la liste existante. le .ajouter() appels de méthode list_resize () qui gère l'allocation de mémoire pour les listes. Chaque objet de liste conserve une liste de la quantité de mémoire allouée. Si l'élément que vous ajoutez va entrer dans la mémoire libre existante, il est simplement ajouté. Si la liste nécessite plus d’espace mémoire, elle est développée. La longueur des listes est étendue à 0, 4, 8, 16, 25, 35, 46, 58, 72 et 88.
PyMem_Realloc () est appelé pour développer la mémoire allouée dans une liste. PyMem_Realloc () est un wrapper d'API pour pymalloc_realloc ().
Python a aussi un wrapper spécial pour l'appel C malloc (), qui définit la taille maximale de l’allocation de mémoire pour éviter les erreurs de débordement de la mémoire tampon (voir PyMem_RawMalloc ()).
En résumé:
- L’allocation des blocs de mémoire bruts se fait via
PyMem_RawAlloc (). - Les pointeurs sur les objets Python sont stockés dans la
PyArena. PyArenastocke également une liste chaînée de blocs de mémoire alloués.
Plus d'informations sur l'API sont détaillées dans la documentation CPython.
Comptage de références
Pour créer une variable en Python, vous devez attribuer une valeur à un uniquement variable nommée:
Chaque fois qu'une valeur est affectée à une variable en Python, le nom de la variable est vérifié dans la portée des variables locales et globales pour voir si elle existe déjà.
Parce que ma_variable n'est pas déjà dans le des locaux() ou globals () dictionnaire, ce nouvel objet est créé et la valeur est assignée comme étant la constante numérique 180392.
Il y a maintenant une référence à ma_variable, donc le compteur de référence pour ma_variable est incrémenté de 1.
You will see function calls Py_INCREF() et Py_DECREF() throughout the C source code for CPython. These functions increment and decrement the count of references to that object.
References to an object are decremented when a variable falls outside of the scope in which it was declared. Scope in Python can refer to a function or method, a comprehension, or a lambda function. These are some of the more literal scopes, but there are many other implicit scopes, like passing variables to a function call.
The handling of incrementing and decrementing references based on the language is built into the CPython compiler and the core execution loop, ceval.c, which we will cover in detail later in this article.
Whenever Py_DECREF() is called, and the counter becomes 0, the PyObject_Free() function is called. For that object PyArena_Free() is called for all of the memory that was allocated.
Garbage Collection
How often does your garbage get collected? Weekly, or fortnightly?
When you’re finished with something, you discard it and throw it in the trash. But that trash won’t get collected straight away. You need to wait for the garbage trucks to come and pick it up.
CPython has the same principle, using a garbage collection algorithm. CPython’s garbage collector is enabled by default, happens in the background and works to deallocate memory that’s been used for objects which are no longer in use.
Because the garbage collection algorithm is a lot more complex than the reference counter, it doesn’t happen all the time, otherwise, it would consume a huge amount of CPU resources. It happens periodically, after a set number of operations.
CPython’s standard library comes with a Python module to interface with the arena and the garbage collector, the gc module. Here’s how to use the gc module in debug mode:
>>> importation gc
>>> gc.set_debug(gc.DEBUG_STATS)
This will print the statistics whenever the garbage collector is run.
You can get the threshold after which the garbage collector is run by calling get_threshold():
>>> gc.get_threshold()
(700, 10, 10)
You can also get the current threshold counts:
>>> gc.get_count()
(688, 1, 1)
Lastly, you can run the collection algorithm manually:
This will call collect() à l'intérieur de Modules/gcmodule.c file which contains the implementation of the garbage collector algorithm.
Conclusion
In Part 1, you covered the structure of the source code repository, how to compile from source, and the Python language specification. These core concepts will be critical in Part 2 as you dive deeper into the Python interpreter process.
Part 2: The Python Interpreter Process
Now that you’ve seen the Python grammar and memory management, you can follow the process from typing python to the part where your code is executed.
There are five ways the python binary can be called:
- To run a single command with
-cand a Python command - To start a module with
-mand the name of a module - To run a file with the filename
- To run the
stdininput using a shell pipe - To start the REPL and execute commands one at a time
The three source files you need to inspect to see this process are:
Programs/python.cis a simple entry point.Modules/main.ccontains the code to bring together the whole process, loading configuration, executing code and clearing up memory.Python/initconfig.cloads the configuration from the system environment and merges it with any command-line flags.
This diagram shows how each of those functions is called:

The execution mode is determined from the configuration.
The CPython source code style:
Similar to the PEP8 style guide for Python code, there is an official style guide for the CPython C code, designed originally in 2001 and updated for modern versions.
There are some naming standards which help when navigating the source code:
-
Use a
Pyprefix for public functions, never for static functions. lePy_prefix is reserved for global service routines likePy_FatalError. Specific groups of routines (like specific object type APIs) use a longer prefix, such asPyString_for string functions. -
Public functions and variables use MixedCase with underscores, like this:
PyObject_GetAttr,Py_BuildValue,PyExc_TypeError. -
Occasionally an “internal” function has to be visible to the loader. We use the
_Pyprefix for this, for example,_PyObject_Dump. -
Macros should have a MixedCase prefix and then use upper case, for example
PyString_AS_STRING,Py_PRINT_RAW.
Establishing Runtime Configuration
In the swimlanes, you can see that before any Python code is executed, the runtime first establishes the configuration.
The configuration of the runtime is a data structure defined in Include/cpython/initconfig.h nommé PyConfig.
The configuration data structure includes things like:
- Runtime flags for various modes like debug and optimized mode
- The execution mode, such as whether a filename was passed,
stdinwas provided or a module name - Extended option, specified by
-X - Environment variables for runtime settings
The configuration data is primarily used by the CPython runtime to enable and disable various features.
Python also comes with several Command Line Interface Options. In Python you can enable verbose mode with the -v flag. In verbose mode, Python will print messages to the screen when modules are loaded:
$ ./python.exe -v -c "print('hello world')"


# installing zipimport hook
import zipimport # builtin
# installed zipimport hook
...
You will see a hundred lines or more with all the imports of your user site-packages and anything else in the system environment.
You can see the definition of this flag within Include/cpython/initconfig.h à l'intérieur de struct pour PyConfig:
/* --- PyConfig ---------------------------------------------- */

typedef struct {
    int _config_version;  /* Internal configuration version,
                                                                                                                    used for ABI compatibility */
    int _config_init;     /* _PyConfigInitEnum value */

    ...

    /* If greater than 0, enable the verbose mode: print a message each time a
                            module is initialized, showing the place (filename or built-in module)
                            from which it is loaded.

                            If greater or equal to 2, print a message for each file that is checked
                            for when searching for a module. Also provides information on module
                            cleanup at exit.

                            Incremented by the -v option. Set by the PYTHONVERBOSE environment
                            variable. If set to -1 (default), inherit Py_VerboseFlag value. * /
    int verbeux;
Dans Python/initconfig.c, the logic for reading settings from environment variables and runtime command-line flags is established.
dans le config_read_env_vars function, the environment variables are read and used to assign the values for the configuration settings:
statique PyStatus
config_read_env_vars(PyConfig *config)
{
    PyStatus statut;
    int use_env = config->use_environment;

    /* Get environment variables */
    _Py_get_env_flag(use_env, Etconfig->parser_debug, "PYTHONDEBUG");
    _Py_get_env_flag(use_env, Etconfig->verbeux, "PYTHONVERBOSE");
    _Py_get_env_flag(use_env, Etconfig->optimization_level, "PYTHONOPTIMIZE");
    _Py_get_env_flag(use_env, Etconfig->inspecter, "PYTHONINSPECT");
For the verbose setting, you can see that the value of PYTHONVERBOSE is used to set the value of &config->verbose, if PYTHONVERBOSE is found. If the environment variable does not exist, then the default value of -1 will remain.
Then in config_parse_cmdline dans initconfig.c again, the command-line flag is used to set the value, if provided:
statique PyStatus
config_parse_cmdline(PyConfig *config, PyWideStringList *warnoptions,
                     Py_ssize_t *opt_index)

...

        commutateur (c)
...

        Cas 'v':
            config->verbeux++;
            Pause;
...
        /* This space reserved for other options */

        défaut:
            /* unknown argument: parsing failed */
            config_usage(1, programme);
            revenir _PyStatus_EXIT(2);

     tandis que (1);
This value is later copied to a global variable Py_VerboseFlag par le _Py_GetGlobalVariablesAsDict une fonction.
Within a Python session, you can access the runtime flags, like verbose mode, quiet mode, using the sys.flags named tuple.
le -X flags are all available inside the sys._xoptions dictionary:
$ ./python.exe -X dev -q

>>> importation sys
>>> sys.drapeaux
sys.flags(debug=0, inspect=0, interactive=0, optimize=0, dont_write_bytecode=0,
    no_user_site=0, no_site=0, ignore_environment=0, verbose=0, bytes_warning=0,
    quiet=1, hash_randomization=1, isolated=0, dev_mode=True, utf8_mode=0)

>>> sys._xoptions
'dev': True
As well as the runtime configuration in initconfig.h, there is also the build configuration, which is located inside pyconfig.h in the root folder. This file is created dynamically in the configurer step in the build process, or by Visual Studio for Windows systems.
You can see the build configuration by running:
$ ./python.exe -m sysconfig
Reading Files/Input
Once CPython has the runtime configuration and the command-line arguments, it can establish what it needs to execute.
This task is handled by the pymain_main function inside Modules/main.c. Depending on the newly created config instance, CPython will now execute code provided via several options.
Input via -c
The simplest is providing CPython a command with the -c option and a Python program inside quotes.
Par exemple:
$ ./python.exe -c "print('hi')"
salut
Here is the full flowchart of how this happens:
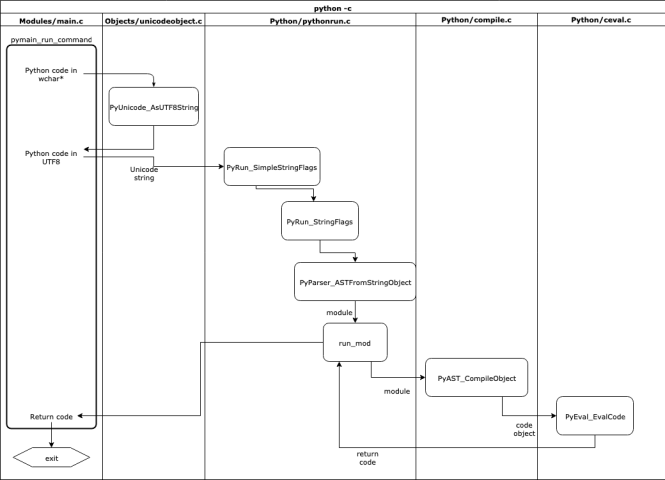
Premièrement le pymain_run_command() function is executed inside Modules/main.c taking the command passed in -c as an argument in the C type wchar_t*. le wchar_t* type is often used as a low-level storage type for Unicode data across CPython as the size of the type can store UTF8 characters.
When converting the wchar_t* to a Python string, the Objects/unicodeobject.c file has a helper function PyUnicode_FromWideChar() that returns a PyObject, of type str. The encoding to UTF8 is then done by PyUnicode_AsUTF8String() on the Python str object to convert it to a Python octets object.
Once this is complete, pymain_run_command() will then pass the Python bytes object to PyRun_SimpleStringFlags() for execution, but first converting the octets à un str type again:
statique int
pymain_run_command(wchar_t *commander, PyCompilerFlags *cf)

    PyObject *unicode, *octets;
    int ret;

    unicode = PyUnicode_FromWideChar(commander, -1);
    si (unicode == NULL)
        goto Erreur;


    si (PySys_Audit("cpython.run_command", "O", unicode) < 0)
        revenir pymain_exit_err_print();


    octets = PyUnicode_AsUTF8String(unicode);
    Py_DECREF(unicode);
    si (octets == NULL)
        goto Erreur;


    ret = PyRun_SimpleStringFlags(PyBytes_AsString(octets), cf);
    Py_DECREF(octets);
    revenir (ret != 0);

Erreur:
    PySys_WriteStderr("Unable to decode the command from the command line: n");
    revenir pymain_exit_err_print();
The conversion of wchar_t* to Unicode, bytes, and then a string is roughly equivalent to the following:
unicode = str(commander)
bytes_ = octets(unicode.encoder('utf8'))
# call PyRun_SimpleStringFlags with bytes_
le PyRun_SimpleStringFlags() function is part of Python/pythonrun.c. It’s purpose is to turn this simple command into a Python module and then send it on to be executed.
Since a Python module needs to have __main__ to be executed as a standalone module, it creates that automatically:
int
PyRun_SimpleStringFlags(const carboniser *commander, PyCompilerFlags *drapeaux)

    PyObject *m, *ré, *v;
    m = PyImport_AddModule("__main__");
    si (m == NULL)
        revenir -1;
    ré = PyModule_GetDict(m);
    v = PyRun_StringFlags(commander, Py_file_input, ré, ré, drapeaux);
    si (v == NULL)
        PyErr_Print();
        revenir -1;

    Py_DECREF(v);
    revenir 0;
Une fois que PyRun_SimpleStringFlags() has created a module and a dictionary, it calls PyRun_StringFlags(), which creates a fake filename and then calls the Python parser to create an AST from the string and return a module, mod:
PyObject *
PyRun_StringFlags(const carboniser *str, int début, PyObject *globals,
                  PyObject *des locaux, PyCompilerFlags *drapeaux)
{
...
    mod = PyParser_ASTFromStringObject(str, filename, début, drapeaux, arène);
    si (mod != NULL)
        ret = run_mod(mod, filename, globals, des locaux, drapeaux, arène);
    PyArena_Free(arène);
    revenir ret;
You’ll dive into the AST and Parser code in the next section.
Input via -m
Another way to execute Python commands is by using the -m option with the name of a module.
A typical example is python -m unittest to run the unittest module in the standard library.
Being able to execute modules as scripts were initially proposed in PEP 338 and then the standard for explicit relative imports defined in PEP366.
The use of the -m flag implies that within the module package, you want to execute whatever is inside __main__. It also implies that you want to search sys.path for the named module.
This search mechanism is why you don’t need to remember where the unittest module is stored on your filesystem.
Inside Modules/main.c there is a function called when the command-line is run with the -m flag. The name of the module is passed as the modname argument.
CPython will then import a standard library module, runpy and execute it using PyObject_Call(). The import is done using the C API function PyImport_ImportModule(), found within the Python/import.c fichier:
statique int
pymain_run_module(const wchar_t *modname, int set_argv0)

    PyObject *module, *runpy, *runmodule, *runargs, *résultat;
    runpy = PyImport_ImportModule("runpy");
 ...
    runmodule = PyObject_GetAttrString(runpy, "_run_module_as_main");
 ...
    module = PyUnicode_FromWideChar(modname, wcslen(modname));
 ...
    runargs = Py_BuildValue("(Oi)", module, set_argv0);
 ...
    résultat = PyObject_Call(runmodule, runargs, NULL);
 ...
    si (résultat == NULL)
        revenir pymain_exit_err_print();

    Py_DECREF(résultat);
    revenir 0;
In this function you’ll also see 2 other C API functions: PyObject_Call() et PyObject_GetAttrString(). Parce que PyImport_ImportModule() returns a PyObject*, the core object type, you need to call special functions to get attributes and to call it.
In Python, if you had an object and wanted to get an attribute, then you could call getattr(). In the C API, this call is PyObject_GetAttrString(), which is found in Objects/object.c. If you wanted to run a callable, you would give it parentheses, or you can run the __call__() property on any Python object. le __call__() method is implemented inside Objects/object.c:
salut = "hi!"
salut.plus haut() == salut.plus haut.__call__()  # this is the same
le runpy module is written in pure Python and located in Lib/runpy.py.
Executing python -m is equivalent to running python -m runpy . le runpy module was created to abstract the process of locating and executing modules on an operating system.
runpy does a few things to run the target module:
- Calls
__import__()for the module name you provided - Ensembles
__name__(the module name) to a namespace called__main__ - Executes the module within the
__main__espace de noms
le runpy module also supports executing directories and zip files.
Input via Filename
If the first argument to python was a filename, such as python test.py, then CPython will open a file handle, similar to using open() in Python and pass the handle to PyRun_SimpleFileExFlags() à l'intérieur Python/pythonrun.c.
There are 3 paths this function can take:
- If the file path is a
.pycfile, it will callrun_pyc_file(). - If the file path is a script file (
.py) it will runPyRun_FileExFlags(). - If the filepath is
stdinbecause the user rancommand | pythonthen treatstdinas a file handle and runPyRun_FileExFlags().
int
PyRun_SimpleFileExFlags(FICHIER *fp, const carboniser *filename, int closeit,
PyCompilerFlags *drapeaux)
...
m = PyImport_AddModule("__main__");
...
si (maybe_pyc_file(fp, filename, poste, closeit))
...
v = run_pyc_file(pyc_fp, filename, ré, ré, drapeaux);
autre
/* When running from stdin, leave __main__.__loader__ alone */
si (strcmp(filename, "" ) != 0 &&
set_main_loader(ré, filename, "SourceFileLoader") < 0)
fprintf(stderr, "python: failed to set __main__.__loader__ n");
ret = -1;
goto terminé;
v = PyRun_FileExFlags(fp, filename, Py_file_input, ré, ré,
closeit, drapeaux);
...
revenir ret;
Input via File With PyRun_FileExFlags()
Pour stdin and basic script files, CPython will pass the file handle to PyRun_FileExFlags() située dans le pythonrun.c fichier.
The purpose of PyRun_FileExFlags() est similaire à PyRun_SimpleStringFlags() utilisé pour le -c input. CPython will load the file handle into PyParser_ASTFromFileObject(). We’ll cover the Parser and AST modules in the next section.
Because this is a full script, it doesn’t need the PyImport_AddModule("__main__"); step used by -c:
PyObject *
PyRun_FileExFlags(FICHIER *fp, const carboniser *filename_str, int début, PyObject *globals,
                  PyObject *des locaux, int closeit, PyCompilerFlags *drapeaux)

 ...
    mod = PyParser_ASTFromFileObject(fp, filename, NULL, début, 0, 0,
                                     drapeaux, NULL, arène);
 ...
    ret = run_mod(mod, filename, globals, des locaux, drapeaux, arène);
Identical to PyRun_SimpleStringFlags(), once PyRun_FileExFlags() has created a Python module from the file, it sent it to run_mod() to be executed.
run_mod() is found within Python/pythonrun.c, and sends the module to the AST to be compiled into a code object. Code objects are a format used to store the bytecode operations and the format kept in .pyc files:
statique PyObject *
run_mod(mod_ty mod, PyObject *filename, PyObject *globals, PyObject *des locaux,
            PyCompilerFlags *drapeaux, PyArena *arène)

    PyCodeObject *co;
    PyObject *v;
    co = PyAST_CompileObject(mod, filename, drapeaux, -1, arène);
    si (co == NULL)
        revenir NULL;

    si (PySys_Audit("exec", "O", co) < 0)
        Py_DECREF(co);
        revenir NULL;


    v = run_eval_code_obj(co, globals, des locaux);
    Py_DECREF(co);
    revenir v;
We will cover the CPython compiler and bytecodes in the next section. The call to run_eval_code_obj() is a simple wrapper function that calls PyEval_EvalCode() dans le Python/eval.c fichier. le PyEval_EvalCode() function is the main evaluation loop for CPython, it iterates over each bytecode statement and executes it on your local machine.
Input via Compiled Bytecode With run_pyc_file()
dans le PyRun_SimpleFileExFlags() there was a clause for the user providing a file path to a .pyc fichier. If the file path ended in .pyc then instead of loading the file as a plain text file and parsing it, it will assume that the .pyc file contains a code object written to disk.
le run_pyc_file() function inside Python/pythonrun.c then marshals the code object from the .pyc file by using the file handle. Marshaling is a technical term for copying the contents of a file into memory and converting them to a specific data structure. The code object data structure on the disk is the CPython compiler’s way to caching compiled code so that it doesn’t need to parse it every time the script is called:
statique PyObject *
run_pyc_file(FICHIER *fp, const carboniser *filename, PyObject *globals,
             PyObject *des locaux, PyCompilerFlags *drapeaux)
 !PyCode_Check(v))
        Py_XDECREF(v);
        PyErr_SetString(PyExc_RuntimeError,
                   "Bad code object in .pyc file");
        goto Erreur;

    fclose(fp);
    co = (PyCodeObject *)v;
    v = run_eval_code_obj(co, globals, des locaux);
    si (v && drapeaux)
        drapeaux->cf_flags
Once the code object has been marshaled to memory, it is sent to run_eval_code_obj(), which calls Python/ceval.c to execute the code.
Lexing and Parsing
In the exploration of reading and executing Python files, we dived as deep as the parser and AST modules, with function calls to PyParser_ASTFromFileObject().
Sticking within Python/pythonrun.c, le PyParser_ASTFromFileObject() function will take a file handle, compiler flags and a PyArena instance and convert the file object into a node object using PyParser_ParseFileObject().
With the node object, it will then convert that into a module using the AST function PyAST_FromNodeObject():
mod_ty
PyParser_ASTFromFileObject(FICHIER *fp, PyObject *filename, const carboniser* enc,
                           int début, const carboniser *ps1,
                           const carboniser *ps2, PyCompilerFlags *drapeaux, int *errcode,
                           PyArena *arène)
{
    ...
    nœud *n = PyParser_ParseFileObject(fp, filename, enc,
                                       Et_PyParser_Grammar,
                                       début, ps1, ps2, Etse tromper, Etiflags);
    ...
    si (n) = iflags Et PyCF_MASK;
        mod = PyAST_FromNodeObject(n, drapeaux, filename, arène);
        PyNode_Free(n);
    ...
    revenir mod;
Pour PyParser_ParseFileObject() we switch to Parser/parsetok.c and the parser-tokenizer stage of the CPython interpreter. This function has two important tasks:
- Instantiate a tokenizer state
tok_stateen utilisantPyTokenizer_FromFile()dansParser/tokenizer.c - Convert the tokens into a concrete parse tree (a list of
nœud) usingparsetok()dansParser/parsetok.c
nœud *
PyParser_ParseFileObject(FICHIER *fp, PyObject *filename,
                         const carboniser *enc, grammaire *g, int début,
                         const carboniser *ps1, const carboniser *ps2,
                         perrdetail *err_ret, int *drapeaux)

    struct tok_state *tok;
...
    si ((tok = PyTokenizer_FromFile(fp, enc, ps1, ps2)) == NULL)
        err_ret->Erreur = E_NOMEM;
        revenir NULL;

...
    revenir parsetok(tok, g, début, err_ret, drapeaux);
tok_state (defined in Parser/tokenizer.h) is the data structure to store all temporary data generated by the tokenizer. It is returned to the parser-tokenizer as the data structure is required by parsetok() to develop the concrete syntax tree.
Inside parsetok(), it will use the tok_state structure and make calls to tok_get() in a loop until the file is exhausted and no more tokens can be found.
tok_get(), defined in Parser/tokenizer.c behaves like an iterator. It will keep returning the next token in the parse tree.
tok_get() is one of the most complex functions in the whole CPython codebase. It has over 640 lines and includes decades of heritage with edge cases, new language features, and syntax.
One of the simpler examples would be the part that converts a newline break into a NEWLINE token:
statique int
tok_get(struct tok_state *tok, carboniser **p_start, carboniser **p_end)

...
    /* Newline */
    si (c == 'n')  tok->niveau > 0)
            goto nextline;

        *p_start = tok->début;
        *p_end = tok->cabot - 1; /* Leave 'n' out of the string */
        tok->cont_line = 0;
        si (tok->async_def)
            /* We're somewhere inside an 'async def' function, and
                                                            we've encountered a NEWLINE after its signature. * /
            tok->async_def_nl = 1;

        revenir NEWLINE;

...
Dans ce cas, NEWLINE is a token, with a value defined in Include/token.h. All tokens are constant int values, and the Include/token.h file was generated earlier when we ran make regen-grammar.
le nœud type returned by PyParser_ParseFileObject() is going to be essential for the next stage, converting a parse tree into an Abstract-Syntax-Tree (AST):
typedef struct _node
    court               n_type;
    carboniser                *n_str;
    int                 n_lineno;
    int                 n_col_offset;
    int                 n_nchildren;
    struct _node        *n_child;
    int                 n_end_lineno;
    int                 n_end_col_offset;
 nœud;
Since the CST is a tree of syntax, token IDs, and symbols, it would be difficult for the compiler to make quick decisions based on the Python language.
That is why the next stage is to convert the CST into an AST, a much higher-level structure. This task is performed by the Python/ast.c module, which has both a C and Python API.
Before you jump into the AST, there is a way to access the output from the parser stage. CPython has a standard library module analyseur, which exposes the C functions with a Python API.
The module is documented as an implementation detail of CPython so that you won’t see it in other Python interpreters. Also the output from the functions is not that easy to read.
The output will be in the numeric form, using the token and symbol numbers generated by the make regen-grammar stage, stored in Include/token.h:
>>> de pprint importation pprint
>>> importation analyseur
>>> st = analyseur.expr('a + 1')
>>> pprint(analyseur.st2list(st))
[258[258[258[258
    [332[332[332[332
        [306[306[306[306
            [310[310[310[310
                [311[311[311[311
                    [312[312[312[312
                        [313[313[313[313
                            [316[316[316[316
                                [317[317[317[317
                                    [318[318[318[318
                                        [319[319[319[319
                                            [320[320[320[320
                                                [321,[322,[323,[324,[325,[321,[322,[323,[324,[325,[321,[322,[323,[324,[325,[321, [322, [323, [324, [325, [1, 'a']]]]]],
            [14, '+'],
            [321, [322, [323, [324, [325, [2, '1']]]]]]]]]]]]]]]]],
 [4, ''],
 [0, '']]
To make it easier to understand, you can take all the numbers in the symbole et jeton modules, put them into a dictionary and recursively replace the values in the output of parser.st2list() with the names:
importation symbole
importation jeton
importation analyseur

def lex(expression):
    des symboles = v: k pour k, v dans symbole.__dict__.articles() si isinstance(v, int)
    jetons = v: k pour k, v dans jeton.__dict__.articles() si isinstance(v, int)
    lexique = **des symboles, **jetons
    st = analyseur.expr(expression)
    st_list = analyseur.st2list(st)

    def remplacer(l: liste):
        r = []
        pour je dans l:
            si isinstance(je, liste):
                r.ajouter(remplacer(je))
            autre:
                si je dans lexique:
                    r.ajouter(lexique[[[[je])
                autre:
                    r.ajouter(je)
        revenir r

    revenir remplacer(st_list)
You can run lex() with a simple expression, like a + 1 to see how this is represented as a parser-tree:
>>> de pprint importation pprint
>>> pprint(lex('a + 1'))

['eval_input'['eval_input'['eval_input'['eval_input'
    ['testlist'['testlist'['testlist'['testlist'
        ['test'['test'['test'['test'
            ['or_test'['or_test'['or_test'['or_test'
                ['and_test'['and_test'['and_test'['and_test'
                    ['not_test'['not_test'['not_test'['not_test'
                        ['comparison'['comparison'['comparison'['comparison'
                            ['expr'['expr'['expr'['expr'
                                ['xor_expr'['xor_expr'['xor_expr'['xor_expr'
                                    ['and_expr'['and_expr'['and_expr'['and_expr'
                                        ['shift_expr'['shift_expr'['shift_expr'['shift_expr'
                                            ['arith_expr'['arith_expr'['arith_expr'['arith_expr'
                                                ['term'['term'['term'['term'
                                                    ['factor',['power',['atom_expr',['atom',['factor',['power',['atom_expr',['atom',['factor',['power',['atom_expr',['atom',['factor', ['power', ['atom_expr', ['atom', ['NAME', 'a']]]]]],
            ['PLUS', '+'],
                                                ['term'['term'['term'['term'
                                                    ['factor'['factor'['factor'['factor'
                                                        ['power',['atom_expr',['atom',['power',['atom_expr',['atom',['power',['atom_expr',['atom',['power', ['atom_expr', ['atom', ['NUMBER', '1']]]]]]]]]]]]]]]]],
 ['NEWLINE', ''],
 ['ENDMARKER', '']]
In the output, you can see the symbols in lowercase, such as 'test' and the tokens in uppercase, such as 'NUMBER'.
Abstract Syntax Trees
The next stage in the CPython interpreter is to convert the CST generated by the parser into something more logical that can be executed. The structure is a higher-level representation of the code, called an Abstract Syntax Tree (AST).
ASTs are produced inline with the CPython interpreter process, but you can also generate them in both Python using the ast module in the Standard Library as well as through the C API.
Before diving into the C implementation of the AST, it would be useful to understand what an AST looks like for a simple piece of Python code.
To do this, here’s a simple app called instaviz for this tutorial. It displays the AST and bytecode instructions (which we’ll cover later) in a Web UI.
To install instaviz:
Then, open up a REPL by running python at the command line with no arguments:
>>> importation instaviz
>>> def Exemple():
                            a = 1
                            b = a + 1
                            return b

>>> instaviz.spectacle(Exemple)
You’ll see a notification on the command-line that a web server has started on port 8080. If you were using that port for something else, you can change it by calling instaviz.show(example, port=9090) or another port number.
In the web browser, you can see the detailed breakdown of your function:

The bottom left graph is the function you declared in REPL, represented as an Abstract Syntax Tree. Each node in the tree is an AST type. They are found in the ast module, and all inherit from _ast.AST.
Some of the nodes have properties which link them to child nodes, unlike the CST, which has a generic child node property.
For example, if you click on the Assign node in the center, this links to the line b = a + 1:

It has two properties:
des ciblesis a list of names to assign. It is a list because you can assign to multiple variables with a single expression using unpackingvaleuris the value to assign, which in this case is aBinOpstatement,a + 1.
If you click on the BinOp statement, it shows the properties of relevance:
la gauche: the node to the left of the operatorop: the operator, in this case, anAjouternode (+) for additiondroite: the node to the right of the operator

Compiling an AST in C is not a straightforward task, so the Python/ast.c module is over 5000 lines of code.
There are a few entry points, forming part of the AST’s public API. In the last section on the lexer and parser, you stopped when you’d reached the call to PyAST_FromNodeObject(). By this stage, the Python interpreter process had created a CST in the format of node * tree.
Jumping then into PyAST_FromNodeObject() à l'intérieur Python/ast.c, you can see it receives the node * tree, the filename, compiler flags, and the PyArena.
The return type from this function is mod_ty, defined in Include/Python-ast.h. mod_ty is a container structure for one of the 5 module types in Python:
ModuleInteractiveExpressionFunctionTypeSuite
Dans Include/Python-ast.h you can see that an Expression type requires a field corps, which is an expr_ty type. le expr_ty type is also defined in Include/Python-ast.h:
enum _mod_kind Module_kind=1, Interactive_kind=2, Expression_kind=3,
                 FunctionType_kind=4, Suite_kind=5;
struct _mod
    enum _mod_kind gentil;
    syndicat
        struct
            asdl_seq *corps;
            asdl_seq *type_ignores;
         Module;

        struct
            asdl_seq *corps;
         Interactive;

        struct
            expr_ty corps;
         Expression;

        struct
            asdl_seq *argtypes;
            expr_ty résultats;
         FunctionType;

        struct
            asdl_seq *corps;
         Suite;

     v;
;
The AST types are all listed in Parser/Python.asdl. You will see the module types, statement types, expression types, operators, and comprehensions all listed. The names of the types in this document relate to the classes generated by the AST and the same classes named in the ast standard module library.
The parameters and names in Include/Python-ast.h correlate directly to those specified in Parser/Python.asdl:
-- ASDL's 5 builtin types are:
-- identifier, int, string, object, constant

module Python
{
    mod = Module(stmt* body, type_ignore *type_ignores)
        | Interactive(stmt* body)
        | Expression(expr body)
        | FunctionType(expr* argtypes, expr returns)
The C header file and structures are there so that the Python/ast.c program can quickly generate the structures with pointers to the relevant data.
Regarder PyAST_FromNodeObject() you can see that it is essentially a commutateur statement around the result from TYPE(n). TYPE() is one of the core functions used by the AST to determine what type a node in the concrete syntax tree is. In the case of PyAST_FromNodeObject() it’s just looking at the first node, so it can only be one of the module types defined as Module, Interactive, Expression, FunctionType.
The result of TYPE() will be either a symbol or token type, which we’re very familiar with by this stage.
Pour file_input, the results should be a Module. Modules are a series of statements, of which there are a few types. The logic to traverse the children of n and create statement nodes is within ast_for_stmt(). This function is called either once, if there is only 1 statement in the module, or in a loop if there are many. The resulting Module is then returned with the PyArena.
Pour eval_input, the result should be an Expression. The result from CHILD(n ,0), which is the first child of n is passed to ast_for_testlist() which returns an expr_ty type. Ce expr_ty est envoyé à Expression() with the PyArena to create an expression node, and then passed back as a result:
mod_ty
PyAST_FromNodeObject(const nœud *n, PyCompilerFlags *drapeaux,
                     PyObject *filename, PyArena *arène)
{
    ...
    commutateur (TYPE(n))
        Cas file_input:
            stmts = _Py_asdl_seq_new(num_stmts(n), arène);
            si (!stmts)
                goto en dehors;
            pour (je = 0; je < NCH(n) - 1; je++)
                ch = ENFANT(n, je);
                si (TYPE(ch) == NEWLINE)
                    continuer;
                REQ(ch, stmt);
                num = num_stmts(ch);
                si (num == 1)
                    s = ast_for_stmt(Etc, ch);
                    si (!s)
                        goto en dehors;
                    asdl_seq_SET(stmts, k++, s);

                autre
                    ch = ENFANT(ch, 0);
                    REQ(ch, simple_stmt);
                    pour (j = 0; j < num; j++)
                        s = ast_for_stmt(Etc, ENFANT(ch, j * 2));
                        si (!s)
                            goto en dehors;
                        asdl_seq_SET(stmts, k++, s);


            /* Type ignores are stored under the ENDMARKER in file_input. * /
            ...

            res = Module(stmts, type_ignores, arène);
            Pause;
        Cas eval_input:
            expr_ty testlist_ast;

            /* XXX Why not comp_for here? * /
            testlist_ast = ast_for_testlist(Etc, ENFANT(n, 0));
            si (!testlist_ast)
                goto en dehors;
            res = Expression(testlist_ast, arène);
            Pause;

        Cas single_input:
            ...
            Pause;
        Cas func_type_input:
            ...
        ...
    revenir res;
Inside the ast_for_stmt() function, there is another commutateur statement for each possible statement type (simple_stmt, compound_stmt, and so on) and the code to determine the arguments to the node class.
One of the simpler functions is for the power expression, i.e., 2**4 is 2 to the power of 4. This function starts by getting the ast_for_atom_expr(), which is the number 2 in our example, then if that has one child, it returns the atomic expression. If it has more than one child, it will get the right-hand (the number 4) and return a BinOp (binary operation) with the operator as Pow (power), the left hand of e (2), and the right hand of f (4):
statique expr_ty
ast_for_power(struct compiler *c, const nœud *n)

    /* power: atom trailer* ('**' factor)*
                    * /
    expr_ty e;
    REQ(n, Puissance);
    e = ast_for_atom_expr(c, ENFANT(n, 0));
    si (!e)
        revenir NULL;
    si (NCH(n) == 1)
        revenir e;
    si (TYPE(ENFANT(n, NCH(n) - 1)) == facteur)
        expr_ty f = ast_for_expr(c, ENFANT(n, NCH(n) - 1));
        si (!f)
            revenir NULL;
        e = BinOp(e, Pow, f, LINENO(n), n->n_col_offset,
                  n->n_end_lineno, n->n_end_col_offset, c->c_arena);

    revenir e;
You can see the result of this if you send a short function to the instaviz module:
>>> def foo():
                            2**4
>>> importation instaviz
>>> instaviz.spectacle(foo)

In the UI you can also see the corresponding properties:

In summary, each statement type and expression has a corresponding ast_for_*() function to create it. The arguments are defined in Parser/Python.asdl and exposed via the ast module in the standard library. If an expression or statement has children, then it will call the corresponding ast_for_* child function in a depth-first traversal.
Conclusion
CPython’s versatility and low-level execution API make it the ideal candidate for an embedded scripting engine. You will see CPython used in many UI applications, such as Game Design, 3D graphics and system automation.
The interpreter process is flexible and efficient, and now you have an understanding of how it works you’re ready to understand the compiler.
Part 3: The CPython Compiler and Execution Loop
In Part 2, you saw how the CPython interpreter takes an input, such as a file or string, and converts it into a logical Abstract Syntax Tree. We’re still not at the stage where this code can be executed. Next, we have to go deeper to convert the Abstract Syntax Tree into a set of sequential commands that the CPU can understand.
Compiling
Now the interpreter has an AST with the properties required for each of the operations, functions, classes, and namespaces. It is the job of the compiler to turn the AST into something the CPU can understand.
This compilation task is split into 2 parts:
- Traverse the tree and create a control-flow-graph, which represents the logical sequence for execution
- Convert the nodes in the CFG to smaller, executable statements, known as byte-code
Earlier, we were looking at how files are executed, and the PyRun_FileExFlags() fonctionner dans Python/pythonrun.c. Inside this function, we converted the FICHIER handle into a mod, of type mod_ty. This task was completed by PyParser_ASTFromFileObject(), which in turns calls the tokenizer, parser-tokenizer and then the AST:
PyObject *
PyRun_FileExFlags(FICHIER *fp, const carboniser *filename_str, int début, PyObject *globals,
                  PyObject *des locaux, int closeit, PyCompilerFlags *drapeaux)

 ...
    mod = PyParser_ASTFromFileObject(fp, filename, NULL, début, 0, 0,
 ...
    ret = run_mod(mod, filename, globals, des locaux, drapeaux, arène);
The resulting module from the call to is sent to run_mod() toujours dedans Python/pythonrun.c. This is a small function that gets a PyCodeObject de PyAST_CompileObject() and sends it on to run_eval_code_obj(). You will tackle run_eval_code_obj() in the next section:
statique PyObject *
run_mod(mod_ty mod, PyObject *filename, PyObject *globals, PyObject *des locaux,
            PyCompilerFlags *drapeaux, PyArena *arène)

    PyCodeObject *co;
    PyObject *v;
    co = PyAST_CompileObject(mod, filename, drapeaux, -1, arène);
    si (co == NULL)
        revenir NULL;

    si (PySys_Audit("exec", "O", co) < 0)
        Py_DECREF(co);
        revenir NULL;


    v = run_eval_code_obj(co, globals, des locaux);
    Py_DECREF(co);
    revenir v;
le PyAST_CompileObject() function is the main entry point to the CPython compiler. It takes a Python module as its primary argument, along with the name of the file, the globals, locals, and the PyArena all created earlier in the interpreter process.
We’re starting to get into the guts of the CPython compiler now, with decades of development and Computer Science theory behind it. Don’t be put off by the language. Once we break down the compiler into logical steps, it’ll make sense.
Before the compiler starts, a global compiler state is created. This type, compilateur is defined in Python/compile.c and contains properties used by the compiler to remember the compiler flags, the stack, and the PyArena:
struct compilateur
    PyObject *c_filename;
    struct symtable *c_st;
    PyFutureFeatures *c_future; /* pointer to module's __future__ */
    PyCompilerFlags *c_flags;

    int c_optimize;              /* optimization level */
    int c_interactive;           /* true if in interactive mode */
    int c_nestlevel;
    int c_do_not_emit_bytecode;  /* The compiler won't emit any bytecode
                                                                                                                                                if this value is different from zero.
                                                                                                                                                This can be used to temporarily visit
                                                                                                                                                nodes without emitting bytecode to
                                                                                                                                                check only errors. * /

    PyObject *c_const_cache;     /* Python dict holding all constants,
                                                                                                                                                including names tuple */
    struct compiler_unit *u; /* compiler state for current block */
    PyObject *c_stack;           /* Python list holding compiler_unit ptrs */
    PyArena *c_arena;            /* pointer to memory allocation arena */
;
Inside PyAST_CompileObject(), there are 11 main steps happening:
- Create an empty
__doc__property to the module if it doesn’t exist. - Create an empty
__annotations__property to the module if it doesn’t exist. - Set the filename of the global compiler state to the filename argument.
- Set the memory allocation arena for the compiler to the one used by the interpreter.
- Copy any
__future__flags in the module to the future flags in the compiler. - Merge runtime flags provided by the command-line or environment variables.
- Enable any
__future__features in the compiler. - Set the optimization level to the provided argument, or default.
- Build a symbol table from the module object.
- Run the compiler with the compiler state and return the code object.
- Free any allocated memory by the compiler.
PyCodeObject *
PyAST_CompileObject(mod_ty mod, PyObject *filename, PyCompilerFlags *drapeaux,
                   int optimiser, PyArena *arène)
 PyErr_Occurred());
    revenir co;
Future Flags and Compiler Flags
Before the compiler runs, there are two types of flags to toggle the features inside the compiler. These come from two places:
- The interpreter state, which may have been command-line options, set in
pyconfig.hor via environment variables - The use of
__future__statements inside the actual source code of the module
To distinguish the two types of flags, think that the __future__ flags are required because of the syntax or features in that specific module. For example, Python 3.7 introduced delayed evaluation of type hints through the annotations future flag:
de __future__ importation annotations
The code after this statement might use unresolved type hints, so the __future__ statement is required. Otherwise, the module wouldn’t import. It would be unmaintainable to manually request that the person importing the module enable this specific compiler flag.
The other compiler flags are specific to the environment, so they might change the way the code executes or the way the compiler runs, but they shouldn’t link to the source in the same way that __future__ statements do.
One example of a compiler flag would be the -O flag for optimizing the use of affirmer statements. This flag disables any affirmer statements, which may have been put in the code for debugging purposes.
It can also be enabled with the PYTHONOPTIMIZE=1 environment variable setting.
Symbol Tables
Dans PyAST_CompileObject() there was a reference to a symtable and a call to PySymtable_BuildObject() with the module to be executed.
The purpose of the symbol table is to provide a list of namespaces, globals, and locals for the compiler to use for referencing and resolving scopes.
le symtable structure in Include/symtable.h is well documented, so it’s clear what each of the fields is for. There should be one symtable instance for the compiler, so namespacing becomes essential.
If you create a function called resolve_names() in one module and declare another function with the same name in another module, you want to be sure which one is called. The symtable serves this purpose, as well as ensuring that variables declared within a narrow scope don’t automatically become globals (after all, this isn’t JavaScript):
struct symtable
    PyObject *st_filename;          /* name of file being compiled,
                                                                                                                                                            decoded from the filesystem encoding */
    struct _symtable_entry *st_cur; /* current symbol table entry */
    struct _symtable_entry *st_top; /* symbol table entry for module */
    PyObject *st_blocks;            /* dict: map AST node addresses
                                                                                                                                                    *       to symbol table entries */
    PyObject *st_stack;             /* list: stack of namespace info */
    PyObject *st_global;            /* borrowed ref to st_top->ste_symbols */
    int st_nblocks;                 /* number of blocks used. kept for
                                                                                                                                                            consistency with the corresponding
                                                                                                                                                            compiler structure */
    PyObject *st_private;           /* name of current class or NULL */
    PyFutureFeatures *st_future;    /* module's future features that affect
                                                                                                                                                            the symbol table */
    int recursion_depth;            /* current recursion depth */
    int recursion_limit;            /* recursion limit */
;
Some of the symbol table API is exposed via the symtable module in the standard library. You can provide an expression or a module an receive a symtable.SymbolTable instance.
You can provide a string with a Python expression and the compile_type de "eval", or a module, function or class, and the compile_mode de "exec" to get a symbol table.
Looping over the elements in the table we can see some of the public and private fields and their types:
>>> importation symtable
>>> s = symtable.symtable('b + 1', filename='test.py', compile_type='eval')
>>> [[[[symbole.__dict__ pour symbole dans s.get_symbols()]
['_Symbol__name': 'b', '_Symbol__flags': 6160, '_Symbol__scope': 3, '_Symbol__namespaces': ()]
The C code behind this is all within Python/symtable.c and the primary interface is the PySymtable_BuildObject() une fonction.
Similar to the top-level AST function we covered earlier, the PySymtable_BuildObject() function switches between the mod_ty possible types (Module, Expression, Interactive, Suite, FunctionType), and visits each of the statements inside them.
Remember, mod_ty is an AST instance, so the will now recursively explore the nodes and branches of the tree and add entries to the symtable:
struct symtable *
PySymtable_BuildObject(mod_ty mod, PyObject *filename, PyFutureFeatures *futur)

    struct symtable *st = symtable_new();
    asdl_seq *seq;
    int je;
    PyThreadState *tstate;
    int recursion_limit = Py_GetRecursionLimit();
...
    st->st_top = st->st_cur;
    commutateur (mod->gentil)
    Cas Module_kind:
        seq = mod->v.Module.corps;
        pour (je = 0; je < asdl_seq_LEN(seq); je++)
            si (!symtable_visit_stmt(st,
                        (stmt_ty)asdl_seq_GET(seq, je)))
                goto Erreur;
        Pause;
    Cas Expression_kind:
        ...
    Cas Interactive_kind:
        ...
    Cas Suite_kind:
        ...
    Cas FunctionType_kind:
        ...

    ...
So for a module, PySymtable_BuildObject() will loop through each statement in the module and call symtable_visit_stmt(). le symtable_visit_stmt() is a huge commutateur statement with a case for each statement type (defined in Parser/Python.asdl).
For each statement type, there is specific logic to that statement type. For example, a function definition has particular logic for:
- If the recursion depth is beyond the limit, raise a recursion depth error
- The name of the function to be added as a local variable
- The default values for sequential arguments to be resolved
- The default values for keyword arguments to be resolved
- Any annotations for the arguments or the return type are resolved
- Any function decorators are resolved
- The code block with the contents of the function is visited in
symtable_enter_block() - The arguments are visited
- The body of the function is visited
Remarque: If you’ve ever wondered why Python’s default arguments are mutable, the reason is in this function. You can see they are a pointer to the variable in the symtable. No extra work is done to copy any values to an immutable type.
statique int
symtable_visit_stmt(struct symtable *st, stmt_ty s)
{
    si (++st->recursion_depth > st->recursion_limit)                           // 1.
        PyErr_SetString(PyExc_RecursionError,
                        "maximum recursion depth exceeded during compilation");
        VISIT_QUIT(st, 0);

    commutateur (s->gentil) {
    Cas FunctionDef_kind:
        si (!symtable_add_def(st, s->v.FunctionDef.prénom, DEF_LOCAL))            // 2.
            VISIT_QUIT(st, 0);
        si (s->v.FunctionDef.args->défauts)                                    // 3.
            VISIT_SEQ(st, expr, s->v.FunctionDef.args->défauts);
        si (s->v.FunctionDef.args->kw_defaults)                                 // 4.
            VISIT_SEQ_WITH_NULL(st, expr, s->v.FunctionDef.args->kw_defaults);
        si (!symtable_visit_annotations(st, s, s->v.FunctionDef.args,           // 5.
                                        s->v.FunctionDef.résultats))
            VISIT_QUIT(st, 0);
        si (s->v.FunctionDef.decorator_list)                                    // 6.
            VISIT_SEQ(st, expr, s->v.FunctionDef.decorator_list);
        si (!symtable_enter_block(st, s->v.FunctionDef.prénom,                    // 7.
                                  FunctionBlock, (vide *)s, s->lineno,
                                  s->col_offset))
            VISIT_QUIT(st, 0);
        VISIT(st, arguments, s->v.FunctionDef.args);                            // 8.
        VISIT_SEQ(st, stmt, s->v.FunctionDef.corps);                             // 9.
        si (!symtable_exit_block(st, s))
            VISIT_QUIT(st, 0);
        Pause;
    Cas ClassDef_kind:
        ...

    Cas Return_kind:
        ...
    Cas Delete_kind:
        ...
    Cas Assign_kind:
        ...
    Cas AnnAssign_kind:
        ...
Once the resulting symtable has been created, it is sent back to be used for the compiler.
Core Compilation Process
Now that the PyAST_CompileObject() has a compiler state, a symtable, and a module in the form of the AST, the actual compilation can begin.
The purpose of the core compiler is to:
- Convert the state, symtable, and AST into a Control-Flow-Graph (CFG)
- Protect the execution stage from runtime exceptions by catching any logic and code errors and raising them here
You can call the CPython compiler in Python code by calling the built-in function compile(). It returns a code object instance:
>>> compiler('b+1', 'test.py', mode='eval')
<code object  at 0x10f222780, file "test.py", line 1>
The same as with the symtable() function, a simple expression should have a mode of 'eval' and a module, function, or class should have a mode of 'exec'.
The compiled code can be found in the co_code property of the code object:
>>> co.co_code
b'ex00dx00x17x00Sx00'
There is also a dis module in the standard library, which disassembles the bytecode instructions and can print them on the screen or give you a list of Instruction instances.
If you import dis and give the dis() function the code object’s co_code property it disassembles it and prints the instructions on the REPL:
>>> importation dis
>>> dis.dis(co.co_code)
                                        0 LOAD_NAME                0 (0)
                                        2 LOAD_CONST               0 (0)
                                        4 BINARY_ADD
                                        6 RETURN_VALUE
LOAD_NAME, LOAD_CONST, BINARY_ADD, et RETURN_VALUE are all bytecode instructions. They’re called bytecode because, in binary form, they were a byte long. However, since Python 3.6 the storage format was changed to a mot, so now they’re technically wordcode, not bytecode.
The full list of bytecode instructions is available for each version of Python, and it does change between versions. For example, in Python 3.7, some new bytecode instructions were introduced to speed up execution of specific method calls.
In an earlier section, we explored the instaviz package. This included a visualization of the code object type by running the compiler. It also displays the Bytecode operations inside the code objects.
Execute instaviz again to see the code object and bytecode for a function defined on the REPL:
>>> importation instaviz
>>> def Exemple():
                            a = 1
                            b = a + 1
                            return b
>>> instaviz.spectacle(Exemple)
If we now jump into compiler_mod(), a function used to switch to different compiler functions depending on the module type. We’ll assume that mod est un Module. The module is compiled into the compiler state and then assemble() is run to create a PyCodeObject.
The new code object is returned back to PyAST_CompileObject() and sent on for execution:
statique PyCodeObject *
compiler_mod(struct compilateur *c, mod_ty mod)
{
    PyCodeObject *co;
    int addNone = 1;
    statique PyObject *module;
    ...
    commutateur (mod->gentil)
    Cas Module_kind:
        si (!compiler_body(c, mod->v.Module.corps))
            compiler_exit_scope(c);
            revenir 0;

        Pause;
    Cas Interactive_kind:
        ...
    Cas Expression_kind:
        ...
    Cas Suite_kind:
        ...
    ...
    co = assembler(c, addNone);
    compiler_exit_scope(c);
    revenir co;
le compiler_body() function has some optimization flags and then loops over each statement in the module and visits it, similar to how the symtable functions worked:
statique int
compiler_body(struct compilateur *c, asdl_seq *stmts)

    int je = 0;
    stmt_ty st;
    PyObject *docstring;
    ...
    pour (; je < asdl_seq_LEN(stmts); je++)
        VISIT(c, stmt, (stmt_ty)asdl_seq_GET(stmts, je));
    revenir 1;
The statement type is determined through a call to the asdl_seq_GET() function, which looks at the AST node’s type.
Through some smart macros, VISIT calls a function in Python/compile.c for each statement type:
#define VISIT(C, TYPE, V)
                if (!compiler_visit_ ## TYPE((C), (V)))
                                retourne 0;
For a stmt (the category for a statement) the compiler will then drop into compiler_visit_stmt() and switch through all of the potential statement types found in Parser/Python.asdl:
statique int
compiler_visit_stmt(struct compilateur *c, stmt_ty s)

    Py_ssize_t je, n;

    /* Always assign a lineno to the next instruction for a stmt. * /
    c->u->u_lineno = s->lineno;
    c->u->u_col_offset = s->col_offset;
    c->u->u_lineno_set = 0;

    commutateur (s->gentil)
    Cas FunctionDef_kind:
        revenir compiler_function(c, s, 0);
    Cas ClassDef_kind:
        revenir compiler_class(c, s);
    ...
    Cas For_kind:
        revenir compiler_for(c, s);
    ...


    revenir 1;
As an example, let’s focus on the Pour statement, in Python is the:
pour je dans iterable:
    # block
autre:  # optional if iterable is False
    # block
If the statement is a Pour type, it calls compiler_for(). There is an equivalent compiler_*() function for all of the statement and expression types. The more straightforward types create the bytecode instructions inline, some of the more complex statement types call other functions.
Many of the statements can have sub-statements. UNE pour loop has a body, but you can also have complex expressions in the assignment and the iterator.
The compiler’s compiler_ statements sends blocks to the compiler state. These blocks contain instructions, the instruction data structure in Python/compile.c has the opcode, any arguments, and the target block (if this is a jump instruction), it also contains the line number.
For jump statements, they can either be absolute or relative jump statements. Jump statements are used to “jump” from one operation to another. Absolute jump statements specify the exact operation number in the compiled code object, whereas relative jump statements specify the jump target relative to another operation:
struct instr
    non signé i_jabs : 1;
    non signé i_jrel : 1;
    non signé carboniser i_opcode;
    int i_oparg;
    struct basicblock_ *i_target; /* target block (if jump instruction) */
    int i_lineno;
;
So a frame block (of type basicblock), contains the following fields:
- UNE
b_listpointer, the link to a list of blocks for the compiler state - A list of instructions
b_instr, with both the allocated list sizeb_ialloc, and the number usedb_iused - The next block after this one
b_next - Whether the block has been “seen” by the assembler when traversing depth-first
- If this block has a
RETURN_VALUEopcode (b_return) - The depth of the stack when this block was entered (
b_startdepth) - The instruction offset for the assembler
typedef struct basicblock_
    /* Each basicblock in a compilation unit is linked via b_list in the
                            reverse order that the block are allocated.  b_list points to the next
                            block, not to be confused with b_next, which is next by control flow. * /
    struct basicblock_ *b_list;
    /* number of instructions used */
    int b_iused;
    /* length of instruction array (b_instr) */
    int b_ialloc;
    /* pointer to an array of instructions, initially NULL */
    struct instr *b_instr;
    /* If b_next is non-NULL, it is a pointer to the next
                            block reached by normal control flow. * /
    struct basicblock_ *b_next;
    /* b_seen is used to perform a DFS of basicblocks. * /
    non signé b_seen : 1;
    /* b_return is true if a RETURN_VALUE opcode is inserted. * /
    non signé b_return : 1;
    /* depth of stack upon entry of block, computed by stackdepth() */
    int b_startdepth;
    /* instruction offset for block, computed by assemble_jump_offsets() */
    int b_offset;
 basicblock;
le Pour statement is somewhere in the middle in terms of complexity. There are 15 steps in the compilation of a Pour statement with the pour syntax:
- Create a new code block called
début, this allocates memory and creates abasicblockaiguille - Create a new code block called
nettoyer - Create a new code block called
fin - Push a frame block of type
FOR_LOOPto the stack withdébutas the entry block andfinas the exit block - Visit the iterator expression, which adds any operations for the iterator
- Add the
GET_ITERoperation to the compiler state - Switch to the
débutbloc - Call
ADDOP_JRELwhich callscompiler_addop_j()to add theFOR_ITERoperation with an argument of thenettoyerbloc - Visit the
cibleand add any special code, like tuple unpacking, to thedébutbloc - Visit each statement in the body of the for loop
- Call
ADDOP_JABSwhich callscompiler_addop_j()to add theJUMP_ABSOLUTEoperation which indicates after the body is executed, jumps back to the start of the loop - Move to the
nettoyerbloc - Pop the
FOR_LOOPframe block off the stack - Visit the statements inside the
autresection of the for loop - Utilisez le
finbloc
Referring back to the basicblock structure. You can see how in the compilation of the for statement, the various blocks are created and pushed into the compiler’s frame block and stack:
statique int
compiler_for(struct compilateur *c, stmt_ty s)

    basicblock *début, *nettoyer, *fin;

    début = compiler_new_block(c);                       // 1.
    nettoyer = compiler_new_block(c);                     // 2.
    fin = compiler_new_block(c);                         // 3.
    si (début == NULL
Depending on the type of operation, there are different arguments required. For example, we used ADDOP_JABS et ADDOP_JREL here, which refer to “ADD Operation with Jump to a RELative position” and “ADD Operation with Jump to an ABSolute position”. This is referring to the APPOP_JREL et ADDOP_JABS macros which call compiler_addop_j(struct compiler *c, int opcode, basicblock *b, int absolute) and set the absolu argument to 0 and 1 respectively.
There are some other macros, like ADDOP_I appels compiler_addop_i() which add an operation with an integer argument, or ADDOP_O appels compiler_addop_o() which adds an operation with a PyObject argument.
Once these stages have completed, the compiler has a list of frame blocks, each containing a list of instructions and a pointer to the next block.
Assemblée
With the compiler state, the assembler performs a “depth-first-search” of the blocks and merge the instructions into a single bytecode sequence. The assembler state is declared in Python/compile.c:
struct assembleur
    PyObject *a_bytecode;  /* string containing bytecode */
    int a_offset;              /* offset into bytecode */
    int a_nblocks;             /* number of reachable blocks */
    basicblock **a_postorder; /* list of blocks in dfs postorder */
    PyObject *a_lnotab;    /* string containing lnotab */
    int a_lnotab_off;      /* offset into lnotab */
    int a_lineno;              /* last lineno of emitted instruction */
    int a_lineno_off;      /* bytecode offset of last lineno */
;
le assemble() function has a few tasks:
- Calculate the number of blocks for memory allocation
- Ensure that every block that falls off the end returns
Aucun, this is why every function returnsAucun, whether or not arevenirstatement exists - Resolve any jump statements offsets that were marked as relative
- Call
dfs()to perform a depth-first-search of the blocks - Emit all the instructions to the compiler
- Call
makecode()with the compiler state to generate thePyCodeObject
statique PyCodeObject *
assembler(struct compilateur *c, int addNone)

    basicblock *b, *entryblock;
    struct assembleur une;
    int je, j, nblocks;
    PyCodeObject *co = NULL;

    /* Make sure every block that falls off the end returns None.
                            XXX NEXT_BLOCK() isn't quite right, because if the last
                            block ends with a jump or return b_next shouldn't set.
                    * /
    si (!c->u->u_curblock->b_return)
        NEXT_BLOCK(c);
        si (addNone)
            ADDOP_LOAD_CONST(c, Py_None);
        ADDOP(c, RETURN_VALUE);

    ...
    DFS(c, entryblock, Etune, nblocks);

    /* Can't modify the bytecode after computing jump offsets. * /
    assemble_jump_offsets(Etune, c);

    /* Emit code in reverse postorder from dfs. * /
    pour (je = une.a_nblocks - 1; je >= 0; je-)
        b = une.a_postorder[[[[je];
        pour (j = 0; j < b->b_iused; j++)
            si (!assemble_emit(Etune, Etb->b_instr[[[[j]))
                goto Erreur;

    ...

    co = makecode(c, Etune);
 Erreur:
    assemble_free(Etune);
    revenir co;
The depth-first-search is performed by the dfs() fonctionner dans Python/compile.c, which follows the the b_next pointers in each of the blocks, marks them as seen by toggling b_seen and then adds them to the assemblers **a_postorder list in reverse order.
The function loops back over the assembler’s post-order list and for each block, if it has a jump operation, recursively call dfs() for that jump:
statique vide
DFS(struct compilateur *c, basicblock *b, struct assembleur *une, int fin)

    int je, j;

    /* Get rid of recursion for normal control flow.
                            Since the number of blocks is limited, unused space in a_postorder
                            (from a_nblocks to end) can be used as a stack for still not ordered
                            blocks. * /
    pour (j = fin; b && !b->b_seen; b = b->b_next)
        b->b_seen = 1;
        affirmer(une->a_nblocks < j);
        une->a_postorder[[[[-j] = b;

    tandis que (j < fin)
        b = une->a_postorder[[[[j++];
        pour (je = 0; je < b->b_iused; je++)
            struct instr *instr = Etb->b_instr[[[[je];
            si (instr->i_jrel
        affirmer(une->a_nblocks < j);
        une->a_postorder[[[[une->a_nblocks++] = b;
Creating a Code Object
The task of makecode() is to go through the compiler state, some of the assembler’s properties and to put these into a PyCodeObject en appelant PyCode_New():
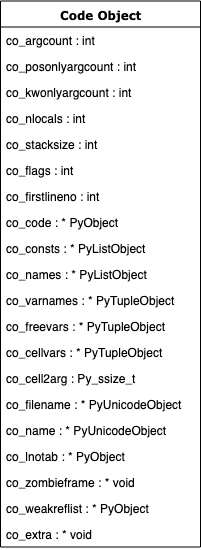
The variable names, constants are put as properties to the code object:
statique PyCodeObject *
makecode(struct compilateur *c, struct assembleur *une)

...

    consts = consts_dict_keys_inorder(c->u->u_consts);
    des noms = dict_keys_inorder(c->u->u_names, 0);
    varnames = dict_keys_inorder(c->u->u_varnames, 0);
...
    cellvars = dict_keys_inorder(c->u->u_cellvars, 0);
...
    freevars = dict_keys_inorder(c->u->u_freevars, PyTuple_GET_SIZE(cellvars));
...
    drapeaux = compute_code_flags(c);
    si (drapeaux < 0)
        goto Erreur;

    bytecode = PyCode_Optimize(une->a_bytecode, consts, des noms, une->a_lnotab);
...
    co = PyCode_NewWithPosOnlyArgs(posonlyargcount+posorkeywordargcount,
                                   posonlyargcount, kwonlyargcount, nlocals_int,
                                   maxdepth, drapeaux, bytecode, consts, des noms,
                                   varnames, freevars, cellvars, c->c_filename,
                                   c->u->u_name, c->u->u_firstlineno, une->a_lnotab);
...
    revenir co;
You may also notice that the bytecode is sent to PyCode_Optimize() before it is sent to PyCode_NewWithPosOnlyArgs(). This function is part of the bytecode optimization process in Python/peephole.c.
The peephole optimizer goes through the bytecode instructions and in certain scenarios, replace them with other instructions. For example, there is an optimizer called “constant unfolding”, so if you put the following statement into your script:
It optimizes that to:
Because 1 and 5 are constant values, so the result should always be the same.
Conclusion
We can pull together all of these stages with the instaviz module:
importation instaviz

def foo():
    une = 2**4
    b = 1 + 5
    c = [[[[1, 4, 6]
    pour je dans c:
        impression(je)
    autre:
        impression(une)
    revenir c


instaviz.spectacle(foo)
Will produce an AST graph:

With bytecode instructions in sequence:

Also, the code object with the variable names, constants, and binary co_code:

Exécution
Dans Python/pythonrun.c we broke out just before the call to run_eval_code_obj().
This call takes a code object, either fetched from the marshaled .pyc file, or compiled through the AST and compiler stages.
run_eval_code_obj() will pass the globals, locals, PyArena, and compiled PyCodeObject à PyEval_EvalCode() dans Python/ceval.c.
This stage forms the execution component of CPython. Each of the bytecode operations is taken and executed using a “Stack Frame” based system.
What is a Stack Frame?
Stack Frames are a data type used by many runtimes, not just Python, that allows functions to be called and variables to be returned between functions. Stack Frames also contain arguments, local variables, and other state information.
Typically, a Stack Frame exists for every function call, and they are stacked in sequence. You can see CPython’s frame stack anytime an exception is unhandled and the stack is printed on the screen.
PyEval_EvalCode() is the public API for evaluating a code object. The logic for evaluation is split between _PyEval_EvalCodeWithName() et _PyEval_EvalFrameDefault(), which are both in ceval.c.
The public API PyEval_EvalCode() will construct an execution frame from the top of the stack by calling _PyEval_EvalCodeWithName().
The construction of the first execution frame has many steps:
- Keyword and positional arguments are resolved.
- The use of
*argset**kwargsin function definitions are resolved. - Arguments are added as local variables to the scope.
- Co-routines and Generators are created, including the Asynchronous Generators.
The frame object looks like this:
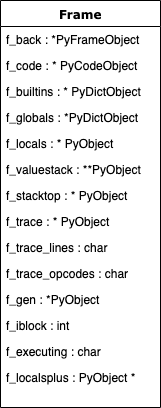
Let’s step through those sequences.
1. Constructing Thread State
Before a frame can be executed, it needs to be referenced from a thread. CPython can have many threads running at any one time within a single interpreter. An Interpreter state includes a list of those threads as a linked list. The thread structure is called PyThreadState, and there are many references throughout ceval.c.
Here is the structure of the thread state object:
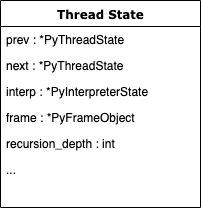
2. Constructing Frames
The input to PyEval_EvalCode() et donc _PyEval_EvalCodeWithName() has arguments for:
_co: unePyCodeObjectglobals: unePyDictwith variable names as keys and their valuesdes locaux: unePyDictwith variable names as keys and their values
The other arguments are optional, and not used for the basic API:
args: unePyTuplewith positional argument values in order, andargcountfor the number of valueskwnames: a list of keyword argument namesKwargs: a list of keyword argument values, andkwcountfor the number of themdefs: a list of default values for positional arguments, anddefcountpour la longueurkwdefs: a dictionary with the default values for keyword argumentsfermeture: a tuple with strings to merge into the code objectsco_freevarschampprénom: the name for this evaluation statement as a stringqualname: the qualified name for this evaluation statement as a string
PyObject *
_PyEval_EvalCodeWithName(PyObject *_co, PyObject *globals, PyObject *des locaux,
           PyObject *const *args, Py_ssize_t argcount,
           PyObject *const *kwnames, PyObject *const *Kwargs,
           Py_ssize_t kwcount, int kwstep,
           PyObject *const *defs, Py_ssize_t defcount,
           PyObject *kwdefs, PyObject *fermeture,
           PyObject *prénom, PyObject *qualname)
 CO_COROUTINE
Frame Execution
As covered earlier in the compiler and AST chapters, the code object contains a binary encoding of the bytecode to be executed. It also contains a list of variables and a symbol table.
The local and global variables are determined at runtime based on how that function, module, or block was called. This information is added to the frame by the _PyEval_EvalCodeWithName() une fonction. There are other usages of frames, like the coroutine decorator, which dynamically generates a frame with the target as a variable.
The public API, PyEval_EvalFrameEx() calls the interpreter’s configured frame evaluation function in the eval_frame property. Frame evaluation was made pluggable in Python 3.7 with PEP 523.
_PyEval_EvalFrameDefault() is the default function, and it is unusual to use anything other than this.
Frames are executed in the main execution loop inside _PyEval_EvalFrameDefault(). This function is central function that brings everything together and brings your code to life. It contains decades of optimization since even a single line of code can have a significant impact on performance for the whole of CPython.
Everything that gets executed in CPython goes through this function.
Remarque: Something you might notice when reading ceval.c, is how many times C macros have been used. C Macros are a way of having DRY-compliant code without the overhead of making function calls. The compiler converts the macros into C code and then compile the generated code.
If you want to see the expanded code, you can run gcc -E on Linux and macOS:
Alternatively, Visual Studio Code can do inline macro expansion once you have installed the official C/C++ extension:

We can step through frame execution in Python 3.7 and beyond by enabling the tracing attribute on the current thread.
This code example sets the global tracing function to a function called trace() that gets the stack from the current frame, prints the disassembled opcodes to the screen, and some extra information for debugging:
importation sys
importation dis
importation traceback
importation io

def trace(Cadre, un événement, args):
   Cadre.f_trace_opcodes = True
   empiler = traceback.extract_stack(Cadre)
   tampon = "   "*len(empiler) + "|"
   si un événement == 'opcode':
      avec io.StringIO() comme en dehors:
         dis.disco(Cadre.f_code, Cadre.f_lasti, fichier=en dehors)
         lignes = en dehors.getvalue().Divisé(' n')
         [[[[impression(f"padl") pour l dans lignes]
   elif un événement == 'call':
      impression(f"padCalling frame.f_code")
   elif un événement == 'return':
      impression(f"padReturning args")
   elif un événement == 'line':
      impression(f"padChanging line to frame.f_lineno")
   autre:
      impression(f"padframe    (event    - args)")
   impression(f"pad----------------------------------")
   revenir trace
sys.settrace(trace)

# Run some code for a demo
eval('"-".join([letter for letter in "hello"])')
This prints the code within each stack and point to the next operation before it is executed. When a frame returns a value, the return statement is printed:

The full list of instructions is available on the dis module documentation.
The Value Stack
Inside the core evaluation loop, a value stack is created. This stack is a list of pointers to sequential PyObject instances.
One way to think of the value stack is like a wooden peg on which you can stack cylinders. You would only add or remove one item at a time. This is done using the PUSH(a) macro, where une is a pointer to a PyObject.
For example, if you created a PyLong with the value 10 and pushed it onto the value stack:
PyObject *une = PyLong_FromLong(dix);
PUSH(une);
This action would have the following effect:

In the next operation, to fetch that value, you would use the POP() macro to take the top value from the stack:
PyObject *une = POP(); // a is PyLongObject with a value of 10
This action would return the top value and end up with an empty value stack:

If you were to add 2 values to the stack:
PyObject *une = PyLong_FromLong(dix);
PyObject *b = PyLong_FromLong(20);
PUSH(une);
PUSH(b);
They would end up in the order in which they were added, so une would be pushed to the second position in the stack:

If you were to fetch the top value in the stack, you would get a pointer to b because it is at the top:

If you need to fetch the pointer to the top value in the stack without popping it, you can use the PEEK(v) operation, where v is the stack position:
PyObject *premier = PEEK(0);
0 represents the top of the stack, 1 would be the second position:

To clone the value at the top of the stack, the DUP_TWO() macro can be used, or by using the DUP_TWO opcode:
This action would copy the value at the top to form 2 pointers to the same object:

There is a rotation macro ROT_TWO that swaps the first and second values:

Each of the opcodes have a predefined “stack effect,” calculated by the stack_effect() function inside Python/compile.c. This function returns the delta in the number of values inside the stack for each opcode.
Example: Adding an Item to a List
In Python, when you create a list, the .append() method is available on the list object:
my_list = []
my_list.ajouter(obj)
Où obj is an object, you want to append to the end of the list.
There are 2 operations involved in this operation. LOAD_FAST, to load the object obj to the top of the value stack from the list of des locaux in the frame, and LIST_APPEND to add the object.
First exploring LOAD_FAST, there are 5 steps:
-
The pointer to
objis loaded fromGETLOCAL(), where the variable to load is the operation argument. The list of variable pointers is stored infastlocals, which is a copy of the PyFrame attributef_localsplus. The operation argument is a number, pointing to the index in thefastlocalsarray pointer. This means that the loading of a local is simply a copy of the pointer instead of having to look up the variable name. -
If variable no longer exists, an unbound local variable error is raised.
-
The reference counter for
valeur(in our case,obj) is increased by 1. -
The pointer to
objis pushed to the top of the value stack. -
le
FAST_DISPATCHmacro is called, if tracing is enabled, the loop goes over again (with all the tracing), if tracing is not enabled, agotois called tofast_next_opcode, which jumps back to the top of the loop for the next instruction.
 ...
    Cas TARGET(LOAD_FAST):
        PyObject *valeur = GETLOCAL(oparg);                 // 1.
        si (valeur == NULL)
            format_exc_check_arg(
                PyExc_UnboundLocalError,
                UNBOUNDLOCAL_ERROR_MSG,
                PyTuple_GetItem(co->co_varnames, oparg));
            goto Erreur;                                    // 2.

        Py_INCREF(valeur);                                  // 3.
        PUSH(valeur);                                       // 4.
        FAST_DISPATCH();                                   // 5.

 ...
Now the pointer to obj is at the top of the value stack. The next instruction LIST_APPEND is run.
Many of the bytecode operations are referencing the base types, like PyUnicode, PyNumber. Par exemple, LIST_APPEND appends an object to the end of a list. To achieve this, it pops the pointer from the value stack and returns the pointer to the last object in the stack. The macro is a shortcut for:
PyObject *v = (*--stack_pointer);
Now the pointer to obj is stored as v. The list pointer is loaded from PEEK(oparg).
Then the C API for Python lists is called for liste et v. The code for this is inside Objects/listobject.c, which we go into in the next chapter.
A call to PREDICT is made, which guesses that the next operation will be JUMP_ABSOLUTE. le PREDICT macro has compiler-generated goto statements for each of the potential operations’ Cas statements. This means the CPU can jump to that instruction and not have to go through the loop again:
 ...
        Cas TARGET(LIST_APPEND):
            PyObject *v = POP();
            PyObject *liste = PEEK(oparg);
            int se tromper;
            se tromper = PyList_Append(liste, v);
            Py_DECREF(v);
            si (se tromper != 0)
                goto Erreur;
            PREDICT(JUMP_ABSOLUTE);
            DISPATCH();

 ...
Opcode predictions:
Some opcodes tend to come in pairs thus making it possible to predict the second code when the first is run. Par exemple, COMPARE_OP is often followed by POP_JUMP_IF_FALSE ou POP_JUMP_IF_TRUE.
“Verifying the prediction costs a single high-speed test of a register variable against a constant. If the pairing was good, then the processor’s own internal branch predication has a high likelihood of success, resulting in a nearly zero-overhead transition to the next opcode. A successful prediction saves a trip through the eval-loop including its unpredictable switch-case branch. Combined with the processor’s internal branch prediction, a successful PREDICT has the effect of making the two opcodes run as if they were a single new opcode with the bodies combined.”
If collecting opcode statistics, you have two choices:
- Keep the predictions turned-on and interpret the results as if some opcodes had been combined
- Turn off predictions so that the opcode frequency counter updates for both opcodes
Opcode prediction is disabled with threaded code since the latter allows the CPU to record separate branch prediction information for each opcode.
Some of the operations, such as CALL_FUNCTION, CALL_METHOD, have an operation argument referencing another compiled function. In these cases, another frame is pushed to the frame stack in the thread, and the evaluation loop is run for that function until the function completes. Each time a new frame is created and pushed onto the stack, the value of the frame’s f_back is set to the current frame before the new one is created.
This nesting of frames is clear when you see a stack trace, take this example script:
def function2():
  élever RuntimeError

def function1():
  function2()

si __name__ == '__main__':
  function1()
Calling this on the command line will give you:
$ ./python.exe example_stack.py
Traceback (most recent call last):
File "example_stack.py", line 8, in
Dans traceback.py, le walk_stack() function used to print trace backs:
def walk_stack(f):
    """Walk a stack yielding the frame and line number for each frame.

                This will follow f.f_back from the given frame. If no frame is given, the
                current stack is used. Usually used with StackSummary.extract.
                """
    si f est Aucun:
        f = sys._getframe().f_back.f_back
    tandis que f est ne pas Aucun:
        rendement f, f.f_lineno
        f = f.f_back
Here you can see that the current frame, fetched by calling sys._getframe() and the parent’s parent is set as the frame, because you don’t want to see the call to walk_stack() ou print_trace() in the trace back, so those function frames are skipped.
Then the f_back pointer is followed to the top.
sys._getframe() is the Python API to get the Cadre attribute of the current thread.
Here is how that frame stack would look visually, with 3 frames each with its code object and a thread state pointing to the current frame:
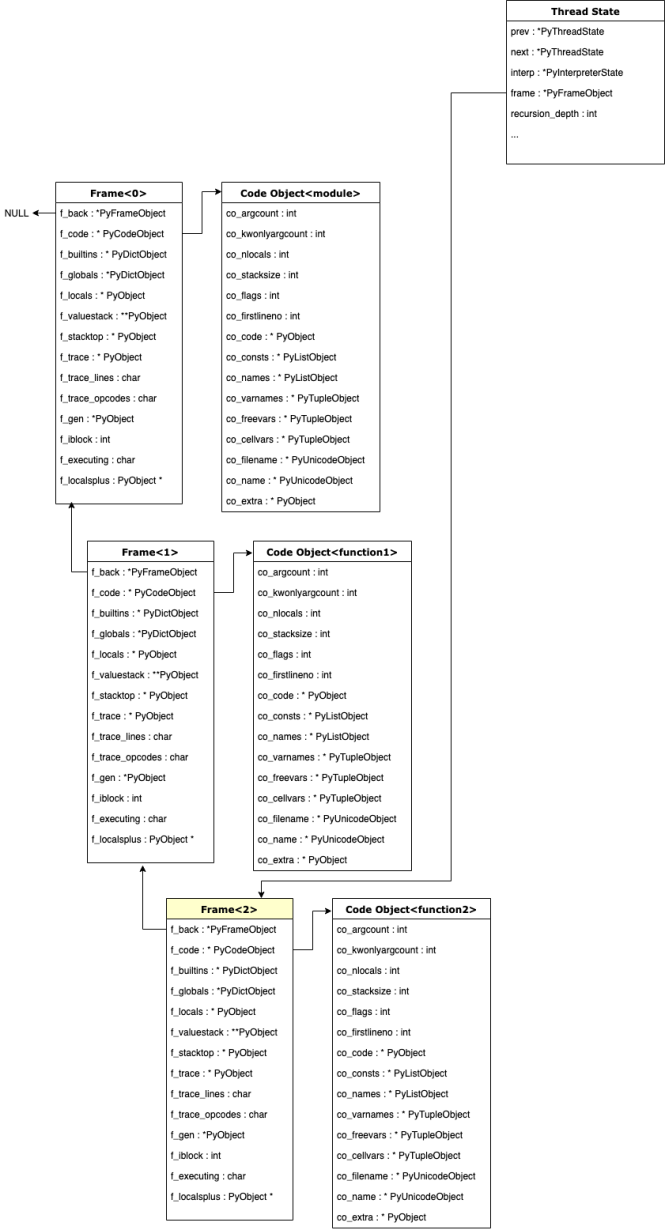
Conclusion
In this Part, you explored the most complex element of CPython: the compiler. The original author of Python, Guido van Rossum, made the statement that CPython’s compiler should be “dumb” so that people can understand it.
By breaking down the compilation process into small, logical steps, it is far easier to understand.
In the next chapter, we connect the compilation process with the basis of all Python code, the objet.
Part 4: Objects in CPython
CPython comes with a collection of basic types like strings, lists, tuples, dictionaries, and objects.
All of these types are built-in. You don’t need to import any libraries, even from the standard library. Also, the instantiation of these built-in types has some handy shortcuts.
For example, to create a new list, you can call:
Or, you can use square brackets:
Strings can be instantiated from a string-literal by using either double or single quotes. We explored the grammar definitions earlier that cause the compiler to interpret double quotes as a string literal.
All types in Python inherit from objet, a built-in base type. Even strings, tuples, and list inherit from objet. During the walk-through of the C code, you have read lots of references to PyObject*, the C-API structure for an objet.
Because C is not object-oriented like Python, objects in C don’t inherit from one another. PyObject is the data structure for the beginning of the Python object’s memory.
Much of the base object API is declared in Objects/object.c, like the function PyObject_Repr, which the built-in repr() une fonction. You will also find PyObject_Hash() and other APIs.
All of these functions can be overridden in a custom object by implementing “dunder” methods on a Python object:
classe MyObject(objet):
    def __init__(soi, identifiant, prénom):
        soi.identifiant = identifiant
        soi.prénom = prénom

    def __repr__(soi):
        revenir "<0    id=1>".format(soi.prénom, soi.identifiant)
This code is implemented in PyObject_Repr(), inside Objects/object.c. The type of the target object, v will be inferred through a call to Py_TYPE() et si le tp_repr field is set, then the function pointer is called.
If the tp_repr field is not set, i.e. the object doesn’t declare a custom __repr__ method, then the default behavior is run, which is to return "<%s object at %p>" with the type name and the ID:
PyObject *
PyObject_Repr(PyObject *v)
PyObject *res;
si (PyErr_CheckSignals())
revenir NULL;
...
si (v == NULL)
revenir PyUnicode_FromString("" );
si (Py_TYPE(v)->tp_repr == NULL)
revenir PyUnicode_FromFormat("<%s object at %p>",
v->ob_type->tp_name, v);
...
The ob_type field for a given PyObject* will point to the data structure PyTypeObject, defined in Include/cpython/object.h.
This data-structure lists all the built-in functions, as fields and the arguments they should receive.
Take tp_repr as an example:
typedef struct _typeobject {
    PyObject_VAR_HEAD
    const carboniser *tp_name; /* For printing, in format "." */
    Py_ssize_t tp_basicsize, tp_itemsize; /* For allocation */

    /* Methods to implement standard operations */
...
    reprfunc tp_repr;
Où reprfunc est un typedef pour PyObject *(*reprfunc)(PyObject *);, a function that takes 1 pointer to PyObject (soi).
Some of the dunder APIs are optional, because they only apply to certain types, like numbers:
    /* Method suites for standard classes */

    PyNumberMethods *tp_as_number;
    PySequenceMethods *tp_as_sequence;
    PyMappingMethods *tp_as_mapping;
A sequence, like a list would implement the following methods:
typedef struct
    lenfunc sq_length; // len(v)
    binaryfunc sq_concat; // v + x
    ssizeargfunc sq_repeat; // for x in v
    ssizeargfunc sq_item; // v[x]
    vide *was_sq_slice; // v[x:y:z]
    ssizeobjargproc sq_ass_item; // v[x] = z
    vide *was_sq_ass_slice; // v[x:y] = z
    objobjproc sq_contains; // x in v

    binaryfunc sq_inplace_concat;
    ssizeargfunc sq_inplace_repeat;
 PySequenceMethods;
All of these built-in functions are called the Python Data Model. One of the great resources for the Python Data Model is “Fluent Python” by Luciano Ramalho.
Base Object Type
Dans Objects/object.c, the base implementation of objet type is written as pure C code. There are some concrete implementations of basic logic, like shallow comparisons.
Not all methods in a Python object are part of the Data Model, so that a Python object can contain attributes (either class or instance attributes) and methods.
A simple way to think of a Python object is consisting of 2 things:
- The core data model, with pointers to compiled functions
- A dictionary with any custom attributes and methods
The core data model is defined in the PyTypeObject, and the functions are defined in:
Objects/object.cfor the built-in methodsObjects/boolobject.cpour lebooltypeObjects/bytearrayobject.cpour leoctet[]typeObjects/bytesobjects.cpour leoctetstypeObjects/cellobject.cpour lecelluletypeObjects/classobject.cfor the abstractclassetype, used in meta-programmingObjects/codeobject.cused for the built-incodeobject typeObjects/complexobject.cfor a complex numeric typeObjects/iterobject.cfor an iteratorObjects/listobject.cpour lelistetypeObjects/longobject.cpour lelonguenumeric typeObjects/memoryobject.cfor the base memory typeObjects/methodobject.cfor the class method typeObjects/moduleobject.cfor a module typeObjects/namespaceobject.cfor a namespace typeObjects/odictobject.cfor an ordered dictionary typeObjects/rangeobject.cfor a range generatorObjects/setobject.cpour unensembletypeObjects/sliceobject.cfor a slice reference typeObjects/structseq.cpour unstruct.StructtypeObjects/tupleobject.cpour untupletypeObjects/typeobject.cpour untypetypeObjects/unicodeobject.cpour unstrtypeObjects/weakrefobject.cpour unweakrefobjet
We’re going to dive into 3 of these types:
- Booleans
- Integers
- Generators
Booleans and Integers have a lot in common, so we’ll cover those first.
The Bool and Long Integer Type
le bool type is the most straightforward implementation of the built-in types. It inherits from longue and has the predefined constants, Py_True et Py_False. These constants are immutable instances, created on the instantiation of the Python interpreter.
Inside Objects/boolobject.c, you can see the helper function to create a bool instance from a number:
PyObject *PyBool_FromLong(longue D'accord)

    PyObject *résultat;

    si (D'accord)
        résultat = Py_True;
    autre
        résultat = Py_False;
    Py_INCREF(résultat);
    revenir résultat;
This function uses the C evaluation of a numeric type to assign Py_True ou Py_False to a result and increment the reference counters.
The numeric functions for et, xor, et ou are implemented, but addition, subtraction, and division are dereferenced from the base long type since it would make no sense to divide two boolean values.
The implementation of et pour un bool value checks if une et b are booleans, then check their references to Py_True, otherwise, are cast as numbers, and the et operation is run on the two numbers:
statique PyObject *
bool_and(PyObject *une, PyObject *b)
 !PyBool_Check(b))
        revenir PyLong_Type.tp_as_number->nb_and(une, b);
    revenir PyBool_FromLong((une == Py_True) Et (b == Py_True));
le longue type is a bit more complex, as the memory requirements are expansive. In the transition from Python 2 to 3, CPython dropped support for the int type and instead used the longue type as the primary integer type. Python’s longue type is quite special in that it can store a variable-length number. The maximum length is set in the compiled binary.
The data structure of a Python longue se compose de PyObject header and a list of digits. The list of digits, ob_digit is initially set to have one digit, but it later expanded to a longer length when initialized:
struct _longobject
    PyObject_VAR_HEAD
    chiffre ob_digit[[[[1];
;
Memory is allocated to a new longue à travers _PyLong_New(). This function takes a fixed length and makes sure it is smaller than MAX_LONG_DIGITS. Then it reallocates the memory for ob_digit to match the length.
To convert a C longue type to a Python longue type, the longue is converted to a list of digits, the memory for the Python longue is assigned, and then each of the digits is set.
Parce que longue is initialized with ob_digit already being at a length of 1, if the number is less than 10, then the value is set without the memory being allocated:
PyObject *
PyLong_FromLong(longue ival)

    PyLongObject *v;
    non signé longue abs_ival;
    non signé longue t;  /* unsigned so >> doesn't propagate sign bit */
    int ndigits = 0;
    int signe;

    CHECK_SMALL_INT(ival);
...
    /* Fast path for single-digit ints */
    si (!(abs_ival >> PyLong_SHIFT))
        v = _PyLong_New(1);
        si (v)
            Py_SIZE(v) = signe;
            v->ob_digit[[[[0] = Py_SAFE_DOWNCAST(
                abs_ival, non signé longue, chiffre);

        revenir (PyObject*)v;

...
    /* Larger numbers: loop to determine number of digits */
    t = abs_ival;
    tandis que (t)
        ++ndigits;
        t >>= PyLong_SHIFT;

    v = _PyLong_New(ndigits);
    si (v != NULL)
        chiffre *p = v->ob_digit;
        Py_SIZE(v) = ndigits*signe;
        t = abs_ival;
        tandis que (t)
            *p++ = Py_SAFE_DOWNCAST(
                t Et PyLong_MASK, non signé longue, chiffre);
            t >>= PyLong_SHIFT;


    revenir (PyObject *)v;
To convert a double-point floating point to a Python longue, PyLong_FromDouble() does the math for you:
PyObject *
PyLong_FromDouble(double dval)

    PyLongObject *v;
    double frac;
    int je, ndig, expo, neg;
    neg = 0;
    si (Py_IS_INFINITY(dval))
        PyErr_SetString(PyExc_OverflowError,
                        "cannot convert float infinity to integer");
        revenir NULL;

    si (Py_IS_NAN(dval))
        PyErr_SetString(PyExc_ValueError,
                        "cannot convert float NaN to integer");
        revenir NULL;

    si (dval < 0.0)
        neg = 1;
        dval = -dval;

    frac = frexp(dval, Etexpo); /* dval = frac*2**expo; 0.0 <= frac < 1.0 */
    si (expo <= 0)
        revenir PyLong_FromLong(0L);
    ndig = (expo-1) / PyLong_SHIFT + 1; /* Number of 'digits' in result */
    v = _PyLong_New(ndig);
    si (v == NULL)
        revenir NULL;
    frac = ldexp(frac, (expo-1) % PyLong_SHIFT + 1);
    pour (je = ndig; -je >= 0; )
        chiffre morceaux = (chiffre)frac;
        v->ob_digit[[[[je] = morceaux;
        frac = frac - (double)morceaux;
        frac = ldexp(frac, PyLong_SHIFT);

    si (neg)
        Py_SIZE(v) = -(Py_SIZE(v));
    revenir (PyObject *)v;
The remainder of the implementation functions in longobject.c have utilities, such as converting a Unicode string into a number with PyLong_FromUnicodeObject().
A Review of the Generator Type
Python Generators are functions which return a rendement statement and can be called continually to generate further values.
Commonly they are used as a more memory efficient way of looping through values in a large block of data, like a file, a database or over a network.
Generator objects are returned in place of a value when rendement is used instead of revenir. The generator object is created from the rendement statement and returned to the caller.
Let’s create a simple generator with a list of 4 constant values:
>>> def Exemple():
...   lst = [[[[1,2,3,4]
...   pour je dans lst:
...     rendement je
...
>>> gen = Exemple()
>>> gen
If you explore the contents of the generator object, you can see some of the fields starting with gi_:
>>> dir(gen)
[[[[
    'close',
    'gi_code',
    'gi_frame',
    'gi_running',
    'gi_yieldfrom',
    'send',
    'throw']
le PyGenObject type is defined in Include/genobject.h and there are 3 flavors:
- Generator objects
- Coroutine objects
- Async generator objects
All 3 share the same subset of fields used in generators, and have similar behaviors:

Focusing first on generators, you can see the fields:
gi_framelinking to aPyFrameObjectfor the generator, earlier in the execution chapter, we explored the use of locals and globals inside a frame’s value stack. This is how generators remember the last value of local variables since the frame is persistent between callsgi_runningset to 0 or 1 if the generator is currently runninggi_codelinking to aPyCodeObjectwith the compiled function that yielded the generator so that it can be called againgi_weakreflistlinking to a list of weak references to objects inside the generator functiongi_nameas the name of the generatorgi_qualnameas the qualified name of the generatorgi_exc_stateas a tuple of exception data if the generator call raises an exception
The coroutine and async generators have the same fields but prepended with cr et ag respectively.
If you call __next__() on the generator object, the next value is yielded until eventually a StopIteration is raised:
>>> gen.__next__()
1
>>> gen.__next__()
2
>>> gen.__next__()
3
>>> gen.__next__()
4
>>> gen.__next__()
Traceback (most recent call last):
Fichier "" , line 1, in
Chaque fois __next__() is called, the code object inside the generators gi_code field is executed as a new frame and the return value is pushed to the value stack.
You can also see that gi_code is the compiled code object for the generator function by importing the dis module and disassembling the bytecode inside:
>>> gen = Exemple()
>>> importation dis
>>> dis.disco(gen.gi_code)
        2           0 LOAD_CONST               1 (1)
                                                        2 LOAD_CONST               2 (2)
                                                        4 LOAD_CONST               3 (3)
                                                        6 LOAD_CONST               4 (4)
                                                        8 BUILD_LIST               4
                                                    10 STORE_FAST               0 (l)

        3          12 SETUP_LOOP              18 (to 32)
                                                    14 LOAD_FAST                0 (l)
                                                    16 GET_ITER
                                >>   18 FOR_ITER                10 (to 30)
                                                    20 STORE_FAST               1 (i)

        4          22 LOAD_FAST                1 (i)
                                                    24 YIELD_VALUE
                                                    26 POP_TOP
                                                    28 JUMP_ABSOLUTE           18
                                >>   30 POP_BLOCK
                                >>   32 LOAD_CONST               0 (None)
                                                    34 RETURN_VALUE
Whenever __next__() is called on a generator object, gen_iternext() is called with the generator instance, which immediately calls gen_send_ex() à l'intérieur Objects/genobject.c.
gen_send_ex() is the function that converts a generator object into the next yielded result. You’ll see many similarities with the way frames are constructed in Python/ceval.c from a code object as these functions have similar tasks.
le gen_send_ex() function is shared with generators, coroutines, and async generators and has the following steps:
-
The current thread state is fetched
-
The frame object from the generator object is fetched
-
If the generator is running when
__next__()was called, raise aValueError -
If the frame inside the generator is at the top of the stack:
- In the case of a coroutine, if the coroutine is not already marked as closing, a
RuntimeErrorest élevé - If this is an async generator, raise a
StopAsyncIteration - For a standard generator, a
StopIterationis raised.
- In the case of a coroutine, if the coroutine is not already marked as closing, a
-
If the last instruction in the frame (
f->f_lasti) is still -1 because it has just been started, and this is a coroutine or async generator, then a non-None value can’t be passed as an argument, so an exception is raised -
Else, this is the first time it’s being called, and arguments are allowed. The value of the argument is pushed to the frame’s value stack
-
le
f_backfield of the frame is the caller to which return values are sent, so this is set to the current frame in the thread. This means that the return value is sent to the caller, not the creator of the generator -
The generator is marked as running
-
The last exception in the generator’s exception info is copied from the last exception in the thread state
-
The thread state exception info is set to the address of the generator’s exception info. This means that if the caller enters a breakpoint around the execution of a generator, the stack trace goes through the generator and the offending code is clear
-
The frame inside the generator is executed within the
Python/ceval.cmain execution loop, and the value returned -
The thread state last exception is reset to the value before the frame was called
-
The generator is marked as not running
-
The following cases then match the return value and any exceptions thrown by the call to the generator. Remember that generators should raise a
StopIterationwhen they are exhausted, either manually, or by not yielding a value. Coroutines and async generators should not:- If no result was returned from the frame, raise a
StopIterationfor generators andStopAsyncIterationfor async generators - Si un
StopIterationwas explicitly raised, but this is a coroutine or an async generator, raise aRuntimeErroras this is not allowed - Si un
StopAsyncIterationwas explicitly raised and this is an async generator, raise aRuntimeError, as this is not allowed
- If no result was returned from the frame, raise a
-
Lastly, the result is returned back to the caller of
__next__()
statique PyObject *
gen_send_ex(PyGenObject *gen, PyObject *arg, int exc, int fermeture)

    PyThreadState *tstate = _PyThreadState_GET();       // 1.
    PyFrameObject *f = gen->gi_frame;                   // 2.
    PyObject *résultat;

    si (gen->gi_running)      // 3.
        const carboniser *msg = "generator already executing";
        si (PyCoro_CheckExact(gen))
            msg = "coroutine already executing";

        autre si (PyAsyncGen_CheckExact(gen))
            msg = "async generator already executing";

        PyErr_SetString(PyExc_ValueError, msg);
        revenir NULL;

    si (f == NULL
Going back to the evaluation of code objects whenever a function or module is called, there was a special case for generators, coroutines, and async generators in _PyEval_EvalCodeWithName(). This function checks for the CO_GENERATOR, CO_COROUTINE, et CO_ASYNC_GENERATOR flags on the code object.
When a new coroutine is created using PyCoro_New(), a new async generator is created with PyAsyncGen_New() or a generator with PyGen_NewWithQualName(). These objects are returned early instead of returning an evaluated frame, which is why you get a generator object after calling a function with a yield statement:
PyObject *
_PyEval_EvalCodeWithName(PyObject *_co, PyObject *globals, PyObject *des locaux, ...
...
    /* Handle generator/coroutine/asynchronous generator */
    si (co->co_flags Et (CO_GENERATOR | CO_COROUTINE | CO_ASYNC_GENERATOR))
        PyObject *gen;
        PyObject *coro_wrapper = tstate->coroutine_wrapper;
        int is_coro = co->co_flags Et CO_COROUTINE;
        ...
        /* Create a new generator that owns the ready to run frame
                                    * and return that as the value. * /
        si (is_coro)
            gen = PyCoro_New(f, prénom, qualname);
         autre si (co->co_flags Et CO_ASYNC_GENERATOR)
            gen = PyAsyncGen_New(f, prénom, qualname);
         autre
            gen = PyGen_NewWithQualName(f, prénom, qualname);

        ...
        revenir gen;

...
The flags in the code object were injected by the compiler after traversing the AST and seeing the rendement ou yield from statements or seeing the coroutine décorateur.
PyGen_NewWithQualName() appellera gen_new_with_qualname() with the generated frame and then create the PyGenObject avec NULL values and the compiled code object:
statique PyObject *
gen_new_with_qualname(PyTypeObject *type, PyFrameObject *f,
                      PyObject *prénom, PyObject *qualname)

    PyGenObject *gen = PyObject_GC_New(PyGenObject, type);
    si (gen == NULL)
        Py_DECREF(f);
        revenir NULL;

    gen->gi_frame = f;
    f->f_gen = (PyObject *) gen;
    Py_INCREF(f->f_code);
    gen->gi_code = (PyObject *) (f->f_code);
    gen->gi_running = 0;
    gen->gi_weakreflist = NULL;
    gen->gi_exc_state.exc_type = NULL;
    gen->gi_exc_state.exc_value = NULL;
    gen->gi_exc_state.exc_traceback = NULL;
    gen->gi_exc_state.previous_item = NULL;
    si (prénom != NULL)
        gen->gi_name = prénom;
    autre
        gen->gi_name = ((PyCodeObject *)gen->gi_code)->co_name;
    Py_INCREF(gen->gi_name);
    si (qualname != NULL)
        gen->gi_qualname = qualname;
    autre
        gen->gi_qualname = gen->gi_name;
    Py_INCREF(gen->gi_qualname);
    _PyObject_GC_TRACK(gen);
    revenir (PyObject *)gen;
Bringing this all together you can see how the generator expression is a powerful syntax where a single keyword, rendement triggers a whole flow to create a unique object, copy a compiled code object as a property, set a frame, and store a list of variables in the local scope.
To the user of the generator expression, this all seems like magic, but under the covers it’s not cette complex.
Conclusion
Now that you understand how some built-in types, you can explore other types.
When exploring Python classes, it is important to remember there are built-in types, written in C and classes inheriting from those types, written in Python or C.
Some libraries have types written in C instead of inheriting from the built-in types. Un exemple est numpy, a library for numeric arrays. le nparray type is written in C, is highly efficient and performant.
In the next Part, we will explore the classes and functions defined in the standard library.
Part 5: The CPython Standard Library
Python has always come “batteries included.” This statement means that with a standard CPython distribution, there are libraries for working with files, threads, networks, web sites, music, keyboards, screens, text, and a whole manner of utilities.
Some of the batteries that come with CPython are more like AA batteries. They’re useful for everything, like the collections module and the sys module. Some of them are a bit more obscure, like a small watch battery that you never know when it might come in useful.
There are 2 types of modules in the CPython standard library:
- Those written in pure Python that provides a utility
- Those written in C with Python wrappers
We will explore both types.
Python Modules
The modules written in pure Python are all located in the Lib/ directory in the source code. Some of the larger modules have submodules in subfolders, like the email module.
An easy module to look at would be the colorsys module. It’s only a few hundred lines of Python code. You may not have come across it before. le colorsys module has some utility functions for converting color scales.
When you install a Python distribution from source, standard library modules are copied from the Lib folder into the distribution folder. This folder is always part of your path when you start Python, so you can importation the modules without having to worry about where they’re located.
Par exemple:
>>> importation colorsys
>>> colorsys
We can see the source code of rgb_to_hls() à l'intérieur Lib/colorsys.py:
# HLS: Hue, Luminance, Saturation
# H: position in the spectrum
# L: color lightness
# S: color saturation

def rgb_to_hls(r, g, b):
    maxc = max(r, g, b)
    minc = min(r, g, b)
    # XXX Can optimize (maxc+minc) and (maxc-minc)
    l = (minc+maxc)/2.0
    si minc == maxc:
        revenir 0.0, l, 0.0
    si l <= 0.5:
        s = (maxc-minc) / (maxc+minc)
    autre:
        s = (maxc-minc) / (2.0-maxc-minc)
    rc = (maxc-r) / (maxc-minc)
    gc = (maxc-g) / (maxc-minc)
    avant JC = (maxc-b) / (maxc-minc)
    si r == maxc:
        h = avant JC-gc
    elif g == maxc:
        h = 2.0+rc-avant JC
    autre:
        h = 4.0+gc-rc
    h = (h/6.0) % 1.0
    revenir h, l, s
There’s nothing special about this function, it’s just standard Python. You’ll find similar things with all of the pure Python standard library modules. They’re just written in plain Python, well laid out and easy to understand. You may even spot improvements or bugs, so you can make changes to them and contribute it to the Python distribution. We’ll cover that toward the end of this article.
Python and C Modules
The remainder of modules are written in C, or a combination or Python and C. The source code for these is in Lib/ for the Python component, and Modules/ for the C component. There are two exceptions to this rule, the sys module, found in Python/sysmodule.c et le __builtins__ module, found in Python/bltinmodule.c.
Python will import * from __builtins__ when an interpreter is instantiated, so all of the functions like print(), chr(), format(), etc. are found within Python/bltinmodule.c.
Because the sys module is so specific to the interpreter and the internals of CPython, that is found inside the Python directement. It is also marked as an “implementation detail” of CPython and not found in other distributions.
The built-in print() function was probably the first thing you learned to do in Python. So what happens when you type print("hello world!")?
- The argument
"hello world"was converted from a string constant to aPyUnicodeObjectby the compiler builtin_print()was executed with 1 argument, and NULLkwnames- le
fichiervariable is set toPyId_stdout, the system’sstdoutmanipuler - Each argument is sent to
fichier - A line break,
nest envoyé àfichier
statique PyObject *
builtin_print(PyObject *soi, PyObject *const *args, Py_ssize_t nargs, PyObject *kwnames)
 fichier == Py_None)
        fichier = _PySys_GetObjectId(EtPyId_stdout);
        ...

    ...
    pour (je = 0; je < nargs; je++)
        si (je > 0)
            si (sep == NULL)
                se tromper = PyFile_WriteString(" ", fichier);
            autre
                se tromper = PyFile_WriteObject(sep, fichier,
                                         Py_PRINT_RAW);
            si (se tromper)
                revenir NULL;

        se tromper = PyFile_WriteObject(args[[[[je], fichier, Py_PRINT_RAW);
        si (se tromper)
            revenir NULL;


    si (fin == NULL)
        se tromper = PyFile_WriteString(" n", fichier);
    autre
        se tromper = PyFile_WriteObject(fin, fichier, Py_PRINT_RAW);
    ...
    Py_RETURN_NONE;
The contents of some modules written in C expose operating system functions. Because the CPython source code needs to compile to macOS, Windows, Linux, and other *nix-based operating systems, there are some special cases.
le temps module is a good example. The way that Windows keeps and stores time in the Operating System is fundamentally different than Linux and macOS. This is one of the reasons why the accuracy of the clock functions differs between operating systems.
Dans Modules/timemodule.c, the operating system time functions for Unix-based systems are imported from
#ifdef HAVE_SYS_TIMES_H
#comprendre
Later in the file, time_process_time_ns() is defined as a wrapper for _PyTime_GetProcessTimeWithInfo():
statique PyObject *
time_process_time_ns(PyObject *soi, PyObject *inutilisé)

    _PyTime_t t;
    si (_PyTime_GetProcessTimeWithInfo(Ett, NULL) < 0)
        revenir NULL;

    revenir _PyTime_AsNanosecondsObject(t);
_PyTime_GetProcessTimeWithInfo() is implemented multiple different ways in the source code, but only certain parts are compiled into the binary for the module, depending on the operating system. Windows systems will call GetProcessTimes() and Unix systems will call clock_gettime().
Other modules that have multiple implementations for the same API are the threading module, the file system module, and the networking modules. Because the Operating Systems behave differently, the CPython source code implements the same behavior as best as it can and exposes it using a consistent, abstracted API.
The CPython Regression Test Suite
CPython has a robust and extensive test suite covering the core interpreter, the standard library, the tooling and distribution for both Windows and Linux/macOS.
The test suite is located in Lib/test and written almost entirely in Python.
The full test suite is a Python package, so can be run using the Python interpreter that you’ve compiled. Change directory to the Lib directory and run python -m test -j2, où j2 means to use 2 CPUs.
On Windows use the rt.bat script inside the PCBuild folder, ensuring that you have built the Release configuration from Visual Studio in advance:
$ cd PCbuild
$ rt.bat -q

C:reposcpythonPCbuild>"C:reposcpythonPCbuildwin32python.exe"  -u -Wd -E -bb -m test
== CPython 3.8.0b4
== Windows-10-10.0.17134-SP0 little-endian
== cwd: C:reposcpythonbuildtest_python_2784
== CPU count: 2
== encodings: locale=cp1252, FS=utf-8
Run tests sequentially
0:00:00 [  1/420] test_grammar
0:00:00 [  2/420] test_opcodes
0:00:00 [  3/420] test_dict
0:00:00 [  4/420] test_builtin
...
On Linux:
$ cd Lib
$ ../python -m tester -j2
== CPython 3.8.0b4
== macOS-10.14.3-x86_64-i386-64bit little-endian
== cwd: /Users/anthonyshaw/cpython/build/test_python_23399
== CPU count: 4
== encodings: locale=UTF-8, FS=utf-8
Run tests in parallel using 2 child processes
0:00:00 load avg: 2.14 [  1/420] test_opcodes passed
0:00:00 load avg: 2.14 [  2/420] test_grammar passed
...
On macOS:
$ cd Lib
$ ../python.exe -m tester -j2
== CPython 3.8.0b4
== macOS-10.14.3-x86_64-i386-64bit little-endian
== cwd: /Users/anthonyshaw/cpython/build/test_python_23399
== CPU count: 4
== encodings: locale=UTF-8, FS=utf-8
Run tests in parallel using 2 child processes
0:00:00 load avg: 2.14 [  1/420] test_opcodes passed
0:00:00 load avg: 2.14 [  2/420] test_grammar passed
...
Some tests require certain flags; otherwise they are skipped. For example, many of the IDLE tests require a GUI.
To see a list of test suites in the configuration, use the --list-tests flag:
$ ../python.exe -m tester --list-tests

test_grammar
test_opcodes
test_dict
test_builtin
test_exceptions
...
You can run specific tests by providing the test suite as the first argument:
$ ../python.exe -m tester test_webbrowser

Run tests sequentially
0:00:00 load avg: 2.74 [1/1] test_webbrowser

== Tests result: SUCCESS ==

1 test OK.

Total duration: 117 ms
Tests result: SUCCESS
You can also see a detailed list of tests that were executed with the result using the -v argument:
$ ../python.exe -m tester test_webbrowser -v

== CPython 3.8.0b4
== macOS-10.14.3-x86_64-i386-64bit little-endian
== cwd: /Users/anthonyshaw/cpython/build/test_python_24562
== CPU count: 4
== encodings: locale=UTF-8, FS=utf-8
Run tests sequentially
0:00:00 load avg: 2.36 [1/1] test_webbrowser
test_open (test.test_webbrowser.BackgroundBrowserCommandTest) ... ok
test_register (test.test_webbrowser.BrowserRegistrationTest) ... ok
test_register_default (test.test_webbrowser.BrowserRegistrationTest) ... ok
test_register_preferred (test.test_webbrowser.BrowserRegistrationTest) ... ok
test_open (test.test_webbrowser.ChromeCommandTest) ... ok
test_open_new (test.test_webbrowser.ChromeCommandTest) ... ok
...
test_open_with_autoraise_false (test.test_webbrowser.OperaCommandTest) ... ok

-------------------------------------------------- --------------------

Ran 34 tests in 0.056s

OK (skipped=2)

== Tests result: SUCCESS ==

1 test OK.

Total duration: 134 ms
Tests result: SUCCESS
Understanding how to use the test suite and checking the state of the version you have compiled is very important if you wish to make changes to CPython. Before you start making changes, you should run the whole test suite and make sure everything is passing.
Installing a Custom Version
From your source repository, if you’re happy with your changes and want to use them inside your system, you can install it as a custom version.
For macOS and Linux, you can use the altinstall command, which won’t create symlinks for python3 and install a standalone version:
For Windows, you have to change the build configuration from Debug à Release, then copy the packaged binaries to a directory on your computer which is part of the system path.
The CPython Source Code: Conclusion
Congratulations, you made it! Did your tea get cold? Make yourself another cup. You’ve earned it.
Now that you’ve seen the CPython source code, the modules, the compiler, and the tooling, you may wish to make some changes and contribute them back to the Python ecosystem.
The official dev guide contains plenty of resources for beginners. You’ve already taken the first step, to understand the source, knowing how to change, compile, and test the CPython applications.
Think back to all the things you’ve learned about CPython over this article. All the pieces of magic to which you’ve learned the secrets. The journey doesn’t stop here.
This might be a good time to learn more about Python and C. Who knows: you could be contributing more and more to the CPython project!
[ad_2]